



Tuesday, March 18, 2008

Makin' Cupcakes

A friend of mine was holding a bake sale to raise money for the university library and had asked me if I would be willing to bake something. Of course, I wanted to make something... you don't have to ask me twice :P Baking for a cause is always exciting, and it gives me a chance to come up with creative presentations and decorative ideas for the goodies. Having finished up my annotated bibliography for my History class, I decided that I was free to let my mind wander into the realm of baking. What would I make? It would have to be something that people would enjoy, but not something that was too common. At first I thought about cookies, but then I decided against it because I'm sure the bake sale would end up with a butt-load of cookies. I finally settled on cupcakes; they can be versatiles and elegant, and decorating them would be so much fun. Here's what I came up with...

Chai Latte Cupcakes
Yields 12 cupcakes (plus 1 mini-loaf)

Cupcakes:
- 2 cups all purpose flour
- 1/2 cup + 1 tbsp milk
- 1/2 cup + 1 tbsp Tazo Chai Liquid mix (the kind Starbuck's uses)
- 1/2 tsp salt
- 1/2 tsp baking soda
- 1 tsp baking powder
- 1 1/2 tbsp chai spice mix (recipe follows)
- 3/4 cup butter
- 1 1/2 cup sugar
- 3 eggs
- 1 tsp vanilla extract
- 1 batch of Chai Buttercream (recipe follows)

Chai Spice Mix (grind all ingredients together)
- 2 tsp fennel, whole
- 2 tsp cloves, whole
- 1 tbsp cardamom, ground
- 2 tsp cinnamon, ground
- 2 tsp ginger, ground

Method
1. Pre-heat oven to 350F, prepare the muffin pan.
2. Make chai tea by combining milk with Tazo liquid.
3. In a bowl, combine flour, baking powder, baking soda, salt and 1 1/2 tbsp chai spice mix.
4. In a separate bowl, cream butter and sugar until fluffy.
5. Add in eggs, one at a time, mixing thoroughly. Add in vanilla.
6. Stir half of butter mixture with the dry ingredients; add in half of the milk mixture to the dry ingredients. Stir well.
7. Add in the remaining egg and milk mixtures to the batter; stir just until combined.
8. Fill muffin tins 3/4-full, bake for 20minutes (or until toothpick comes out clean).
9. Remove from pan, cool completely on wire rack and decorate with buttercream frosting.

Chai Buttercream
- 1/2 cup butter
- 2 - 3 cups powdered sugar, sifted
- 1/8 cup milk (more or less, depending on desired consistency)
- 1 tsp chai spice mix
- 1 tbsp minced fresh ginger

Method
1. Beat butter until fluffy, smooth and creamy.
2. Add in sifted sugar, milk, ginger and chai spice.
3. Adjust milk-sugar ratio to reach desired consistency. Fill piping bag and decorate your cupcakes

My friend was quite excited to see the cute cupcakes I had prepared. I wonder how much she'll be selling them for? I'll probably stop by the bake sale tomorrow, just to see what kind of goodies the other contributors had made. It's always fun to see what other bakers concoct.
The recipe made enough for 12 regular sized cupcakes, and a small (I mean really small) loaf cake. Since there was some buttercream left over, I served the mini slices of cake with the frosting to my parents. My mom is addicted to the Starbuck's Chai Tea Latte and she just loved this dessert. My dad wasn't as ecstatic over the cake, but he did say that the chai flavor was very strong. The cake was very moist, and the frosting was beautifully ginger-flavored. I will definitely be making this recipe again! You should try it.

Update: I've just entered this blog entry into the Sugar High Fridays Challenge #41... yay! I think I'm getting the hang of this "Intra-net" thing; I'm so excited... this is my first ever entry into a blog event! See the details here: http://www.ismyblogburning.com/events/sugar-high-friday-41-sweet-gifts/ or for the original post click http://www.giftbb.com/sugar-high-friday-41-sweet-gifts/
Oh, and the bake sale was a success. My friend mentioned that my cupcakes were the first to sell-out! I'm not sure what I'm most proud of, being the first to sell-out my goodies or helping out the University... hmmm, tough one :P

Thursday, March 13, 2008

Oatbran & Flax Bread

Woah, I can't believe that I actually took the big leap and decided to try my hand at baking bread. And not just any bread, a cob!! Yes, the traditional and rustic crusty bread... made of course with my use-to-be enemy yeast :)
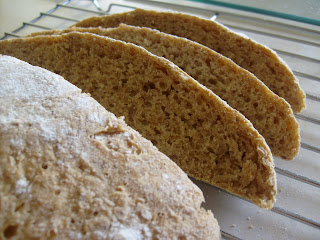
After the great success I had last week with the Japanese Melon-pan, I really wanted to work on my yeast-bread skills. I totally should have been working on my RELS paper (which is due in a week) but I couldn't concentrate, and kneading bread dough seems to be a good stress-reliever. I used the recipe from bakingbites.com, because it seemed pretty straight forward (I don't think I'm up to doing the "crazy" breads yet).

The dough smelled amazing as it rose, and even better as it baked. I wanted the crust of my bread to turn out really crunchy, so I used the steam + bake method that involved filling a shallow sheet-cake pan with water and placing it on the rack below my bread. I also spritzed some water around the oven and on my bread (just to make sure that it would come out nice and crunchy). I'm glad to say that the bread was a success. My parents and I enjoyed it with some delightful basil-mayo topped with tomato, and also some poppyseed-goat cheese spread! Delicious... and fresh from the oven. I can't wait to try out some more yeast recipes (wow... didn't think I'd ever be saying that!)

Thursday, March 06, 2008

AHHH STRESS!!! Oh, and Melon Pan :P

What to do, what to do... I have two RELS papers due and one Nursing paper to work on, a ton of journals and a handful of clinicals to complete, not to mention a bunch of forums!!!?!? Rather than stress myself out over my workload, I decided to de-stress through the baking process. And what better way to do it, than by working with my nemesis... YEAST! If I could work with this guy, I would feel invincible and prepared for anything that lies ahead.

Japanese Melon Pan

Yields 12 buns

Dough Ingredients:
2/3 cup milk
4 tbsp butter
2 eggs, beaten
1/3 cup milk
1 pkg (8g) dry yeast
1/2 tsp granulated sugar
4 1/2 cups flour
1/2 cup granulated sugar
2 tbsp brown sugar
1/2 tsp cinnamon
1/2 tbsp salt

Method:

1. Combine 2/3 cup milk and butter in a saucepan. Heat just until butter melts, then allow the mixture to cool to room temperature. Now add in the eggs.
2. Heat the 1/3 cup milk until at room temperature, stir in yeast and 1/2 tsp sugar. Allow mixture to sit until bubbles form on surface (10 minutes). Stir it into the milk and egg mixture.
3. Meanwhile, combine flour, 1/2 cup sugar, 2 tablespoons brown sugar, cinnamon and salt.
4. Stir yeast, milk and egg mixture into dry ingredients to make a medium dough (not too damp or too dry - add flour or water as needed).
5. Knead dough for 5 to 10 minutes. Lightly grease the dough, place it in a dish, cover it with a damp towel, and allow to rise until doubled in size (1 to 2 hours)
6. While the dough is rising cream together the topping ingredients (recipe follows); cover and set aside in the fridge.
7. After dough has risen, divide it into 12 balls (about 3 inches in diameter) and place them on baking sheets.
8. Drape damp towel over the rolls and allow for second rise (10 to 15 minutes)
9. Roll out the topping and cover each roll with a thin layer. Leave topping as is, or cut designs (like my oddly shaped stars).
10. Bake for 10-12mins at 350 degrees F.

Topping Ingredients:

- 1/4 cup butter
- 1/4 cup granulated sugar
- 1 egg
- 1 cup flour
- 1 tsp baking soda
- a dash of vanilla essense

I must say that I have impeccable timing, as these buns were fresh out of the oven the second my sisters got home from school. My sister, who are addicted to all things anime and Japanese were so excited to eat these buns. My mom didn't mind taking a nibble either. The dough was a bit more dense then I would have liked, usually when we buy Polo Pau from T&T the bun dough is very light and fluffy. My dad did comment on how the melon-pan skin was quite pale, perhaps next time I'll try a recipe that uses only egg yolks for the topping. All in all, the bread made a delicious tea-time treat and my whole familiy enjoyed the yeasty goodness. YEAH! I can't believe that this is the third time in my life that I've had the yeast rise properly. I think this is going to be the start of a beautiful friendship :)

Saturday, March 01, 2008

HAPPY BIRTHDAY MOM!!

Yeah! The cakes were a success... but more importantly, the birthday was amazing. We had lots of fun with friends and relived tons of past memories. Wow! I can't believe another year's gone by. My mom doesn't mind being older, and seriously, it's the age you feel inside that counts! MOM WE LOVE YOU!!!

Mango Mousse Cake

Strawberry Mousse Cake, with Pocky!!
This cake was inspired by Su-Yin

WooT! I'm so glad the cakes turned out right, it would have been a bummer if the cakes were the thing that dampened the birthday. Although with all the action that day, I don't think anything could've ruined the festivities :)

I very well, can't leave you without at least one recipe... so here's the one I used for my mango mousse cake. Enjoy!

Mango Mousse Cake

1 recipe of your favorite white-cake (genoise works well), enough to make two 9-inch round and 3/4-inch high cakes

(A)

- 450g mango puree (from can, or fresh)
- 1/8cup sugar- 1 tbsp rum (or rum flavor)

- Chunks of fresh mango (sliced and cubed)

B)

- 350ml whipping cream

- 2 - 3 tbsp icing sugar

C)

- 100g white chocolate

- 70ml whipping cream

D)

- 15g gelatin

- 60ml hot water

Mango Mirror Layer

- 150gm mango puree

- 1 tbsp gelatin

- 50ml hot water

Method: (do after baking & cooling your cake base)

1. Add sugar and rum to the mango puree, mix well.

2. Whip 350ml whipping cream with icing sugar until it reaches mousse-like state.

3. In a separate bowl (or on stove-top) melt chocolate in 70ml whipping cream.

4. In a separate bowl, dissolve the gelatin in hot water. Stir this mixture into the mango puree.

5. Add melted chocolate mixture to the puree.

6. Fold the entire mixture into the stiff-whipped cream.

7. Line a 9-inch spring form cake pan with parchment paper. Add a slice of the cake base, top it with half the puree. Add in mango chunks (reserving some for garnish). Press the fruits down gently if needed.

8. Top it with the second layer of cake and pour the rest of the puree.

9. Refrigerate for at least 3 - 4 hours then garnish with your choice of fruit.

10. For mirror layer, dissolve gelatin in hot water, mix into 150gm mango puree. Pour mixture over top of the chilled-decorated cake, refrigerate for 2hrs.

Wednesday, February 27, 2008

Mom's 50th!!!


It's the big 5-0!!! My mom is the greatest, and what can I ever do to celebrate her 5th decade of life? I know... I'll make her a cake. Yes, it's a far cry from all the effort and time and craziness she has put up with when dealing with me. I've scoured the billions of blogs that I have saved to my "favorites" and was hoping to find the perfect cake recipe. I finally did... I'll be whipping up one mango-mousse cake and one raspberry-mousse cake. Well, now that I've blogged about making the sponge, I hope that the cake turns out!


White Sponge Cake

Ingredients:

- 4 egg yolks

- 1/8 cup granulated sugar

- 1 tbsp rum

- 1 tsp vanilla

- 110ml water

- 75ml canola oil

- 1 1/4 cup self-rising cake flour (or cake flour + 1/4tsp salt + 1/2 tsp baking powder)

- 4 egg whites

- 3tbsp granulated sugar

- 1/2 tsp cream of tartar


Method:

1. Mix egg yolks with 1/8 cup sugar and the cake flour; mix well, until it resembles pastry dough.

2. Stir together the water, oil, rum and vanilla flavoring. Slowly add the oil mixture to the egg yolk mixture. Blend well and set aside

3. In a separate (chilled, metal) bowl, whip egg whites until frothy. Slowly add in the cream of tartar and continue whipping until soft peaks form. Gradually add in the sugar, and continue to whip the whites until they form stiff peaks.

4. Add half of the egg white mixture to the egg yolk batter, until just combined (do this gently).

5. Add in the remaining egg whites and fold in gently, until just combined.

6. Pour batter into prepared 9-inch pan (I used two 9-inch pans with 1 1/2 inch sides, so I wouldn't have to cut the cake into layers)

For the chocolate sponge, follow the recipe above, simply adding in 1/8 cup cocoa powder to the egg yolks in step #1.


Well, the cakes smelled delicious. But now the real task begins. I must attempt to prepare the mousse cake and have it set properly. Because the last time I tried to make a mousse cake it was quite disasterous :P (see for yourself)

Asparagus Tonight


I guess my spontaneous grocery shopping disease is going around. My mom just decided to splurge and buy some asparagus!!! Yeah, I'm so super excited. It's been a long time since we've had such a treat. You don't generally hear a young adult say "YEAY ASPARAGUS" but I am seriously a green-vegetable maniac... I love asparagus, spinach, artichokes, brussle sprouts, cabbage, broccoli, zucchini, beans and peas. If it's green and is veggie in nature, it'll be in my stomach in about 2 seconds. Anywho, mom and I had no clue how we wanted to prepare this yummy veg, but we both agreed on one thing... it was going to be simple. No flambé stuff, or fancy julienned things, or deep-fried this or roasted that... just the veggie in all it's glory (plus some other stuff for added flavor :P)


Just Asparagus

Ingredients:
- 1 lb asparagus, cut into 3-inch lengths
- 2 tbsp butter
- 3 cloves of garlic, minced
- 1 shallot, minced
- salt and pepper to tast
- 1/2 tsp each thyme and tarragon
- 1 heaping tbsp parmesan cheese


Method:

1. Boil a pot of water and cook asparagus until just tender (we enjoy ours on the slightly crisp side). Drain and set aside.
2. Place butter in non-stick pan and fry over medium heat until melted. While butter is melting, add in the herbs (if you want the flavor to be more infused, whip the herbs with the butter about 10minutes before cooking). Add in garlic and shallots, continuing to frying until just fragrant. Add in the parmesan cheese, salt and pepper to taste.
3. Place the cooked asparagus in serving dish, and then drizzle the garlic-parmesan butter over the vegetables. Lightly toss the sauce and asparagus, being sure to coat all the vegetables.


Wow! This impromtu recipe was a stunner, I must say. My dad was amazed by the mere auroma coming from the kitchen as we made the garlic-parmesan butter. One bite into the crisp green asparagus and we were not ready to stop. My sisters on the other hand, like many young children, were disgusted by the strange green spears and would have no part in our culinary adventure :( Hopefully their tastes will change... and I'll remember to re-prepare this recipe, just for them (oh, and maybe for me and my parents as well!)

Lunch-time Delight: Baked Onion and Feta


What can I say, I'm a sucker for discount foods. It's a disease, I know it. But just this afternoon, I decided to go shopping at Real Canadian Superstore. I had to pick up a couple of things to prepare for mom's 50th birthday... eggs, whipping cream, fruits, white chocolate (now you know it's gonna be good) and just chanced upon the deli section. I seriously can not go to a supermarket and not look around. I'm always browsing each aisle and making sure I've seen all the food they have to offer. Whenever I tell myself that I'm only going to be going in for 1 item, I'll always spend 1 hr in the store and end up coming out with a bag full of groceries (not good when you're poor university student).
But anyways, back to the focus of this blurb. I chanced upon the deli section and to my surprise, they had sundried-tomato feta cheese at 50% off!! It was discounted for quick sale because it was going to expire in 2-days. Pft... I could make a meal with this cheese today! I was sold... Anywho, I drove back home and planned out my meal. It was going to be something simple; simple and delicious.


Baked Onion and Feta

Ingredients:
- 4 medium onions
- 1/2 cup chicken broth
- 3 oz feta, crumbled
- 1 tsp thyme (but I always add in a bunch more)
- 1 tsp dried tarragon
- 1/4 cup panko + more for coating
- dash of ground pepper


Method:

1. Set oven to 375F
2. Peel onions; cut the top 1/3rd of the onion off (leaving the core/root intact). Place the onions cut-side down in a baking tray and fill it with the chicken broth.
3. Cover tray with aluminum foil and bake onions for 30mins, remove the foil and continue to bake for another 30mins.
4. Meanwhile, mix together feta, herbs, panko and pepper.
5. Remove onions from the oven (they should be beautifully caramel-y and browning), flip them over so that the cut side is on top. Remove the inner few "rings/chunks" of onion (I usually only take out 3-4 pieces)... go ahead and eat these!
6. Fill the onion-hole you've just created with the cheese mixture and stuff it well. Sprinkle on some extra panko breadcrumbs for added crispiness.
7. Set the oven to broil and then place the onions back in the oven for about 1-2 minutes, or just until the cheese melts and the panko is beautifully golden in color.


My mom arrived home just in time to share in this delightful meal with me. I was very excited to have her test out this very spontaneous recipe, and whew... she like it. Well, even if she didn't I sure did and will definitely be making this again. Mmmm, I smell a themed-dinner coming up. Hmm, maybe when I have more free time :P

Monday, February 25, 2008

Shrimp and Veggie Pasta

Hmm.... do you know how hard it is to find a recipe for pasta sauce that isn't tomato based? Oh, and it can't be an alfredo sauce, because that'd be too boring? I know, I know... I'm far too picky, but I really wanted to try out a really good recipe for my special tomato-basil infused spaghetti. And I ended up finding it! After rummaging through all of my recipe books, could you imagine that I would only find the appropriate recipe in a Highliner© recipe booklet I had picked up at the supermarket?!? I know! Insane :P

I did make a couple of modifications... okay, I completely obliterated the original recipe, but I must credit the Highliner© booklet as my inspiration for this lovely pasta.

Shrimp and Veggie Pasta

Ingredients:
- 6 oz spaghetti, uncooked
- 1 cup cooked frozen shrimp, defrosted
- 1 tbsp butter
- 2 tsp garlic
- 1/2 tsp each thyme, parsley, basil and tarragon (dried)
- 3 tbsp all-purpose flour
- 1/2 cup chicken broth
- 1 splash of cooking sherry
- 1/2 cup tomatoes, diced
- 1/2 red pepper, sliced
- 1/2 orange pepper, sliced
- 1 small onion, sliced
- Stem of one broccoli, julienned
- salt and pepper to taste

Method:
1. Boil water to cook pasta; in the meantime, cut up all the veggies.
2. Melt butter over medium heat in non-stick fry pan, add in garlic and fry until fragrant.
3. Add onions to frying pan, cooking until transparent. Sprinkle in the herbs.
4. Add in the flour, stirring constantly to prevent clumping. Add in the chicken broth, sherry and shrimp. Season with salt and pepper to taste. Reduce the heat to low, cover and let simmer.
5. Boil pasta according to directions. Add broccoli, and red and orange peppers to the boiling pasta water, 5mins before the pasta is completely cooked.
6. Drain pasta and boiled vegetables, shaking until semi-dry. Add spaghetti to the frying pan and stir well. Coat pasta with the sauce, adding more chicken broth (or even some milk) for more moisture. Dish out and enjoy!

This recipe very tasty. I wasn't quite sure how it would turn out, but the veggies were beautifully tender and the shrimp was a nice touch. I'm sure you could use sliced chicken in place of the shellfish, but I would go for shrimp anyday. The rest of my family was eating regular tomato-based spaghetti sauce with regular spaghetti pasta, but when my mom saw the yummy dish I had cooked up she had to try some. She said that it could have used more salt (I actually don't like my sauce too salty) and after she shook on some sauce, she really took a liking too it.

Pandan Agar Agar

Just like I promised... I'm using up the packets of agar agar that I've had lying around my house to make this awesome treat. My mom was so excited when I mentioned I would be making this dessert. Agar agar is her favorite and we don't eat much of it here in Canada. It's my mom's birthday on Marth 3rd and I thought I'd make her this special treat, and bring back some memories of Singapore. But now, I have to figure out what cake to make her... one that'll top this. I got the recipe from roseskitchen and followed it to a "t". No alterations or substitutions. Definitely give this recipe a try!

Thursday, February 21, 2008

Caramel Macaroons


This is one recipe that I've been dying to try out. Ever since I've become a foodie (some 2 years ago) I was fascinated by the elegant look of the French Macaroon. But my search for the perfect recipe was not turning up any results. I finally found this one, from Tartelette (an amazing blog, I must say) and it was perfect! The macaroons came out light and beautifully crisp. The only variation I made was to used a different recipe for the sauce (instead of a dulce de leche, I opted for caramel fudge). The recipe is as follows...


Caramel Fudge

Ingredients:
- 1/2 cup butter
- 1/2 cup packed light brown sugar
- 2 tablespoons light corn syrup
- 1/2 cup sweetened condensed milk

Method:
1. In a pot, combine 1/2 cup butter, brown sugar, corn syrup, and sweetened condensed milk
2. Bring to a boil; continuing to boil for 5 minutes
3. Remove from heat and beat vigorously with a wooden spoon for about 3 minutes
4. Cool until it begins to firm slightly, and then use spoonfuls as filling for your macaroons


Sadly, one of my sisters wasn't able to eat these, as she's allergic to nuts but my parents and my other sister quite enjoyed this sweet treat. Because these macaroons only use egg whites, I decided to use the egg yolks for another recipe that I have been longing to try... and one that everyone in my family can enjoy. PANDAN AGAR AGAR!!! Coming soon...

Blueberry Crumble Cake


Well, I guess it's not really blueberry season... or is it? I'm not quite sure. Let me look it up...

yup, I'm right! The blueberry is in season during the late summer; and sadly, right now in Canada it's far from the late summer. It was actually pretty nippy out today, maybe that's what prompted me to bake a comfy-cozy crumble...


Blueberry Crumble Cake

Streusel Topping:
- 1/3 cup all-purpose flour
- 1/3 cup white sugar
- 1/2 tsp ground cinnamon
- 1/4 cup cold unsalted butter, cut into pieces
Cake Batter:
- 2 1/8 cup all purpose flour
- 2 tsp baking powder
- 1/4 tsp salt
- 1/4 cup unsalted butter, room temperature
- 1/4 cup apple sauce, unsweetened
- 1/2 cup white sugar
- 1 large egg
- 1/2 tsp vanilla extract
- 1/3 cup milk
- 1/3 cup low-fat vanilla yogurt
- 2 cups fresh blueberries


Method:
1. Preheat oven to 350F. Butter a 9x5 inch loaf pan (line it with parchement paper, optional)
2. Streusel topping: In a bowl, mix together flour, sugar, and cinnamon. Cut in butter with a fork until it resembles coarse crumbs. Set aside.

3. Cake Batter: In a separate bowl, whisk together the flour, baking powder, and salt. Set aside.
4. In another bowl, cream the butter with the apple sauce, gradually adding the sugar. Beat until fluffy. Add in egg and vanilla, beating well.
5. Combine milk and yogurt.
6. Add flour mixture, alternately with milk mixture, and beat just until combined.
7. Add in 1 cup of blueberries, saving the other 1 cup for the streusel. Spread batter in prepared pan, smoothing the top.
8. Evenly arrange remaining blueberries on top of the batter and sprinkle with streusel topping.
9. Bake for 45 - 50 mins or until a toothpick inserted comes out clean.

10. Remove from oven and place on a wire rack to cool slightly. Serve warm or at room temperature.

The vanilla yogurt adds even more delicious richness and flavor, and the blueberries sure made my day. My younger sister really loves blueberries; she'll eat them with anything. By themselves, in a puree, stuffed in a sandwich ... any way, shape or form (she's the one I gave the blueberry gouash to for Christmas). Having it as a cozy snack with our afternoon tea was just the thing to get us up and ready to enjoy the rest of the sunny (yet still nippy) day.

Wednesday, February 13, 2008

Lazy Lasagna

Decided to use up some left-overs again (surprise, surprise). This time it was rotini pasta. I was really craving lasagna but was too lazy to go out and buy the lasagna pasta, and since I had a lot (about 4L) of rotini I thought that this would do. Surprisingly everyone else in the family was delighted to have this faux-sagna! I used this recipe for the "Lazy Lasagna", but instead of spaghetti sauce, I used low-sodium tomato sauce and added in my own mix of herbs. I'm sure you could use macaroni or any other shaped pasta and it would taste just as good. As you can see, the family dug right into the "lasagna" with two large spoons :P ... that means it's gotta be good!

Tuesday, February 12, 2008

Zongzi


Well, I guess I managed to find the time to prepare quite a few CNY goodies this year. I can't believe how adventurous I'm being, in terms of cooking new foods. I had never made Nian Gao before... but now I can say that I did. All that's left is for me to attempt the ever popular Zongzi. Would I do it? Of course...

Zongzi
Ingredients:
- 650g glutinous rice, soaked overnight and drained
- Dried bamboo leaves, boiled, washed and soaked
- Hemp strings
- 1 bag of redbean paste

Method:
1. Boil a large pot of water; add in the bamboo leaves and string and continue to boil water for 10minutes.
2. Stop boiling, but keep leaves and string soaking until ready for use.
3. Roll paste into balls and set aside.
4. Take two leaves, and form a cone out of them. Fill the cone half-way with glutinous rice, then add a ball of bean paste. Continually tap the filling, to ensure that it is being firmly packed down. Top off the cone with some more glutinouse rice.
5. Wrap up the zongzi and then tie them up with the string.
6. Boil a large pot of water and drop in the zongzi. Boil for 1 hr, remove and serve.

We love to eat our sweet Zongzi dipped in granulated sugar, brown sugar or really any type of sweetner (condensed milk could be good with it too... albeit strange). My parents were quite impressed with the rice dumplings I made, and were amazed at my "wrapping-job" knowing that this was my first attempt at working with bamboo leaves. Hmmm... what can I say, I have a gift!

CNY: Nian Gao

Woot! Finally, I gotten the courage to make Nian Gao. Actually it wasn't so much the courage as the pressure to find the "right" recipe. There are so many recipes available on the web that I had no clue which one to use. I finally settled on Florence's recipe and it turned out great. I didn't have such a nice mold to make the rice cake in, so I simply lined an 8-inch cake pan with banana leaves and steamed.


Here's the cake before steaming...

Here's the cake after steaming... (note the silly little holes that decided to appear. Probably due to condensation on the steamer lid dripping down)

Well, I'm still contemplating how to serve this... should I simply cut it into pieces and plate it? Or should I sandwich it between 2pcs of yam, dip it in egg and then fry it? I think the latter sounds best...

Thursday, February 07, 2008

Happy CNY!!!

Finally, it's the Year of the Rat!
Today is the first year of the lunar new year. Hooray! Don't think that I've forgotten... how could I? Being CNY, my dad went out to buying CNY treats (from T&T of course), here are a couple pictures of the goodies. Needless to say, I will be getting high on sugar for the next week.

Rice Crackers and Milk Chews


Candied Waterchestnut and Coconut Strips


The ever popular, Peanut Candy!

Cuttlefish Crisps and other Crackers

Of course, with my father getting the family hyped up for CNY, I now have to think of the perfect CNY recipes to make (good thing I have a week).

Tuesday, February 05, 2008

Onsen Tamago


Hmm... I decided that today I would do a little cooking. And by little, I mean really little. I had a Nursing midterm to study for, and didn't really feel ready to cook up a storm. Well, that's not exactly true... I wanted to cook, but my conscience wouldn't let me cook without major guilt overshadowing my everymove. So, for this culinary excursion I decided to make the simple Japanese dish Onsen Tamago, or literally "Hotspring Egg".
Sadly, there are few hotsprings where I live... actually there's a lot of snow at the moment :P So, I used the next best device on hand to simulate the constant warm temperature of a hotspring... MY RICE COOKER! Yup, just follow this easy recipe and you've got yourself an onsen tamago without having to hike to your nearest hotspring.


Rice Cooker Tamago

Ingredients
- As many eggs as you wish to eat
- Rice to cook

Method:

1. Cook your rice, as per usual, in the rice cooker
2. Wait for the rice cooker to reach the "warming" stage
3. Stick your eggs in the rice and continue warming for 40minutes.
4. Dish out the rice, and gently crack the egg over the rice... or eat by itself

This was really good... and if you want more flavor than just egg, add in some soy sauce, sesame oil, fried onion/garlic etc. This egg was delicious, albeit not the prettiest thing ever, but it was certainly tastey.

Sunday, February 03, 2008

Lunch-time Delight: Potato Salad


I'm training for the Vancouver Sun Run in April and have been fascinated by all the information available for runners. My dad is a member of the Running Room club and has been getting a bunch of their magazines. Usually, I don't look at any of them, but lately I've been wanting to read-up on running, fitness and of course... healthy recipes for runners. I went to runnersworld.com and found a bunch of recipes that would be perfect to test out... but could I decide on just one? This was tricky. I saw this recipe for Pre- or Post-run Potato Salad and just had to make it. I love, love, love potato salad, but they always smother it with more mayonnaise than real potato so this recipe looked divine.
I used russet potatoes because I didn't have any nugget ones, so it turned out more crumbly than it was suppose to be. But it tasted delicious. I actually prefer the soft russets in salad, as opposed to the crunchy nugget potatoes. Go ahead and try this recipe... you don't have to be a runner to enjoy it!

Lunch-time Delight: Orange Curry Couscous


Feeling adventurous today, and didn't have anything in mind for lunch... that can only mean it's time to try out a new recipe. I had a bag of couscous sitting in my pantry that wasn't being of any use, and a friend of the family had given us a box of 32 California Oranges, so I went ahead and made this Orange Curry Couscous. The meal was delicious, and had a beautifully spicey-sweet flavor. I offered some to my mom for lunch, but she replied "I don't like the taste of couscous". I was kind of surprised... did couscous really have a taste of it's own? In this recipe I couldn't really taste the couscous-iness, it was overpowered by the curry powder and the orange juice. I tried to convince my mom of this, but she wasn't buying into it. Oh well, that just means more for me!

Happy CNY

It's that time of year again, Chinese New Year!!! Wahoo! I love this "holiday" because it gives me an excuse to bake, buy and make yummy CNY treats.

Prosperity Buns filled with Lotus Paste (Not a creation of mine, but I bought these from T&T... I think I'll try making them someday... but only when yeast and I have mended our broken relationship)


The Japanese also enjoy CNY celebrations, so of course I had to prepare my sisters' favorite treat. Hanami Dango... this time I used matcha powder for the green dough, and it was superb


Laughing Dumplings... one of my personal favorites. I actually made these ahead of time, and then brought them to work (KFC) and fried them. Hehehe, I'm so sneaky... but it beats slaving over the wok and hoping that my oil was a consistent temperature.

The Laughing Dumpling recipe can be found on Florence's Blog along with a bunch of other great CNY recipes. I hope to make some more CNY treats before my stressful student life takes hold of me once more... but I've got midterms this week, and my world is spinning round-and-round. Well, I still have until Thursday to celebrate CNY! But until then... Gong Xi!

Bento Lunch

Sorry I've been gone for so long but Nursing School is a total stressor. It's not that I haven't been baking or cooking a lot recently, because believe me... I have. Cooking is the only way to relieve the stress. So to maintain my sanity during the last few days of school I decided to prepare myself some cute bentos. It's been a while since my last bento excursion, but I decided that it was time to re-invent myself... sounds cheesey, I know...

Day 1:
Fish-shaped Onigiri with ketchup blush
Cucumber "waves"
Romaine Lettuce "kelp"
Soy sauce in a fish-shaped container
I know this bento isn't the most creative, but it totally helped regain my sanity. It also paved the way for the next days bento creation...

Day 2:
Piplup Onigiri (Crown made of dyed egg, nose made of ketchup rice)
Pokeball made of fishball and pepperoni
Hotdog flower and Cucumber-Carrot Star
I was pretty impressed with this one. My mom couldn't believe that I would spend so much time and effort working on a lunch that would be gobbled up the next day... and to tell you the truth, I didn't care. I had so much fun preparing my lunch that it made it even more special eating it. (That sentenced sounded weird). Anywho, it'll probably be a while before I go on a bento excursion again, but it was fun none-the-less.