Tuesday, December 29, 2009

Eggnog Cake

I think that one of the best parts of the Christmas season (after the family togetherness, yuletide festivities, and joyous giving of gifts and appreciation to others) is when all the holiday goodies go on sale. In the past, I've usually done the majority of my Christmas decor shopping the days immediately following the holiday... and this year was no different. So far I've purchased: wrapping paper, ribbons, bows, wreaths, tree ornaments, chocolates and of course... EGGNOG.

I purposefully held off on buying eggnog before Christmas because I knew that Superstore would have a sale ... and low-and-behold, on the 27th of December eggnog was on sale for $1 a liter. Having bought 4 cartons of the deliciously creamy beverage, I realized that I went a little overboard and would need to finish up the stuff quickly... yes, it's true folks eggnog does not last forever :(

Since I'm the only person in my family who's a real fan of the eggy-nutmeggy concoction it took me a while to figure out how I'd bamboozle the rest of my family to help me in the consumption of the eggnog. Finally, my baking brain decided that an eggnog cake would be just the thing to bridge the gap between my family's tummies and the nog.

Eggnog Cake with Rum Glaze

Ingredients:
- 1 cup whole wheat flour
- 1 1/2 cup-all purpose flour
- 2 tsp baking powder
- 1/2 tsp salt
- 1/4 tsp nutmeg
- 2 eggs
- 1 cup granulated sugar
- 1 cup eggnog
- 1/2 cup butter, melted
- 1 tsp vanilla essence
- 1 tsp spiced rum

Method:
1. Preheat the oven to 350degrees and prepare a 9-inch round cake pan.
2. In a bowl, combine flours, baking powder, salt and nutmeg.
3. In a separate bowl, mix together the eggs, sugar, eggnog, butter, vanilla and rum.
4. Add wet ingredients to the dry mixture and mix until just combined.
5. Bake for 45-50minutes or until a toothpick inserted comes out clean. Remove cake and place on wire cooling rack, with a baking sheet beneath, while you prepare the rum glaze.

Rum Glaze
Ingredients:
- 1 cup sugar
- 3 tbsp spiced rum
- 1/2 cup eggnog
- 1 tbsp butter

Method:
1. Place sugar in a small saucepan on the stove over medium heat. Do not stir sugar, simply allow for the heat to cause sugar to brown and become liquid-like. If you wish to stir the sugar, swirl the saucepan gently. Continue heating sugar until all of it has dissolved.
2. Lower the heat and carefully add in the rum. Be cautious, as the addition of liquid to the hot sugar can cause the syrup to bubble and splatter out of the pan and cause a serious burn-hazard.
3. Once the mixture stops bubbling, stir the rum into the sugar to incorporate the flavor.
4. Carefully add in the eggnog, 1/8 cup at a time. Be cautious, as the addition of eggnog can cause the sugar-rum mixture to foam and expand. By adding eggnog 1/8 cup at a time, you minimize the risk of the glaze overflowing the saucepan. Continue adding the remainder of the eggnog, mixing thoroughly to incorporate the flavor.
5. Remove pan from heat and add in the butter, mixing until butter has melted.
6. Gently spoon 1/2 of the glaze over the top of the eggnog cake (I pierced the surface of the cake with a fork to allow for the glaze to seep into the cake, but this is optional).
7. For serving: slice the cake into pieces and provide the remaining glaze for spooning over each individual slice.

I was a bit wary of whether or not the taste of the eggnog would be palatable in cake-form, but there was nothing to worry about. The cake plus the rum-eggnog glaze gave the dessert a wonderfully nutmeg-eggnog taste... it was fantastic! This cake is quite heavy and dense, with the crumbly and moist texture of a pound cake. The glaze is very, very sweet and I could only manage to finish a small piece of the cake as it was so rich. I'll probably make this cake in the future; it will actually make a nice gift if packaged in a cute loaf-pan for next Christmas, or I could even make some tiny cupcakes and frost them with eggnog-rum buttercream?! Oh, the possibilities!

Sunday, December 27, 2009

Daring Bakers December '09

Wahoo! Closing out the year with a bang... and some clangs in the kitchen! This month's challenge was a lot of fun and very festive. I was so glad to hear that we would be baking gingerbread and making houses/cookies :)

The December 2009 Daring Bakers’ challenge was brought to you by Anna of Very Small Anna and Y of Lemonpi. They chose to challenge Daring Bakers’ everywhere to bake and assemble a gingerbread house from scratch. They chose recipes from Good Housekeeping and from The Great Scandinavian Baking Book as the challenge recipes.

The rules for this DB challenge stated:

1. Everything needs to be edible - no glue or inner non-food supports allowed.

2. You must bake the gingerbread yourself, whichever recipe you choose. No graham cracker houses please!

3. You must use some sort of template. If you don't use ours, take a picture or link to what you do use in your final post. It doesn't have to be super technical - Anna didn't even measure hers, she just cut out shapes from parchment and made sure the edges matched up.

4. Your house must be able to stand on its own. If you want to go adding balconies with candy stick buttresses or whatever go right ahead, but the main house itself must be free-standing.

Gingerbread Creation

Ingredients (Dough):

- 2 1/2 cups (500g) packed dark brown sugar
- 1 1/2 cups (360mL) heavy cream or whipping cream
- 1 1/4 cups (425g) molasses
- 9 1/2 cups (1663g) all-purpose flour

- 2 tablespoon(s) baking soda

- 1 tablespoon(s) ground ginger


Method:

1. In very large bowl, with wire whisk (or with an electric mixer), beat brown sugar, cream, and molasses until sugar lumps dissolve and mixture is smooth. In medium bowl, combine flour, baking soda, and ginger. With spoon, stir flour mixture into cream mixture in 3 additions until dough is too stiff to stir, then knead with hands until flour is incorporated and dough is smooth.

2. Divide dough into 4 equal portions; flatten each into a disk to speed chilling. Wrap each disk well with plastic wrap and refrigerate at least 4 hours or overnight, until dough is firm enough to roll.

3. Grease and flour large cookie sheets (17-inch by 14-inch/43x36cm)

4. Roll out dough, 1 disk at a time on each cookie sheet to about 3/16-inch thickness. (Placing 3/16-inch dowels or rulers on either side of dough to use as a guide will help roll dough to uniform thickness.)

5. Trim excess dough from cookie sheet; wrap and reserve in refrigerator. Chill rolled dough on cookie sheet in refrigerator or freezer at least 10 minutes or until firm enough to cut easily.

6. Preheat oven to 300 degrees F (149C)

7. Use chilled rolled dough, floured poster board patterns, and sharp paring knife to cut all house pieces on cookie sheet, making sure to leave at least 1 1/4 inches between pieces because dough will expand slightly during baking. Wrap and reserve trimmings in refrigerator. Combine and use trimmings as necessary to complete house and other decorative pieces. Cut and bake large pieces and small pieces separately.

8. Chill for 10 minutes before baking if the dough seems really soft after you cut it. This will discourage too much spreading/warping of the shapes you cut.

9. Bake 25 to 30 minutes, until pieces are firm to the touch. Do not overbake; pieces will be too crisp to trim to proper size.

10. Remove cookie sheet from oven. While house pieces are still warm, place poster-board patterns on top and use them as guides to trim shapes to match if necessary. Cool pieces completely before attempting to assemble the house.


Royal Icing

Ingredients:
- 1 large egg white
- 3 cups (330g) powdered sugar
- 1 teaspoon white vinegar
- 1 teaspoon almond extract


Beat all ingredients until smooth, adding the powdered sugar gradually to get the desired consistency. Pipe on pieces and allow to dry before assembling. If you aren't using it all at once you can keep it in a small bowl, loosely covered with a damp towel for a few hours until ready to use. You may have to beat it slightly to get it an even consistency if the top sets up a bit. Piped on the house, this will set up hard over time.


Since I have had experience making gingerbread houses and sleighs... I thought that this year I would branch out and try making a gingerbread boat. I figured that my creation fit into the respective guidelines, as a boat could be considered a house for a pirate! In my head I thought building a gingerbread boat would be fairly simple; however, I was completely mistaken :P During the process of building my pirate house I had to have many people/objects assist me in ensuring that the structure did not collapse upon itself... I suppose I was a bit impatient, and should have taken my time building the base structure before attempting to attach the "deck" but I am not one for being patient when it comes to gingerbread building. As the picture below reveals, a Toblerone bar is perfect for holding the back of the ship in place while the icing dries.

My ship and it's horrid decor... why are the waves made of peppermint? What is a snake doing in the ocean? Why are the cannons so exposed? Why does the mast not have a sail? Why are there no railings on the main deck?


Suffice it to say, I do not recommend that anybody ride on this ship as I'm sure it would not pass its safety inspection. And any poor gingerbread sailor/pirate who boards the USS Toblerone will probably meet a very mushy demise.

Monday, December 14, 2009

Low Fat Fruit Cake

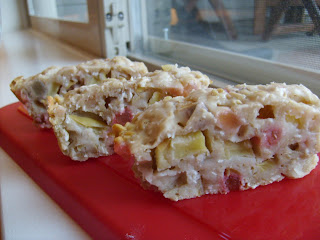
A delicious twist on the holiday classic... fruit cake! This afternoon, as I watched the flurry of snow coming down on the pavement outside, I asked myself... "what could make this moment feel even more Christmas-y?" With this in mind, I thought... FRUIT CAKE! But, I didn't just want to make any old fruit cake, I wanted to make it in such a way as to enjoy my favorite Christmas cake while still maintaining a healthy diet. All that alcohol (who doesn't love rum?) butter and sugary fruits, although delicious can sometimes hamper your holiday healthy-eating plans. But, with this recipe... healthy + tasty can be combined in one sentence with no need to compromise! Albeit, the loaf isn't so pretty to look at... it's kind of pale in comparison to traditional fruit cake. However, it is nice and moist with the addition of freshly cut apples and yes... of course I had to add the rum :P

Low Fat Christmas Fruit Cake
Yields: one 8-inch rectangular loaf (serves 8)
Ingredients:
- 1 cup all purpose flour
- 1 packet of equal/twin/sweet-and-low
- 1/4 tsp salt
- 1/2 tsp each baking soda, baking powder
- 1/4 tsp cinnamon
- 1/2 tsp all spice
- 1/3 cup mixed peel
- 1 medium apple, chopped to the same size as the mixed peel
- 1/3 cup desiccated coconut, sweetened
- 1/4 cup rolled oats
- 1 oz dark rum
- 1 egg white
- 2 tbsp milk powder + enough water to equal 125ml
- 1 tbsp low calorie margarine (I used celeb)

Method:
1. Mix together the fruit peel, chopped apple, coconut and rolled oats. Slowly add in the dark rum. (If you want to add a little more flavor and no calories, you can always add in some vanilla or maple essence). Mix until well combined and allow mixture to rest/soak up the liquor for at least 2 hours.

Tuesday, December 01, 2009

Daring Bakers: On the Spot

Okay, this is just a quick post... but I've been featured as a DB Member on the official Daring Bakers Website (http://thedaringkitchen.com/)! Yay!

Update: I'm no longer in the spotlight :( but you can still read my stuff if you click link Here.