


.jpg)


I've always wanted to try my hand at making a real baked Alaska. I say real, because I've made a baked Alaska once before... a long time ago in my High School Home Economics class... it didn't turn out so well :P But with this month's Daring Baker challenge asking us bakers to try out hand at this finicky dessert I new I had to have my "A-game". My variation for this DB recipe was to make a banana-rum baked Alaska. The cake base would consist of a brown-butter banana bread pound cake, and the ice cream would be a cinnamon, maple, rum flavor.
The August 2010 Daring Bakers’ challenge was hosted by Elissa of 17 and Baking. For the first time, The Daring Bakers partnered with Sugar High Fridays for a co-event and Elissa was the gracious hostess of both. Using the theme of beurre noisette, or browned butter, Elissa chose to challenge Daring Bakers to make a pound cake to be used in either a Baked Alaska or in Ice Cream Petit Fours. The sources for Elissa’s challenge were Gourmet magazine and David Lebovitz’s “The Perfect Scoop”.
Individual Baked Alaska
Vanilla Ice Cream
- 1 cup (250ml) whole milk- A pinch of salt
- 3/4 cup (165g) sugar
- 1 vanilla bean, split lengthwise OR 2 tsp pure vanilla extract
- 2 cups (500ml) heavy (approx 35% butterfat) cream
- 5 large egg yolks- 1 tsp pure vanilla extract
- My Variation: substitute 2tsp vanilla with 2tsp rum extract, add 1/2tsp ground cinnamon and 2tsp maple syrup Method:
1. Heat the milk, salt, and sugar in a medium saucepan until the liquid steams. Scrape out the seeds of the vanilla bean (or extract if using) with a paring knife and add to the milk, along with the bean pod. Cover, remove from heat, and let infuse for an hour. (If making cinnamon-maple ice cream, add in the powder and syrup now!)
2. Set up an ice bath by placing a 2-quart (2 litre) bowl inside a large bowl partially filled with water and ice. Put a strainer on top of the smaller bowl and pour in the cream.
3. In another bowl, lightly beat the egg yolks together. Reheat the milk in the medium saucepan until warmed, and then gradually pour ¼ cup warmed milk into the yolks, constantly whisking to keep the eggs from scrambling. Once the yolks are warmed, scrape the yolk and milk mixture back into the saucepan of warmed milk and cook over low heat. Stir constantly and scrape the bottom with a spatula until the mixture thickens into a custard which thinly coats the back of the spatula.
4. Strain the custard into the heavy cream and stir the mixture until cooled. Add the vanilla extract (1 teaspoon [5ml] if you are using a vanilla bean; 3 teaspoons [15ml] if you are not using a vanilla bean) and refrigerate until thoroughly chilled, preferably overnight.
5. Remove the vanilla bean and freeze in an ice cream maker. If you don’t have an ice cream maker, you can make it without a machine. Brown Butter Pound Cake
- 19 tbsp (275g) unsalted (sweet) butter
-- or if making banana brown-butter cake, use 8 tbsp butter and 1/2 cup mashed banana
- 2 cups (200g) sifted cake flour (not self-rising; sifted)
- 1 tsp baking powder- 1/2 tsp (3g) salt
- 1/2 cup (110g) packed light brown sugar
- 1/3 (75g) cup granulated sugar
- 4 large eggs- 1/2 teaspoon pure vanilla extract Method:
1. Preheat the oven to 325°F/160°C and put a rack in the center. Butter and flour a 9”x9” (23cmx23cm) square pan.
2. Place the butter in a 10” (25cm) skillet over medium heat. Brown the butter until the milk solids are a dark chocolate brown and the butter smells nutty. (Don’t take your eyes off the butter in case it burns.) Pour into a shallow bowl and chill in the freezer until just congealed, 15-30 minutes.3. Whisk together cake flour, baking powder, and salt.
4. Beat the brown butter (if making banana-brown butter cake, add mashed banana now), light brown sugar, and granulated sugar in an electric mixer until light and fluffy, about 2 minutes. Beat in the eggs one at a time, mixing well, and then the vanilla extract.
5. Stir in the flour mixture at low speed until just combined.
6. Scrape the batter into the greased and floured 9”x9” (23cmx23cm) square pan. Smooth the top with a rubber spatula and rap the pan on the counter. Bake until golden brown on top and when a toothpick inserted into the center comes out clean, about 25 minutes.
7. Cool in the pan 10 minutes. Run a knife along the edge and invert right-side-up onto a cooling rack to cool completely. Meringue (For the Baked Alaska)
- 8 large egg whites
- ½ teaspoon (3g) cream of tartar
- ½ teaspoon (3g) salt
- 1 cup (220g) sugar
Method:
1. Beat the egg whites, cream of tartar, and salt on high speed in an electric mixer until soft peaks form. Beat in the sugar gradually in a slow stream until stiff peaks form.
Assembly Instructions – Baked Alaska
1. Line four 4” (10cm) diameter tea cups with plastic wrap, so that plastic wrap covers all the sides and hangs over the edge. Fill to the top with ice cream. (For my banana-rum baked Alaska, I sliced pieces of banana and layered it on top of the ice cream after I pressed it into the bowls/cups)
2. Level the top of the brown butter pound cake with a serrated knife or with a cake leveler. Cut out four 4” (10cm) diameter circles from the cake. Discard the scraps or use for another purpose.
3. Make the meringue (see above.)
 4. Unwrap the ice cream “cups” and invert on top of a cake round. Trim any extra cake if necessary.
5. Pipe the meringue over the ice cream and cake, or smooth it over with a spatula, so that none of the ice cream or cake is exposed. Freeze for one hour or up to a day.
 I attempted to use my hand-held long-ended lighter to brown the edges of the meringue but I suppose the flame wasn't hot enough for the browning effect to be properly seen. Note to self: invest in a good quality hand-held torch (justify the need for one by making creme brulee and baked Alaskas at least 2 times a week :P). So, with the failed attempt at browning with my lighter, I decided to just put the baked Alaska in the oven as the recipe had described. In the end, there was a little bit of a mess on my pan. I must have missed a spot during the meringue piping process, leaving a part of the ice cream exposed. This resulted in a little bit of a melty, leakage of ice cream through the meringue layer... but, thankfully, I pulled the dessert out of the oven before any real damage was done. And my sisters, my parents and I decided to just enjoy the dessert communally, straight off the pan. I cannot describe the taste, only that it was deliciously sweet, cakey and fluffy (thanks to the meringue). I will definitely be trying this recipe again.
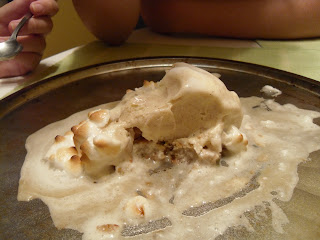 Mmm... the aftermath of the melty, fluffy, sweet dessert! What a nice treat on a warm summer's day.
Individual Baked Alaska
Vanilla Ice Cream
- 1 cup (250ml) whole milk- A pinch of salt
- 3/4 cup (165g) sugar
- 1 vanilla bean, split lengthwise OR 2 tsp pure vanilla extract
- 2 cups (500ml) heavy (approx 35% butterfat) cream
- 5 large egg yolks- 1 tsp pure vanilla extract
- My Variation: substitute 2tsp vanilla with 2tsp rum extract, add 1/2tsp ground cinnamon and 2tsp maple syrup
 Method:
1. Heat the milk, salt, and sugar in a medium saucepan until the liquid steams. Scrape out the seeds of the vanilla bean (or extract if using) with a paring knife and add to the milk, along with the bean pod. Cover, remove from heat, and let infuse for an hour. (If making cinnamon-maple ice cream, add in the powder and syrup now!)
2. Set up an ice bath by placing a 2-quart (2 litre) bowl inside a large bowl partially filled with water and ice. Put a strainer on top of the smaller bowl and pour in the cream.
3. In another bowl, lightly beat the egg yolks together. Reheat the milk in the medium saucepan until warmed, and then gradually pour ¼ cup warmed milk into the yolks, constantly whisking to keep the eggs from scrambling. Once the yolks are warmed, scrape the yolk and milk mixture back into the saucepan of warmed milk and cook over low heat. Stir constantly and scrape the bottom with a spatula until the mixture thickens into a custard which thinly coats the back of the spatula.
4. Strain the custard into the heavy cream and stir the mixture until cooled. Add the vanilla extract (1 teaspoon [5ml] if you are using a vanilla bean; 3 teaspoons [15ml] if you are not using a vanilla bean) and refrigerate until thoroughly chilled, preferably overnight.
5. Remove the vanilla bean and freeze in an ice cream maker. If you don’t have an ice cream maker, you can make it without a machine.
 Brown Butter Pound Cake
- 19 tbsp (275g) unsalted (sweet) butter
-- or if making banana brown-butter cake, use 8 tbsp butter and 1/2 cup mashed banana
- 2 cups (200g) sifted cake flour (not self-rising; sifted)
- 1 tsp baking powder- 1/2 tsp (3g) salt
- 1/2 cup (110g) packed light brown sugar
- 1/3 (75g) cup granulated sugar
- 4 large eggs- 1/2 teaspoon pure vanilla extract
 Method:
1. Preheat the oven to 325°F/160°C and put a rack in the center. Butter and flour a 9”x9” (23cmx23cm) square pan.
2. Place the butter in a 10” (25cm) skillet over medium heat. Brown the butter until the milk solids are a dark chocolate brown and the butter smells nutty. (Don’t take your eyes off the butter in case it burns.) Pour into a shallow bowl and chill in the freezer until just congealed, 15-30 minutes.3. Whisk together cake flour, baking powder, and salt.
4. Beat the brown butter (if making banana-brown butter cake, add mashed banana now), light brown sugar, and granulated sugar in an electric mixer until light and fluffy, about 2 minutes. Beat in the eggs one at a time, mixing well, and then the vanilla extract.
5. Stir in the flour mixture at low speed until just combined.
6. Scrape the batter into the greased and floured 9”x9” (23cmx23cm) square pan. Smooth the top with a rubber spatula and rap the pan on the counter. Bake until golden brown on top and when a toothpick inserted into the center comes out clean, about 25 minutes.
7. Cool in the pan 10 minutes. Run a knife along the edge and invert right-side-up onto a cooling rack to cool completely.
 Meringue (For the Baked Alaska)
- 8 large egg whites
- ½ teaspoon (3g) cream of tartar
- ½ teaspoon (3g) salt
- 1 cup (220g) sugar
Method:
1. Beat the egg whites, cream of tartar, and salt on high speed in an electric mixer until soft peaks form. Beat in the sugar gradually in a slow stream until stiff peaks form.
Assembly Instructions – Baked Alaska
1. Line four 4” (10cm) diameter tea cups with plastic wrap, so that plastic wrap covers all the sides and hangs over the edge. Fill to the top with ice cream. (For my banana-rum baked Alaska, I sliced pieces of banana and layered it on top of the ice cream after I pressed it into the bowls/cups)
2. Level the top of the brown butter pound cake with a serrated knife or with a cake leveler. Cut out four 4” (10cm) diameter circles from the cake. Discard the scraps or use for another purpose.
3. Make the meringue (see above.)
 4. Unwrap the ice cream “cups” and invert on top of a cake round. Trim any extra cake if necessary.
5. Pipe the meringue over the ice cream and cake, or smooth it over with a spatula, so that none of the ice cream or cake is exposed. Freeze for one hour or up to a day.
 I attempted to use my hand-held long-ended lighter to brown the edges of the meringue but I suppose the flame wasn't hot enough for the browning effect to be properly seen. Note to self: invest in a good quality hand-held torch (justify the need for one by making creme brulee and baked Alaskas at least 2 times a week :P). So, with the failed attempt at browning with my lighter, I decided to just put the baked Alaska in the oven as the recipe had described. In the end, there was a little bit of a mess on my pan. I must have missed a spot during the meringue piping process, leaving a part of the ice cream exposed. This resulted in a little bit of a melty, leakage of ice cream through the meringue layer... but, thankfully, I pulled the dessert out of the oven before any real damage was done. And my sisters, my parents and I decided to just enjoy the dessert communally, straight off the pan. I cannot describe the taste, only that it was deliciously sweet, cakey and fluffy (thanks to the meringue). I will definitely be trying this recipe again.
 Mmm... the aftermath of the melty, fluffy, sweet dessert! What a nice treat on a warm summer's day.
.JPG)
.JPG)
.JPG)
.JPG)
.JPG)
.JPG)


