Monday, December 27, 2010

Daring Baker's Challenge: December 2010 - Stollen Wreath

I know it's been a while since my last post... a month to be exact, but don't worry, I'm still alive and kicking! I've just gotten a bit distracted by another blogging side-project. Tumblr's got a hold of me and while I haven't been posting a lot of my baking adventures, if you check out my Tumblr blog (www.silverrock.tumblr.com) you can take a peak into my other obsessions.

But, even though I haven't been blogging recipes recently, I will always do my best to keep up to date with the Daring Baker Challenges. So, here's my Stollen Wreath for December's challenge.

The 2010 December Daring Bakers’ challenge was hosted by Penny of Sweet Sadie’s Baking. She chose to challenge Daring Bakers’ to make Stollen. She adapted a friend’s family recipe and combined it with information from friends, techniques from Peter Reinhart’s book.........and Martha Stewart’s demonstration.

Stollen Wreath

Ingredients:

- ¼ cup lukewarm water

- 2 packages active dry yeast

- 1 cup milk
- 10 tbsp unsalted butter

- 5 ½ cups all-purpose flour

- ½ cup sugar

- ¾ tsp salt

- 1 tsp cinnamon
- 3 large eggs, lightly beaten

- Grated zest of 1
lemon and 1 orange
- 2 tsp vanilla extract

- 1 tsp lemon extract or orange extract

- ¾ cup mixed peel

- 1 cup firmly packed raisins (I substituted 1/2 a cup with cranberries)
- 3 tbsp rum
- 12 red glacé cherries (chopped) for color & taste (optional)

- 1 cup flaked almonds (I didn't use these, as my sister is allergic)

- Melted unsalted butter for coating
- Confectioners’ sugar for dusting


Method:

1. In a small bowl, soak the raisins in the rum (or in the orange juice from the zested orange) and set aside.

2. Pour ¼ cup warm water in
to a small bowl, sprinkle with yeast and let stand 5 minutes. Stir to dissolve yeast completely.
3. In a small saucepan, combine 1 cup milk and 10 tbsp butter over medium - low heat until butter is melted. Let stand until lukewarm, about 5 minutes.

4. Lightly beat eggs in a small bowl and add lemon and vanilla extracts.
5. In a large mixing bowl, stir together the flour, sugar, salt, cinnamon, orange and lemon zests.

6. Then stir in the yeast/water mixture, eggs and the lukewarm milk/butter mixture. This should take about 2 minutes. It should be a soft, but not sticky ball. When the dough comes together, cover the bowl
with either plastic or a tea cloth and let rest for 10 minutes. 7. Add in mixed peel, soaked fruit and almonds and mix with hands to incorporate. Here is where you can add the cherries, if using. Be delicate or your dough will turn red
8. Sprinkle flour on counter, transfer dough to the counter, and begin kneading to distribute the fruit evenly, add additional flour if needed. The dough should be soft and satiny, tacky but not sticky. Knead for ~8 minutes. You can tell when the dough is kneaded enough – a few
raisins will start to fall off the dough onto the counter because at the beginning of the kneading process the dough is very sticky and the raisins will be held into the dough but when the dough is done it is tacky which isn't enough to bind the outside raisins onto the dough ball.
9. Lightly oil a large bowl and transfer the dough to the bowl, rolling around to coat it with the oil. Cover the bowl with plastic wrap.

10. Put it in the fridge overnight. The dough becomes very firm in the fridge but it does rise slowly… the raw dough can be kept in the refrigerator up to a week and then baked on the day you want.
Shaping The Dough
11. Let the dough rest for 2 hours after taking out of the fridge in order to warm slightly.
12. Line a sheet pan with parchment paper.
13. Preheat oven to moderate 350°F/180°C/gas mark 4 with the oven rack on the middle shelf.

14. Punch dough down, roll into a rectangle about 16 x 24 inches and ¼ inch thick.

15. Starting
with a long side, roll up tightly, forming a long, thin cylinder.
16. Transfer the cylinder roll to the sheet pan. Join the ends together, trying to overlap the layers to make the seam stronger and pinch with your fingers to make it stick, forming a large circle. You can form it around a bowl to keep the shape.
17. Using kitchen scissors, make cuts along outside of circle, in 2-inch (5 cm) intervals, cutting 2/3 of the way through the dough.
18. Twist each segment outward, forming a wreath shape. Mist the dough with spray oil and cover loosely with plastic wrap.
19. Proof for ~2 hours at room temperature, or until about 1½ times its original size.

20. Ba
ke the stollen for 20 minutes, then rotate the pan 180 degrees for even baking and continue to bake for 20 to 30 minutes. The bread will bake to a dark mahogany color, should register 190°F/88°C in the center of the loaf, and should sound hollow when thumped on the bottom. 21. Transfer to a cooling rack; brush the top with melted butter while hot
22. Immediately tap a layer of powdered sugar over the top through a sifter.
23. Wait for 1 minute, then tap another layer over-top.

24. The bread should be coated generously with the powdered sugar.

25. Let cool at least an hour before serving. Coat the stollen in butter and icing sugar 3 times, since the many coatings help keep the stollen fresh.

26. When completely cool, store in a plastic bag. Or leave it out uncovered overnight to dry out slightly, German style.

This recipe was challenging for me, as I'm not that gifted when it comes to baking with yeast. As my regular readers may know, yeast and I do not get along very well... we're fair-weather friends, one might say. But thanks to my patience and sticking to the recipe to a "t", I was able to produce a Stollen Wreath which I was most proud of sharing with my family and friends for a Christmas potluck. The wreath was wonderfully moist and sweet, thanks to the many layers of butter and icing sugar, and it was the perfect addition to our holiday banquet. I will definitely be making this recipe again, come next winter-time.

Tuesday, November 30, 2010

Daring Bakers: November 2010 - Crostata

I've been feeling rather guilty having not updated my blog for practically a month. I swear to you I've been in the kitchen quite a few times, and just this past week I whipped up a tasty batch of cookies. I just didn't get around to posting any of my escapades, but thankfully I baked up something for this month's DB challenge. I'm so glad that I joined this group... it's keeping me in-check, and making it so I have to post at least once a month.

I don't know where my time's been running off to. I have been working, but that part of my weekly routine seems to have settled itself out, and I'm getting use to my work schedule... maybe it's because I've been really engrossed in catching up with Arsenal FC's 2010/2011 season (The Premier League, UEFA Champions League and Carling Cup). These guys play brilliant football, and I can't help but be enamored with their dedication to the sport and great team play. I'm sure they'll take the top of the table by the season's end, and with the number of injuries the team's had to endure they're doing amazingly well. The team's last EPL game, they topped Wigan Athletica and like a winter fairlytale, lovely white snow began falling on the pitch.

But anyways, here's my long-awaited blog post for November's DB Challenge: Crostata. The 2010 November Daring Bakers’ challenge was hosted by Simona of briciole. She chose to challenge Daring Bakers’ to make pasta frolla for a crostata. She used her own experience as a source, as well as information from Pellegrino Artusi’s Science in the Kitchen and the Art of Eating Well.

Pasta Frolla (crust)

Ingredients:

  • 1/2 c. minus 1 tbsp superfine sugar or a scant 3/4 cup of powdered sugar
  • 1 and 3/4 cup unbleached all-purpose flour
  • a pinch of salt
  • 1 stick [8 tbsp] cold unsalted butter, cut into small pieces
  • grated zest of half a lemon
  • 1 large egg + egg yolk, lightly beaten in a small bowl
Method:
  1. Whisk together sugar, flour and salt in a bowl.
  2. Rub or cut the butter into the flour until the mixture has the consistency of coarse crumbs. You can do this in the bowl or on your work surface, using your fingertips or an implement of choice.
  3. Make a well in the center of the mounded flour and butter mixture and pour the beaten eggs into it (reserve about a teaspoon of the egg mixture for glazing purposes later on – place in the refrigerator, covered, until ready to use).
  4. Add the lemon zest to your flour/butter/egg mixture.
  5. Use a fork to incorporate the liquid into the solid ingredients, and then use your fingertips.
  6. Knead lightly just until the dough comes together into a ball.
  7. Shape the dough into a flat disk and wrap in plastic wrap. Place the dough in the refrigerator and chill for at least two hours. You can refrigerate the dough overnight.
  8. Roll dough, and form into a baking pan. Add filling, and bake in 350degree oven for 45minutes.
Berry Filling

Ingredients:

  • 1/8 cup butter
  • 1/4 cup granulated sugar
  • 1/2 cup unbleached all-purpose flour + additional 2 tbsp flour for roux
  • 1/4 tsp baking powder
  • a pinch of salt
  • 3/4 cup mixed field berries
  • 1 large egg and 1 large egg yolk, lightly beaten in a small bowl
  • Enough milk to make a thick batter (1/4 to 1/2 cup)
Method:
  1. Melt butter in a heavy bottomed saucepan, add in the sugar and 2 tbsp flour to form roux.
  2. Add in the berries, and heat over medium until berries become macerated.
  3. Add 1/4 cup milk to the mix and continue stirring mixture.
  4. Add in the flour + baking powder mix, stirring until well combined.
  5. Slowly add in the eggs, mixing well to ensure that the eggs do not begin to cook; and if batter remains thick, add in additional milk to form a batter with pudding-like consistency.
  6. Pour into the pasta frolla crust and bake at 350degrees until a toothpick inserted into the center comes out clean.
Yay!! The crostata was tasty, and with the winter-ish weather doing it's business outside (seriously, I can't believe it began snowing already) my family enjoyed the warm pie with a big dollop of whipped cream. Mmmmm... I cannot wait until Christmas rolls around, it seems so close yet so far!

Wednesday, October 27, 2010

October's Daring Baker Challenge: Doughnuts


Eeeee! I know I haven't posted anything in what seems like forever, and yes you can blame my work on that one. I simply haven't found the time to get back into the kitchen! When doing shift-work, it seems like your "days on" are so busy you can't get anything done when you get home... and then on your "days off" you're simply too exhausted to even contemplate doing anything (even the things that you love). But, hopefully I'll get into a good routine soon.

In regards to work, all I have to say is that I'm very glad I have the co-workers I do. Although the work is extremely exhausting and frustrating at times (seeing as how none of us get decent breaks and it's always go-go-go) my team at work is just amazingly supportive and they always offer a hand (even when they're swamped too). Without them, I'd seriously have a complete melt-down... and came so close to it, let me tell you. But for now, I'm good... enjoying my restful days off and finally stepping into the kitchen to do some Daring Baker's work.

Blog-checking lines: The October 2010 Daring Bakers challenge was hosted by Lori of Butter Me Up. Lori chose to challenge DBers to make doughnuts. She used several sources for her recipes including Alton Brown, Nancy Silverton, Kate Neumann and Epicurious.

Boy do I love doughnuts... and I could hardly wait to get cracking on this challenge, so without further adieu. Here's the recipe:


Yeast Doughnuts

Ingredients

- 1 1/2 milk
- 1/3 cup butter
- 4 1/2 tsp active dry yeast
- 1/3 cup warm water
- 2 eggs, large [I substituted one egg for 1/3 cup pumpkin puree]
- 1/4 cup granulated sugar
- 1 1/2 tsp salt
- 1 tsp nutmeg, grated [I also added 1 tsp ground cinnamon]
- 4 2/3 cups all purpose flour + extra for dusting surface
- Enough canola oil to create THREE (3) inches of oil within your frying vessel

Method:

  1. Place the milk in a medium saucepan and heat over medium heat just until warm enough to melt the shortening. (Make sure the shortening is melted so that it incorporates well into the batter.)
  2. Place the shortening in a bowl and pour warmed milk over. Set aside.
  3. In a small bowl, sprinkle the yeast over the warm water and let dissolve for 5 minutes. It should get foamy. After 5 minutes, pour the yeast mixture into the large bowl of a stand mixer and add the milk and shortening mixture, first making sure the milk and shortening mixture has cooled to lukewarm.
  4. Add the eggs, sugar, salt, nutmeg, and half of the flour. Using the paddle attachment of your mixer (if you have one), combine the ingredients on low speed until flour is incorporated and then turn the speed up to medium and beat until well combined.
  5. Add the remaining flour, combining on low speed at first, and then increase the speed to medium and beat well.
  6. Change to the dough hook attachment of the mixer and beat on medium speed until the dough pulls away from the bowl and becomes smooth, approximately 3 to 4 minutes (for me this only took about two minutes). If you do not have a dough hook/stand mixer – knead until the dough is smooth and not sticky.
  7. Transfer to a well-oiled bowl, cover, and let rise for 1 hour or until doubled in size.
  8. On a well-floured surface, roll out dough to 3/8-inch (9 mm)thick. (Make sure the surface really is well-floured otherwise your doughnuts will stick to the counter).
  9. Cut out dough using a 2 1/2-inch (65 mm) doughnut cutter or pastry ring or drinking glass and using a 7/8-inch (22 mm) ring for the center whole. Set on floured baking sheet, cover lightly with a tea towel, and let rise for 30 minutes.
  10. Preheat the oil in a deep fryer or Dutch oven to 365 °F/185°C.
  11. Gently place the doughnuts into the oil, 3 to 4 at a time. Cook for 1 minute per side or until golden brown (my doughnuts only took about 30 seconds on each side at this temperature).
  12. Transfer to a cooling rack placed in baking pan. Allow to cool for 15 to 20 minutes prior to glazing, if desired.
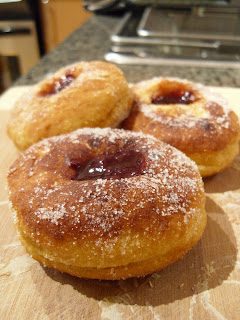
[NOTE: I halved my portion of dough so that I could fry one half, and save the other half of dough to shape and bake. For my baked donuts, I placed them on a well greased baking tray, brushed the uncooked donuts with melted butter and baked at 350degrees for 8-10minutes. Once baked, I then brushed them with a little more butter and dipped them into a mixture of granulated sugar + cinnamon. For my filled donuts, I simply poked a hole in the middle and filled with raspberry preserve]

Yay, for DB challenges! These doughnuts were simply divine! Both the baked and the fried versions were super tasty and they actually weren't that difficult to make. There are times when I look at the DB challenges and think "OMG! I don't have any time to complete this challenge", but then when I look back on it again, it's actually a good thing that these challenges are monthly because then I'm almost guaranteed to enter at least a blog-post a month! So thanks DB's for keeping me on track!

Thursday, October 07, 2010

Irish Soda Bread Take 2


Having already made Irish Soda Bread (and having loved it the last time), I thought I'd try a different recipe to revive the ol' classic. I made the soda bread to go a long with a stew that my dad had prepared for me and brought over to my place... I don't know what could have given him the impression that I don't do home cooking when living on my own (doesn't he read my blog?? or is that too "new agey" for his generation?) but the stew was a welcomed surprise.

Anywho, on with the bread! I love Irish Soda Bread because it's delicious, easy, only uses a few ingredients and you can not screw it up. So, here's the recipe...

Irish Soda Bread

Ingredients:

- 2 cups flour

- 5 tbsp sugar

- 1 1/2 tsp baking powder
- 1 tsp baking soda

- 1 tsp salt
- 3 tbsp butter, cold and cubed
- 1 cup buttermilk (or 2% + 1 1/2 tbsp vinegar, left to sit for ~10mins)
- 2 tbsp mixed grains (optional)

Method:

1. Combine the flour, sugar, baking powder, baking soda and salt in a medium sized bowl.

2. Using a pastry cutter, or your fingers, work the butter into the flour mixture. Continue breaking up the butter until you get pea-sized chunks.

3. Working with the dough as little as possible, add the buttermilk into the dry ingredients.

4. Shape the dough into a rough ball and place on a greased baking tray. Flatten the dough slightly, dust the top with the mixed grains and score the top of the dough with a knife.

5. Bake at 350degrees for 35-40minutes, or until golden brown.


This was such an amazing bread. Really quick, and really simple to conjure up. I think that from start to finish, the entire bread only took about 45minutes to create (including baking time!). I almost didn't even need to eat the bread with the stew, but the smell of my dad's stew was just too alluring to pass up. So, with an amazing comfort-food meal of soda bread and stew... my evening was complete.

Wednesday, October 06, 2010

Welsh Rarebit

Again, thanks to my new found obsession with the show Come Dine With Me I've gotten a hankering for some not-so-Canadian dishes. Not that I'll be cooking anything like Laverbread, skirly, Howtowdie wi Dappit Eggs and Tatties or any black pudding (at least not anytime soon), but I did find myself craving some Welsh Rarebit. The ingredients were on-hand in my kitchen and the recipe didn't seem too labor intensive or complicated for a quick afternoon snack, so... off I went.
Welsh Rarebit

Ingredients:
- 6 slices of French bread
- 1/2 tsp salt, or more to taste
- 2 tsp Worcestershire sauce
- 1 tsp mustard powder
- 1/2 tsp nutmeg
- 1/4 cup butter
- 3 tbsp flour
- 1 clove of garlic minced
- 3/4 cup cheddar cheese, shredded (I only had marble)
- 1/3 cup dark ale (I used Guinness)
- 1/2 cup milk
- chopped spring onion (optional)


Method:
1. Melt butter in a heavy bottomed saucepan and fry garlic until golden brown and fragrant.
2. Add in the flour and mix over medium heat to form a roux.
3. Slowly pour in the dark ale, and continue to mix until well combined. Then, slowly add in the milk and cook over medium until mixture begins to thicken.
4. Add in nutmeg, mustard, Worcestershire sauce and salt to taste. Continue mixing, and add in the cheese. Stir sauce until cheese is well melted and mixture is nice and thick.
5. Place slices of French bread on a baking tray; spread cheese-ale sauce over top of slices and place tray in the oven. Set oven to broil and cook until cheese topping bubbles and browns, and French bread begins to brown.
6. Optional: Serve rarebit topped with a garnish of chopped spring onions.

The Guinness flavor was really strong in the rarebit, but boy was it tasty. Man! The Brits really know how to eat their toast! I mean, toast and beans, toast and eggs, toast and cheese... all sound uber-tasty to me but I've never seen it served as a snack food in Canada. I will definitely be making this recipe again, I just gotta go out and buy more ale... I finished off the last can of Guinness, because hey... what else could I do since my recipe only called for 1/3 cup of the malty, creamy nectar?! (Did I mention that Guinness is my favorite draught... probably why it was the ale that ended up in my rarebit)... uh, oh... gotta sober up before work :P jkjk

Tuesday, October 05, 2010

Bailey's Cheesecake Swirl Brownies

I was sitting at my computer watching another lovely episode of Come Dine With Me, and having watched each of the competitors puddings be either chocolate or cheesecake related I suddenly felt the urge to have something creamy, chocolatey and cream-cheesey. So, just before the winner of the Come Dine With Me episode was revealed, I paused it and ran off to the kitchen to whip up a tasty treat for myself (seeing as how no body else was around to share it with me :P)

Bailey's Cheesecake Swirl Brownie


Ingredients:
- 1/2 cup (8 tbsp) butter
- 1 cup white sugar
- 1/2 cup brown sugar
- 2 eggs
- 1 cup flour
- 1/2 cup unsweetened cocoa powder
- 1 tbsp instant coffee
- 1/4 tsp salt
- 1 tsp vanilla essence
- 2 tsp milk
- Cream Cheese Swirls: 3 tbsp cream cheese + 1 tbsp sugar + 1 tsp flour + 2 tsp Bailey's (all creamed together)


Method:
1. Melt butter and add in both sugars, mixing until well combined. Mix in the eggs one at a time and stir in vanilla.
2. In a separate bowl combine flour, cocoa powder, coffee granules and salt.
3. Add the liquid ingredients to the dry, mix well and then add in the splash of milk.
4. Place in prepared 8x8 pan . Take tsp sized dollops of cream cheese swirl mixture and drop randomly on the surface of the chocolate brownie batter. With a knife, swirl the mixture around.

Look at the lovely swirls of rich, cream cheese! Mmmm...

5. Bake at 350degrees for 35-45minutes.
6. When done, remove from oven and leave to cool on wire rack before slicing.

This brownie turned out better than I had anticipated, and I'm sure if I were a competitor on Come Dine With Me (and had served the dessert with some home made vanilla bean ice cream) I could have been a real contender for top. The topping was nicely crisp and the cream cheese swirls were rich with the ever lovely taste of Bailey's Irish Cream. The inside of the brownie was gooey, soft, moist and simply decadent and it was hardly noticeable that I had used no baking chocolate whatsoever. This recipe is definitely a keeper, that's for sure!


Tuesday, September 28, 2010

Red Wine and Horseradish Beef Roast

I was browsing the grocery store doing my weekly shopping and came across a great deal on a beef roast! It was only $6.88 for a 2lbs of deliciously meaty roast, and since I've never attempted to cook a beef roast dinner before I thought I'd give it a go.

Red Wine Horseradish Roast

- 2lbs beef roast
- 2 tbsp oil
- 1 tsp dried oregano
- 1 tsp dried sage
- 1 tsp cumin
- salt and cracked pepper, to taste
- 1 onion, chopped
- 1 clove of garlic minced
- 1 gala apple, roughly chopped
- 2 tbsp horseradish
- 1/4 cup red cooking wine, plus more for the gravy
- 1 tbsp red wine vinegar
- 1 tbsp barbecue sauce
- 1 tbsp tomato paste
- Your favorite roasting vegetables

Method:
1. Toss together the sage, oregano, cumin, salt and cracked pepper. Rub oil over the roast and coat the roast with the herb-spice blend.
2. In a small sized bowl, combine the garlic, apple, onion, horseradish, wine, vinegar, tomato paste and barbecue sauce.
3. Place the coated roast in an oven-proof dish and pour the horseradish marinade over-top, being sure to coat the entire roast liberally. Marinate in the fridge for 3hours or a maximum of 24hours.
4. When ready to cook, heat some cooking oil in a pan over high heat. Once the oil is hot, take the roast out of the bowl and place in pan. Sear the roast for ~1-2minutes on each side and then remove the roast from the pan, placing back in the oven-proof dish.
5. De-glaze the pan with a splash of red wine, remove from heat and set aside for making the gravy once the roast is completed
6. Place the dish in a 375degree oven, cover and cook for 1 1/2 hours.
7. When there are 30-40minutes left of cooking time, place your roasting vegetables (i.e. carrots, onions, Brussels sprouts etc.) in the dish to cook.
8. Once roast is cooked to your preference, remove from the oven and place on cutting board to rest.
9. Place the pan which was set aside for the gravy back on the stove-top and add 2-3tbsp of flour to make a roux.
10. To the pan, slowly add in the roast drippings. Continue to whisk over medium heat until mixture begins to thicken. If desired, add in some beef stock to enhance the flavor (adding more flour to thicken, as necessary).
11. Slice roast and serve with the vegetables, gravy and whatever sides you like (I served mine with wild rice).

I really enjoyed cooking this roast, it was a great "first" for me. The flavors were amazing, and the meat was wonderfully tender. I normally enjoy my meat rare, and when I first sliced the roast it was perfectly done. However, I forgot that while you let the meat rest it continues to cook, so when I finally plated the meat it ended up being more towards medium. The beef gravy was delicious, and way better than any store-bought gravy I've ever tried. I think I will definitely be making this meal again.

Post Script:
I was completely weirded-out when I went to chop my garlic clove. I grabbed what looked like a regular old clove, smacked it with the side of my clever and then proceeded to peel off the normal looking skin. And what greeted me was this strangely opaque, squidgy, sticky, yellow clove of garlic. It smelled okay, but I was too creeped out to use it so I threw it out. Strangely enough, the rest of the cloves in the bunch were perfectly normal, but this one clove was just an odd-ball. Has anyone seen one of these before?

Monday, September 27, 2010

Daring Baker's August '10: Sugar Cookies


I love sugar cookies! So I was ecstatic to see that this month's DB challenge would be featuring the simply delicious and tasty treat. I wasn't quite sure how I wanted to decorate the cookies, but I realized that in this challenge it was mandatory that we had to use decorate the cookies in a "September theme" (whatever September means to you). So, I chose to do this challenge in two parts. The first day, I made a bunch of little square cookies (each 1 square inch in size), which gave me until day two to decide what my "September theme" would be.

The September 2010 Daring Bakers’ challenge was hosted by Mandy of “What the Fruitcake?!” Mandy challenged everyone to make Decorated Sugar Cookies based on recipes from Peggy Porschen and The Joy of Baking.

Basic Sugar Cookies
(Makes Approximately 36x 10cm / 4" Cookies)


- ½ cup + 6 Tbsp Unsalted Butter, at room temperature
- 3 cups + 3 Tbsp All Purpose

- 1 cup Caster Sugar
- 1 Large Egg, lightly beaten
- 1 tsp Vanilla Extract / Or seeds from 1 vanilla bean


Method:
• Cream together the butter, sugar and any flavorings you’re using. Beat until just becoming
creamy in texture.
• Beat in the egg until well combined, make sure to scrape down the sides of the bowl.
Add the sifted flour and mix on low until a non sticky dough forms.
• Knead into a ball and divide into 2 or 3 pieces.
• Roll out each portion between parchment paper to a thickness of about 5mm (0.2 inch)
• Refrigerate for a minimum of 30mins.
• Once chilled, peel off parchment and place dough on a lightly floured surface.
• Cut out shapes with cookie cutters or a sharp knife.
• Arrange shapes on parchment lined baking sheets and refrigerate for 30mins - 1 hour.
• Re-roll scraps and follow the above process until all scraps are used up.
• Preheat oven to 180°C (160°C Fan Assisted) / 350°F / Gas Mark 4.
• Bake until golden around the edges, about 8-15mins depending on the size of the cookies.
• Once completely cooled, decorate as desired.

So... again, with the theme... hmm... that was a tricky one to figure out. After making the cookies, my mind started running trying to figure out how to theme my cookies for September. Then, after a long hard think, I remembered that September 13th, 2010 was the 25th Anniversary of the release of Super Mario Bros. So, I used the cute little squares as "bits" and created an 8-bit Mario by using various colors of icing sugar to decorate the cookies with the outline-fill/flood


Royal Icing

- 2½ - 3 cups Confectioner’s Sugar, unsifted
- 2 Large Egg Whites
- 2 tsp Lemon Juice
- 1 tsp Almond Extract, optional

• Beat egg whites with lemon juice until combined.
• Sift the icing sugar to remove lumps and add it to the egg whites.
• Beat on low until combined and smooth.
• Use immediately or keep in an airtight container.

Note:
3 cups of confectioner's sugar is good for piping the outline, and by adding a little bit of water to the mixture the icing is perfect for flooding the outline)


Look at all the cute little colored squares! They were a bit time consuming to decorate, but in the end I think they were worth every bit of effort. If I were to do this again, I'd probably pipe the icing a bit closer to the borders of the cookies so that there would be less cookie visible when the 8-bit character is put together. Other than that, the cookies and icing were delicious and my sisters really enjoyed picking apart Mario, piece by piece ^_^


Thursday, September 09, 2010

Easy Creamy Pasta


With such an elaborate dinner last night, I thought that tonight I'd play it a little low key and make an easy creamy pasta dish. It was full of vegetables, and didn't take a lot of time to prepare; this made it even more tasty because I was able to relax and savor the slowness of the day. So, without boring you with a long winded intro (and because I just wanna chill out and watch a movie tonight :P) here's the recipe.

Easy Creamy Pasta

(Yields two servings of pasta)

- 3 cups cooked spaghetti (freshly cooked, and still warm)
- 3 cherry tomatoes, quartered
- 1 cup broccoli rabe
- 1/2 medium onion, thinly sliced
- 1 clove garlic, minced
- 1/2 tsp dried fennel seeds
- 1 tsp crushed red peppers
- 1/2 tsp cayenne pepper
- 1 chicken breast fillet
- 1/2 tsp rosemary
- 1/2 tsp oregano
- 2 tbsp canola oil
- 1/2 tbsp cider vinegar
- A splash of red wine (or you can use grape juice)
- 1 heaping tbsp cream cheese
- Salt and pepper to taste

Method:
1. Season the chicken breast with rosemary, oregano, salt and pepper. Let sit to marinade for at least 10 minutes. Heat 1 tbsp of the oil in a non-stick skillet over medium-high heat until chicken is fully cooked. Remove chicken from pan and set aside.
2. To the skillet, add the remaining 1 tbsp oil until hot and then add the garlic, fennel seeds, cayenne, crushed peppers. Fry over medium heat until fragrant ~1 minute.
3. Add in the onions, broccoli rabe, vinegar and red wine. Cover the pan for 2-3 minutes and allow vegetables to steam
4. Cut the chicken breast into slices, and add to skillet. Next, add the cooked spaghetti, followed by the tomatoes and the cream cheese. Toss the pasta mixture with tongs, season with salt and pepper to taste and serve.

See... nice and simple, it literally took no more than 8minutes to cook. Once the veggies are prepped and you have the pasta already cooked, this dish is a breeze to whip up. I loved the richness that the cream cheese adds to this dish; it adds a great subtle cheese flavor without overpowering the sweetness of the wine and the tangy-ness of the vinegar. All in all, a great comfort food dish... and the colors make it look so elegant! Mama would be proud ^_^

Indian Fusion for Dinner!!

I love Indian food... I don't know if it's the spices that always intrigue my tastebuds, or the fiery heat that comes from eating raw/semi-cooked chilies, but I simply love me some spicy cuisine and Indian is spicy at its best. However, one cannot forget that Malay cooks also know a thing or two about heat! So, I decided that for dinner last night I would whip up an awesome meal of Pea Pilau, Spicy Cashew Prawns and Vegetables, Fish Vindaloo and good ol' Naan bread. (See below for my silly attempt at plating the dish in a fancy way... I kind of failed at it o_O)


But anyways, I must post the recipes for my amazing dishes. I kind of improvised with a lot of the amounts and the cooking times, so if you're trying to cook this dish it's really all about using your own cooking knowledge and never forgetting to taste! taste! taste!!

Spicy Cashew Shrimp
- 20 tiger prawns, defrosted or fresh
- 1/2 tsp salt
- 1 tbsp oil
- 2 tbsp butter, unsalted
- 1 clove garlic, minced
- 1/2 small onion, minced
- 1/2 small onion, chopped
- 1/2 medium zucchini, sliced thinly and tossed with a little salt
- 1/3 cup crushed cashews, unsalted
- 1/2 tsp cumin
- 1/4 tsp coriander
- 1/4 tsp paprika
- 1/4 tsp mustard powder
- 1 tbsp of your favorite hot bean paste
- 2 green chilies, de-veined, seeded and chopped

Method:
1. Toss the tiger prawns with salt to season, leave to rest for at least 10 minutes.
2. Heat oil and butter in a non-stick frying pan over medium-high heat. Once butter is melted, add in the minced garlic, minced onions, cumin, coriander, paprika, mustard powder and bean paste. Fry for about 2minutes, making sure not to burn the garlic.
3. Add prawns to the pan and continue frying until prawns begin to turn pink.
4. Add the lightly salted zucchini slices on top of the prawns and then cover the frying pan with a lid. Allow mixture to simmer for 4-5minutes.
5. Remove lid from pan, toss in the crushed cashew nuts and chilies. Give the dish a final toss in the pan before plating.


Naan Bread
This naan bread is made using the exact same recipe I always use. You can find it here. Or also check out my past blog featuring and Indian inspired menu HERE.


Awww... just look at the little dough balls. They look so fluffy and gooey... but I'd best cook them before my penchant for eating tasty looking things results in me contracting yucky tummy bug :P

And now on to the spiciness... the fun stuff, the fish Vindaloo!!


Fish Vindaloo

- 1 1/2 lb white fish fillets (I used cod), cut into large chunks
- Salt
- 6 dried red chilies, crushed
- 10 garlic cloves
- 2 inch ginger root
- 1 inch galangal root
- 2 tsp cumin seeds
- 1 1/2 lb onions, chopped
- 1/4 cup cider vinegar
- 3 tbsp ghee
- 1/2 tsp cinnamon, powder
- 1/2 tsp cumin, ground
- 1/2 tsp coriander, ground
- 1/2 tsp cardamom, ground
- 1/4 tsp paprika
- 1/4 tsp tumeric
- 1/4 tsp mustard, powder
- Salt
- 1 tbsp sugar
- 6 green chilies, seeded, de-veined and chopped
Method:
1. Sprinkle the fish with salt and leave to stand for 10 minutes. Rinse then pat dry. Grind: red chilies, garlic, ginger, cumin seeds and onions to a fine paste with a scant amount of cider vinegar.
2. Heat the ghee and fry the ground paste for a few minutes. Add the fish, season with salt, and fry over a high-heat for 5 minutes.
3. Lower the heat and simmer until the fish is tender. Add the remaining vinegar, sugar, powdered spices and green chilies and simmer until the sauce thickens


And to round the meal out, with a nice earthy carb... Pea Pilau!


Pea Pilau
- 2 tbsp butter
- 1 tbsp oil
- 1 medium onion, sliced thinly
- 2 cloves garlic, minced
- 1/2 tsp cumin
- 1/2 tsp cardamom
- 1/2 tsp coriander
- 1/4 tsp paprika
- 1/4 tsp mustard powder
- 1/4 tsp cinnamon, ground
- 1/2 tsp tumeric
- 1/3 cup shredded coconut, unsweetened
- 2 cups uncooked white rice (you can use basmati)
- 1 cup frozen peas (no need to defrost)
- Salt and pepper to taste
- 2 1/4 cups water + 1/4 cup coconut milk


Method:
1. Place oil and butter in non-stick frying pan over medium-high heat. Once butter melts, add in the garlic and onion. Cook mixture until it is browned and caramalized, then add the 7 spices and the coconut stir mixture continuously over heat for ~ 2 minutes, until it is aromatic.
2. Add in the uncooked rice and mix thoroughly, allowing the spices to coat the rice. Continue cooking over medium heat for 2 more minutes. Add the peas, and then add salt and pepper to taste.
3. Pour the spiced pea-rice-coconut mixture into a rice cooker, cover with the water + coconut milk mixture. Give mixture a gentle stir, set rice cooker on "cook" and leave the cooker to finish the hard work :P
4. Fluff rice with a fork and serve.


Well... that was my the meal I treated my family to for the day! The prepping and cooking all together took me no more than 2 hours! I was really impressed with my ability to manage time, prep the food and get the meal ready to serve by dinner time! (Honestly, I can't believe that the chefs in Hell's Kitchen can't get food out in under an hour :P)

Friday, August 27, 2010

August's Daring Baker's Baked Alaska


I've always wanted to try my hand at making a real baked Alaska. I say real, because I've made a baked Alaska once before... a long time ago in my High School Home Economics class... it didn't turn out so well :P But with this month's Daring Baker challenge asking us bakers to try out hand at this finicky dessert I new I had to have my "A-game". My variation for this DB recipe was to make a banana-rum baked Alaska. The cake base would consist of a brown-butter banana bread pound cake, and the ice cream would be a cinnamon, maple, rum flavor.
The August 2010 Daring Bakers’ challenge was hosted by Elissa of 17 and Baking. For the first time, The Daring Bakers partnered with Sugar High Fridays for a co-event and Elissa was the gracious hostess of both. Using the theme of beurre noisette, or browned butter, Elissa chose to challenge Daring Bakers to make a pound cake to be used in either a Baked Alaska or in Ice Cream Petit Fours. The sources for Elissa’s challenge were Gourmet magazine and David Lebovitz’s “The Perfect Scoop”.

Individual Baked Alaska

Vanilla Ice Cream

- 1 cup (250ml) whole milk
- A pinch of salt
- 3/4 cup (165g) sugar
- 1 vanilla bean, split lengthwise OR 2 tsp pure vanilla extract
- 2 cups (500ml) heavy (approx 35% butterfat) cream

- 5 large egg yolks- 1 tsp pure vanilla extract
- My Variation: substitute 2tsp vanilla with 2tsp rum extract, add 1/2tsp ground cinnamon and 2tsp maple syrupMethod:
1. Heat the milk, salt, and sugar in a medium saucepan until the liquid steams. Scrape out the seeds of the vanilla bean (or extract if using) with a paring knife and add to the milk, along with the bean pod. Cover, remove from heat, and let infuse for an hour. (If making cinnamon-maple ice cream, add in the powder and syrup now!)
2. Set up an ice bath by plac
ing a 2-quart (2 litre) bowl inside a large bowl partially filled with water and ice. Put a strainer on top of the smaller bowl and pour in the cream.
3. In another bowl, lightly beat the egg yolks together. Reheat the milk in the medium saucepan until warmed, and then gradually pour ¼ cup warmed milk into the yolks, constantly whisking to keep the eggs from scrambling. Once the yolks are warmed, scrape the yolk and milk mixture back into the saucepan of warmed milk and cook over low heat. Stir constantly and scrape the bottom with a spatula until the mixture thickens into a custard which thinly coats the back of the spatula.
4. Strain the custard into the heavy cream and stir the mixture until cooled. Add the vanilla extract (1 teaspoon [5ml] if you are using a vanilla bean; 3 teaspoons [15
ml] if you are not using a vanilla bean) and refrigerate until thoroughly chilled, preferably overnight.
5. Remove the vanilla bean and freeze in an ice cream maker. If you don’t have an ice cream maker, you can make it without a machine.
Brown Butter Pound Cake
- 19 tbsp (275g) unsalted (sweet) butter
-- or if making banana brown-butter cake, use 8 tbsp butter and 1/2 cup mashed banana
- 2 cups (200g) sifted cake flour (not self-rising; sifted)
- 1 tsp baking powder- 1/2 tsp (3g) salt
- 1/2 cup (110g) packed light brown sugar
- 1/3 (75g) cup granulated sugar
- 4 large eggs- 1/2 teaspoon pure vanilla extractMethod:
1. Preheat the oven to 325°F/160°C and put a rack in the center. Butter and flour a 9”x9” (23cmx23cm) square pan.
2. Place the butter in a 10” (25cm) skillet over medium heat. Brown the butter until the milk solids are a dark chocolate brown and the butter smells nutty. (Don’t take your eyes off the butter in case it burns.) Pour into a shallow bowl and chill in the freezer until just congealed, 15-30 minutes.3. Whisk together cake flour, baking powder, and salt.
4. Beat the brown butter (if making banana-brown butter cake, add mashed banana now), light brown sugar, and granulated sugar in an electric mixer until light and fluffy, about 2 minutes. Beat in the eggs one at a time, mixing well, and then the vanilla extract.
5. Stir in the flour mixture at low speed until just combined.

6
. Scrape the batter into the greased and floured 9”x9” (23cmx23cm) square pan. Smooth the top with a rubber spatula and rap the pan on the counter. Bake until golden brown on top and when a toothpick inserted into the center comes out clean, about 25 minutes.
7. Cool in the pan 10 minutes. Run a knife along the edge and invert right-side-up onto a cooling rack to cool completely.Meringue (For the Baked Alaska)
- 8 large egg whites
- ½ teaspoon (3g) cream of tartar
- ½ teaspoon (3g) salt
- 1 cup (220g) sugar

Method:
1. Beat the egg whites, cream of tartar, and salt on high speed in an electric mixer until soft peaks form. Beat in the sugar gradually in a slow stream until stiff peaks form.


Assembly Instructions – Baked Alaska
1. Line four 4” (10cm) diameter tea cups with plastic wrap, so that plastic wrap covers all the sides and hangs over the edge. Fill to the top with ice cream. (For my banana-rum baked Alaska, I sliced pieces of banana and layered it on top of the ice cream after I pressed it into the bowls/cups)

2. Level the top of the brown butter pound cake with a serrated knife or with a cake leveler. Cut out four 4” (10cm) diameter circles from the cake. Discard the scraps or use for another purpose.

3. Make the meringue (see above.)

4. Unwrap the ice cream “cups” and invert on top of a cake round. Trim any extra cake if necessary.
5. Pipe the meringue over the ice cream and cake, or smooth it over with a spatula, so that none of the ice cream or cake is exposed. Freeze for one hour or up to a day.

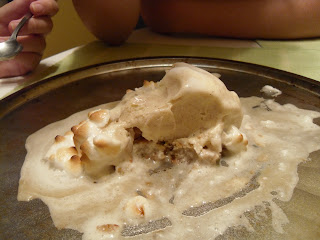
I attempted to use my hand-held long-ended lighter to brown the edges of the meringue but I suppose the flame wasn't hot enough for the browning effect to be properly seen. Note to self: invest in a good quality hand-held torch (justify the need for one by making creme brulee and baked Alaskas at least 2 times a week :P). So, with the failed attempt at browning with my lighter, I decided to just put the baked Alaska in the oven as the recipe had described. In the end, there was a little bit of a mess on my pan. I must have missed a spot during the meringue piping process, leaving a part of the ice cream exposed. This resulted in a little bit of a melty, leakage of ice cream through the meringue layer... but, thankfully, I pulled the dessert out of the oven before any real damage was done. And my sisters, my parents and I decided to just enjoy the dessert communally, straight off the pan. I cannot describe the taste, only that it was deliciously sweet, cakey and fluffy (thanks to the meringue). I will definitely be trying this recipe again.
Mmm... the aftermath of the melty, fluffy, sweet dessert! What a nice treat on a warm summer's day.