Monday, December 26, 2011

Berry Pudding Cake


I think the thing that motivates me most when it comes to baking goodies is when I get to make them for other people and share my love of food with them. If it were just up to cooking for myself, I'd probably just be living off of canned soup and sandwiches... actually, scratch that. It'd probably just be tinned soup and bread... sandwiches would take too much effort :P But anyways, it was because I was scheduled to work on Christmas Eve and Christmas Day (night shifts... so, I still had celebratory time with the family, don't worry) that I was lured back into the kitchen to make treats to share at our staff potluck! So, I decided on something semi-healthy... a berry pudding cake. Nom nom nom.

Berry Pudding Cake

Ingredients:
- 4 cups of mixed berries
- 1/4 cup sugar
- 4 eggs
- 1 tbsp olive oil
- 1 tbsp orange peel
- 1 tsp vanilla
- 1 cup all-purpose flour
- 1 tsp baking powder
- 1/4 tsp salt
- 1 cup sugar
- Powdered sugar to decorate

Method:
1. In a 9-by-3inch dish, add in the berries in an even layer. Sprinkle evenly with 1/4 cup sugar
2. In a separate mixing bowl, whisk the eggs and add in the olive oil, orange peel, vanilla and 1 cup of sugar.
3. Add in the flour, baking powder and salt. Continue to mix until well encorporated.
4. Pour batter evenly over the berries and bake in a 350degree oven for 35-40minutes.
5. Cool and sprinkle with confectioner's sugar. Slice into squares and serve warm or cold.

This was a big hit! I loved it! It was actually really easy and the presentation was simple, yet a real stunner. Definitely a recipe I'll be keeping in my good-books ^^

Sunday, December 18, 2011

Red Velvet Cupcakes


It seems like I'm just always apologizing for stepping away from my food blog for months at a time. I've actually noticed that a lot of the blogs I follow have done the same... I guess it's just that life has taken hold of all of us and we've not had the opportunity to spend as much time in the kitchen as we once did. I'm hoping that soon enough I'll make the kitchen my nesting quarters again, but for now I really have no idea when I'll be posting my baking creations. It's just a spur-of-the-moment kind of thing for me at this point in time. Don't ask me why I decided to wake up this morning and make Red Velvet Cupcakes. Perhaps it was the thought of a future wedding that got me thinking... "I've always wanted Red Velvet Cake for my wedding cake. It's simple, none of that fancy-schmancy custard filling, with multiple layers of cake + fruit preserve + frosting all with a fondant exterior." I just like the plain, the ordinary, the non-showy... that's me. And then I thought to myself how I'd always wanted to bake my own wedding cake or make a cupcake-tree display (as it saves on the messy and awkward hacking up of the cake with a knife). Call me crazy... all my friends have; stating, "You're going to have enough to worry about in terms of the wedding; taking on the task of making the cake... girl, you're insane!" Maybe I am, but I think it'd be cool to say that I made my own wedding cake... either it says "Hey, this girl's really talented" or "Hey, this girl's ridiculously frugal"; honestly, I could live with either remark. Ain't nowt wrong with being frugal.

Anyways... enough with the rambling banter. I'm sure you all just want the recipe. So here it is!

Red Velvet Cupcakes
Yields 8 cupcakes

Ingredients:
1 1/4 cup all purpose flour
1/2 tsp salt
1 tbsp Dutch-processed cocoa powder
1/4 cup butter
3/4 cup granulated sugar
Red food coloring (I use Wilton's concentrated coloring paste, as you get a nice deep color without needing to use loads of coloring)
1 egg
1/2 tbsp vanilla extract
1/2 cup buttermilk
1/2 tsp baking soda
1/2 tsp white vinegar

Method:
1. Set the oven to 350degrees. Sift together the flour, salt and cocoa powder.
2. In a separate bowl, cream the butter and sugar until fluffy. Add in the egg and vanilla, beating until smooth. Add in enough red food coloring to make a deep red color.
3. Alternately, add in the flour mixture and buttermilk mixture to the butter mixture (In thirds, starting with the milk and ending with the flour). Stir until just combined.
4. Pour batter into prepared muffin tins and bake for ~25minutes, or until toothpick inserted in the center comes out clean.
5. Remove from oven, place on cooling rack and then ice with your favorite cream cheese frosting.

My Cream Cheese Frosting Recipe

Ingredients:
- 1/2 cup cream cheese
- 3 tbsp butter
- 1 1/2 cups of confectioner's sugar

Method:
1. Cream the butter and cream cheese together.
2. 1/2 cup at a time, add in the sugar.
3. Place in piping bag and use to decorate.


It actually felt really good to get back into the kitchen after such a long hiatus. Well, I have actually been "in the kitchen" a lot but y'know what I mean... I haven't ventured to make anything new lately, or gotten around to blogging about my cooking adventures. I'll try and amend that problem though. Bye for now, peeps!

Thursday, October 13, 2011

Caramel-filled Crunchie Cupcakes

So, I realize it's been far too long since I last posted a quality recipe post on my blog. I apologize deeply for this... not only to my followers, but to myself. I don't know what's come over me... I really don't. I'd like to blame everything else that's been going on in my life for interrupting my passion for baking and cooking, but that'd just be a cop-out. Sure, work's been stressful (since I have to make up for all of the shifts I swapped to go on my holidays) but who hasn't had to deal with hectic work schedules every now and then. Yes, maybe I've been having some relationship issues on my mind but again, I'm not the only one. So, today I decided to kick myself in the butt and actually make something.

This recipe's for my friend James. It's his birthday tomorrow and he's all sad about being somewhere where he knows very few people, but mostly he's all down about being a year older. I say, "Heck to that! You're only as old as you feel!" And he has got to be the most fun-loving, energetic and just plain wonderful person I have the pleasure of knowing :D

For this recipe, I decided to use one of my favourite chocolate bars and turn it into a cupcake. I dunno, cupcakes seem to be all the rage nowadays. What with all these gourmet bakeries specializing in just cupcakes, and shows like Cupcake Wars on the Food Network getting so much attention. So, I thought I'd join in with the crowd.

Caramel-filled Crunchie Cupcake

Cupcake Ingredients:
- 2 cups flour
- 1 1/2 tsp baking powder
- 1/4 tsp each baking soda and salt
- 1/2 cup butter
- 3/4 cup sugar
- 1/2 cup brown sugar, packed
- 3 eggs
- 1 tbsp molasses (or corn syrup if unavailable)
- 1 1/2 tsp vanilla essence
- 1/2 cup buttermilk
- 1/4 cup whole milk

Caramel Drizzle Ingredients:
- 1 cup sugar
- 2 tbsp corn syrup
- 1 cup heavy cream

Caramel Filling:
- 1/2 cup butter
- 1 cup sugar
- 1 tbsp corn syrup
- 1/2 cup whipping cream

Whipped Cream Ingredients:
- 1 1/2 cup whipping cream
- 1/2 cup powdered sugar

Garnish/Other Ingredients:
- 6 Crunchie Chocolate Bars (cut 18 big-chunks for topping the cupcakes; and then roughly chop the remaining bars)

Cupcake Method:
1. Preheat oven to 350degrees, and prepare the cupcake tins (grease tins well, or use liners)
2. Combine flour, baking powder, baking soda and salt. Set aside.
3. Beat butter until fluffy, add in the sugars and when combined, slowly add in one egg at a time. Add in molasses/corn syrup and vanilla.
4. Alternately, add the flour mixture and the buttermilk + milk into the butter mixture. Continue to mix until well combined.
5. Add in the roughly chopped pieces of Crunchie, and pour batter into the prepared tins (~2/3 full) and bake for 15-20minutes.
6. Remove cakes from oven, cool and slice in half.

Caramel Drizzle Method:
1. Place sugar in a heavy bottomed sauce pan with the corn syrup. Heat pan on medium-high and wait for sugar to melt. Once sugar mixture has turned a dark amber, remove from heat and add in the cream. Allow to cool and use for drizzling the cupcakes when ready.

Caramel Filling Method:
1. Melt butter in a saucepan, add in the sugar and corn syrup. Stir continuously over medium heat for 6-8minutes, or until mixture turns a deep amber.
2. Pour in the cream, and continue to cook for 1-2minutes. Remove from heat and allow to cool to a spreadable consistency.

Whipped Cream Frosting/filling:
1. In a metal bowl, whip the whipping cream until fluffy and firm. Add in the powdered sugar and mix well. Set aside for cupcake assembly.

Assembly:
1. Take top off of a halved cupcake.
2. Spread on a thin layer of whipped cream frosting, followed by a layer of caramel filling.
3. Place top of cupcake back on.
4. Top cupcake with a heaping tbsp of whipped cream frosting. Drizzle on the caramel sauce, sparingly; and top with a chunky piece of Crunchie.

It actually felt really good going back into the kitchen to make something more than a packet of noodles, tea, a sandwich or some sort of frozen dinner. I missed the feeling of being creative and getting my hands dirty; putting effort and love into making dishes is a lot of fun... but I think for a while there, it was becoming more of a chore to up-keep this blog than it was a joy. Hopefully, I'll get back into the groove... and if ever you're worried about whether or not I'm actually still around, check out my tumblr :P I'll probably be on that.

Tuesday, August 30, 2011

The Wizarding World of Harry Potter (more vacation stuffs)

Yes, I am a Harry Potter fan... but not so much of a fan that I'm enraged that I did not get my Pottermore welcome email yet (I'm just a little bit disappointed). But all that aside, The Wizard World of Harry Potter was ridiculously amazing. When I first heard that we would be visiting Islands of Adventure while in Florida, I knew that TWWoHP was the first place I wanted to visit...
What can I say about it? Words do little to describe the atmosphere. They played HP music as you walked through Hogsmeade, and Hogwarts Castle (which was a ride) was beautifully crafted... so much so that it only felt like we waited 30minutes (and not 1hour and 20minutes) to enjoy the ride. The Hogwarts express was very majestic, and I just wanted to hop on and have it take me away to wizarding school :P

What I found hilarious was how they revamped the old unicorn ride to make it the "Flight of the Hippogriff" and the Dueling Dragons ride was redesigned to be the "Dragon Challenge" between the Chinese Fireball and a Hungarian Horntail... oh Universal Studios, way to use existing rides to save money on having to build new Harry Potter themed ones.

One of the things I knew I had to try while at TWWoHP was the Butterbeer. I've come across so many recipes for it online that I really wanted to try the real thing before I ever attempted to make my own. I bought it at the Three Broomsticks, and chose the frozen one of the cold. It was amazing! Sort of like a slightly fizzy, caramel, ginger ale-y slushy with a creamy foam on top... the description makes it sound awful I know, but it was heavenly (and just typing about it is making me want one right now!)

And of course no trip to TWWoHP is complete without buying some sweets. I have terrible sweet-tooth and that coupled with my love for Harry Potter meant that of course I would have to buy a chocolate frog (even though they were $10!!!). I really bought it for the wizard card that was inside and then when I opened it and found Helga Hufflepuff I was rather disappointed and started eating the solid hunk of frog-shaped chocolate because I really wanted Godric Gryffindor. Somehow my sister convinced my dad to buy her one too... but she got Rowena Ravenclaw :( Anywho... I'll leave you to drool over pictures of sweets :P If I have time I'll probably finish up my vacation-related posts with some pictures of the cruise!!

Friday, August 26, 2011

Wow... it's been far too long.


I'm awful, I know... things have just been happening and I haven't had the time to bake or cook anything new as of late. It's just been the same old, same old stuff I've been whipping up... I guess that's the trouble with living on your own. The whole "loving to cook for others" drive just isn't there T^T. And no, it's not a pity party so don't feel bad for me :P Good things have been happening!

I recently returned from a 2 week trip to Florida, which included a cruise from Miami to Key West and then to Cozumel, and let me tell you... it was a BLAST!

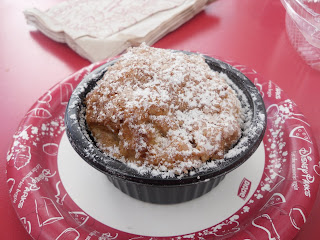
Florida's weather was decent (and since my family had been there before, we knew what to expect) and by decent, I mean that it was the same as always... hot, humid and with the expected thunder-shower every afternoon. We spent one day park-hopping between the Magic Kingdom and Disney's Hollywood Studios... enjoyed the Tower of Terror (as always) and the Rocking Rollercoaster, and a lot of other great shows. Food was pretty much your standard theme-park grub, nothing out of this world except for this Banana pudding I bought from the Main Street Bakery... it was perfect. Not too sweet, not too dry or sticky and it had a nice crunchy crystallized sugar-layer on the top as well as powdered sugar.

Banana Bread-pudding

Chili-dog from Casey's Corner in Disney's Magic Kingdom

We rounded out the day by having dinner at Steak 'n Shake, because they're supposedly well known for their steak-burgers and milk-shakes. The burgers were okay (there's very little that can be done to a beef burger to make it "outstanding")... but their variety of milk-shake flavors was impressive. We tried the cookie dough milk-shake, which was more of a crushed-cookie shake... and didn't actually have real pieces of cookie dough (which disappointed me). But it tasted good, and had a nice consistency (not triple-thick like a McD's shake, but nice a smooth).

Cookie Dough Milk-shake

Mac & Cheese Pizza!? ... only in the US of A :P

I don't know if I (or anyone) could survive living off of the foods that are served in the touristy area of Florida... everything's so grande in size and everything is covered in cheese O_O.

The following day involved a lot of outlet shopping (and a lot of money spending), finished off with a "buffet" of pizza at Cici's. I don't recommend the buffet, as their "salad bar" looked more like a bowl of lettuce with 6 options for garnish and 3 options for dressing... and while their pizza is good, there's really only so much pizza you can eat before you feel gross. However, if you're just order a pizza then Cici's is pretty good.

The following day we visited The Wizarding World of Harry Potter!!! More to come...

Friday, June 10, 2011

White Chocolate and Whopper Blondies

Mmmm.... my sweet tooth kicked in this afternoon and since I had some white chocolate and some Robin's Egg candies from Easter I decided to use them up to make a tasty blondie treat. I'm sure you could use macadamia nuts too and make a yummy white-chocolate + macadamia nut bar, but since my sis is allergic to tree nuts I opted against it. The blondies were really good; not too sweet and not too cakey. Although I would probably have baked them a little less, so they'd be a bit more moist... but I had gotten distracted from my baking because my sister's needed to be picked up from school. Oh well, I'll probably whip these up again soon.


White Chocolate Whopper Blondies

Ingredients:
- 1 1/2 cup butter, softened
- 1 1/2 cup light brown sugar
- 2 eggs
- 1 tbsp vanilla extract
- 3 cups flour
- 1 tsp baking powder
- 1/2 tsp salt
- 1 bar of your favorite white chocolate, coarsely chopped
- 1/2 cup Whopper candies (I used Robin's Egg Whoppers), crushed

Method:
1. Cream together the butter and brown sugar
2. Add eggs and vanilla to the butter mixture and continue mixing.
3. Sift flour, baking powder and salt together in a separate bowl.
4. Add the dry ingredients to the wet, and mix until just combined.
5. Fold in the chopped chocolate and the Whopper candies.
6. Pour mixture into a 9x9 baking pan and bake at 350degrees for 30-35minutes, until just set and still moist.
7. Slice and serve!


Wednesday, June 01, 2011

Spiced Steak

For lack of a better title for this recipe I've just decided to call it spiced steak. The fusion of flavors in this dish make it impossible for me to pinpoint what type of cuisine it is; some-what Indian inspired, some-what Mediterranean, and somewhat Szechuan inspired... well, whatever it is... it's sure tasty.

Spiced Steak (for one)


Ingredients:
- 1 piece of outside round steak
- 2 gloves garlic, minced
- 1 tsp of your favorite chili paste (I used a hot-pot soup chili paste)
- 1/2 tsp coriander seeds, crushed
- 1/2 tsp cumin
- 2 tbsp soy sauce
- 2 tbsp red cooking wine
- 1 tbsp rice wine vinegar
- salt and pepper to taste
- 2 tbsp canola oil

Method:
1. Create marinating sauce by combining the garlic, chili paste, cumin, coriander, soy sauce, cooking wine and vinegar.
2. Rub the steak with salt and pepper and then place in a bowl with the marinade. Coat the steak with the sauce and allow to sit for at least 1 hour; or overnight is possible.
3. Preheat the oven to 450 degrees.
4. Heat the oil in an oven-proof pan. Once oil has reached appropriate temperature, place steak in the pan and sear on either side for about 30 seconds.
4. Pour in the remaining marinade and place pan in the oven to finish cooking the steak (~10minutes for a nice medium). Just before serving, slice the meat on an angle and against the grain.
5. Serve with rice, salad, potatoes, fries or whatever else you enjoy!

Since I did most of the prep for this the night before, it was really simple to finish off this dish for a nice and easy lunch. I served mine with a simple salad and some oven-baked fries, and the dish was perfect. I might try this recipe with another cut of beef next time; while the outside round was relatively flavorful, the lack of marbling within the meat made it slightly tough to carve (hence the reason I pre-cut the meat before serving)... well, maybe next time when I can afford a prime-cut of beef I'll whip up this recipe once more ^__^


Monday, May 30, 2011

Simple Caramel Spread

I didn't really have anything to put on my toast this morning, so I thought I'd make a sweet-spread to make my breakfast just that much more amazing. I have an incredible sweet-tooth, and would probably eat straight sugar if it weren't diabetes inducing and teeth-rotting. This recipe is really simple, takes only 3 ingredients and roughly 10-12minutes to make; good for those mornings when you're in a hurry to get out the door.

Simple Caramel Spread


Ingredients:

- 1/3 cup granulated sugar

- 2 tbsp cream cheese

- 1 tbsp butter


Method:

1. Place sugar, in an even layer, in a heavy-bottom saucepan over medium-high heat.

2. Cook over heat until sugar begins to melt. Do not stir, simply swirl the pan in order to ensure all the sugar melts.

3. Once all the sugar is melted, remove from heat and add in the cream cheese. Stir until mixture becomes smooth and no lumps remain, then add in the butter and do the same.

4. Allow to cool for 1-2 minutes and then serve.


This tasted just like Werther's Originals candy in a smooth paste-form; and after making this, I couldn't help but lick the spoon and attempt to scrape every last bit of the spread from inside the pan... mmmm, it was sooooo sweet and tasty.

Sunday, May 29, 2011

Braised Salmon with Orange Fennel Cream


After watching Top Chef Canada I was inspired to do some cooking. I know I haven't been consistently blogging on you my precious food-blog but I've had reasons for not doing so... basically, this past month I haven't really had any time to whip up any dishes that I haven't blogged about before. What are the reasons? I dunno... lack of creativity, lack of time, lack of money to pay for good quality ingredients to cook with? Potentially all of the above :P

But anyways, I decided that today would be different. I was going to make something delicious, relatively nutritious and something that would get my passion for cooking all fired up again. So, here is what resulted...

Braised Salmon with Orange Fennel Cream

Ingredients:
- 4 salmon fillets, seasoned with salt and pepper for at least 30mins
- 1 medium onion, sliced thinly
- 3 tbsp canola oil
- 3 cloves of garlic, minced
- 3 tbsp chopped onion
- 2 tbsp fennel seeds
- 1 tsp dried parsley (or 1 tbsp fresh parsley)
- 2 tbsp butter
- 3 tbsp flour
- 1/2 cup orange juice
- 1/2 tbsp vinegar
- 1 cup milk
- Salt and Pepper to taste

Method:
1. Heat oil in a large frying pan and add in the garlic, chopped onion, fennel seeds and parsley. Cook over medium-high heat until fragrant and onions begin to caramelize.
2. Place the salmon fillets in the pan, flesh-side down. Sear this side for about 1 minute, then turn over. Ensure all fillets are evenly spaced in the pan, or cook 2 at a time to avoid over-crowding. Remove the fish from the pan and set aside.
3. Add in the butter, stirring until well incorporated with the pan drippings. Place the sliced onions on the bottom of the pan, then return the salmon back to the pan, laying them on-top of the onion slices.
4. Mix the orange juice and vinegar and pour over the fish, then cover the pan for 3-4 minutes to allow the salmon to braise. Watch the fish closely, and ensure that you do no cook it until too dry.
5. Once cooked, remove salmon from the pan and set aside. Make a roux by adding flour to the pan drippings, and mixing it into a smooth paste. Slowly pour in the milk while continuing to stir the paste and cook the sauce over medium heat until thick (it should coat the back of a wooden spoon). Add salt and pepper to taste and serve.

I decided to serve my fish on a bed of garlic-parsley mashed potatoes, with a small dollop of salad greens. The sauce was ridiculously good, and I think it would even have made a nice pasta sauce. Next time I will definitely make this and eat it with some penne and seafood or something along those lines.
Here's a picture of the salmon without all the frou-frou sauce and salad :P

Thursday, May 26, 2011

Sorry for the lack of posts...

As the title says, I'm soooooo sorry for not keeping this blog up to date recently. I've just been really busy with a lot of family issues, relationship stuff and work related stressors. But don't worry, I'm still here and hopefully I'll be back to my good ol' baking/cooking self in the months to come.

I think I just need to take a breather, and then I'll come back refreshed and good as new :)

Sunday, April 24, 2011

Yummy Drop Cookies


I was feeling a little bit down as my football team won't mathematically be able to be No. 1 on the Premier League table, so I decided to whip up a batch of cookies. I had originally intended to just eat the cookie dough raw... but then thought that this was probably just a depression induced thought of stupidity that I'd later regret. So, I completed the baking process by throwing the dough into the oven and voila! I ended up with a lovely batch of cookies that I could share with my colleagues at work... yes, sharing the love is much better than wallowing in the sadness and scraping dough out of a mixing bowl.

Easy Drop Cookies


Ingredients:
- 1 1/4 cup flour
- 1/4 tsp salt
- 1/2 tsp baking powder
- 1/4 tsp baking soda
- 1/2 cup butter
- 1/2 cup packed brown sugar
- 1 egg
- 1 tsp vanilla
- 2 tbsp cream cheese
- Mix-ins of your choice: I used 1/3 cup desiccated coconut, 1/4 cup flax seeds and 1/3 cup rolled oats

Method:
1. Cream the butter and sugar together until fluffy. Add in the egg, vanilla and cream cheese.
2. In a separate bowl, sift together the flour, salt, baking powder and baking soda.
3. Add the dry ingredients to the wet ingredients and mix until just combined.
4. Throw in the mix-ins, stir until distributed thoroughly and then placed rounded tablespoons of dough onto a prepared baking sheet. Flatten dough mounds slightly with the back of floured fork.
5. Bake at a 350degree oven for 15-20minutes.

These turned out light and airy, not too dense and chewy. Next time I make them I'll probably throw in some chocolate or butterscotch chips or crushed whoppers... mmmmm. Well, now I don't feel so down ^____^

Thursday, April 07, 2011

Yogurt Berry Bread

Whipped up this delightfully fruity bread for sharing with my co-workers on a night shift. Seriously, night shifts will be the end of me... don't get me wrong, I love them. But for some reason I always end up working with people who seriously love to order take-aways to gnosh on through the 12 hour shift. I tried to be all healthy by bringing this yogurt berry loaf, but then we all ended up pitching in for pizza, someone brought chips, another person brought brownies and someone else brought pop... o_O But anyways, here's the recipe for my somewhat "healthy" contribution to the food fair.

Yogurt Berry Bread

Yields 1 loaf

Ingredients:
- 2 cups flour
- 1/2 tsp baking powder
- 1/4 tsp salt
- 1 egg
- 1 1/4 cup sugar
- 100g of your favorite yogurt
- 1/3 cup margarine
- 1/4 cup milk
- 1/2 cup berries

Method:
1. Sift together the flour, baking powder and salt.
2. In a separate bowl, cream the sugar and margarine until fluffy. Add in the egg, mixing until well combined; then, add in the yogurt.
3. Add 1/3 of the dry ingredients to the wet and mix well. Now alternate with 1/2 of the milk.
4. Add another 1/3 of the dry ingredients, alternate again with the milk and finish off with the remaining dry ingredients. Add in the berries and continue mixing thoroughly.
5. Pour into a prepared rectangular loaf pan and bake at 350degrees for 45-60minutes, or until toothpick inserted comes out clean.

Sunday, March 27, 2011

Daring Bakers' Challenge: Yeasted Meringue Coffee Cake


I had to make this challenge early, because guess what? I'm going on another little trip. Yup, it was a spur-of-the-moment thing, as one of my friends asked me if I wanted to go with her to Las Vegas. After my trip to London, I realized that these little getaways were just what I needed to stay refreshed and not feel completely over-worked... so I said yes, and now I'm packing for the flight that leaves on the 27th. Vegas for 5 days!! WOHOO!! But now, on to the recipe.

The March 2011 Daring Baker’s Challenge was hosted by Ria of Ria’s Collection and Jamie of Life’s a Feast. Ria and Jamie challenged The Daring Bakers to bake a Yeasted Meringue Coffee Cake.

Filled Meringue Coffee Cake

Ingredients
For the yeast coffee cake dough:

- 4 cups flour
- ¼ cup sugar
- ¾ tsp salt
- 1 package (2 ¼ tsp) active dried yeast
- ¾ cup whole milk
- ¼ cup water
- ½ cup unsalted butter, room temperature
- 2 large eggs, room temperature

For the filling:

- 1 cup chopped pecans or walnuts
- 2 tbsp granulated sugar
- ¼ tsp ground cinnamon
- 1 cup coarsely chopped chocolate

For the meringue:

- 3 large egg whites, room temperature
- ¼ tsp salt
- ½ tsp vanilla
- ½ cup sugar


Directions:

Prepare the dough:

1. In a large mixing bowl, combine 1 ½ cups (230 g) of the flour, the sugar, salt and yeast.

2. In a saucepan, combine the milk, water and butter and heat over medium heat until warm and butter is just melted.

3. With an electric mixer on low speed, gradually add the warm liquid to the flour/yeast mixture, beating until well blended. Increase mixer speed to medium and beat 2 minutes. Add the eggs and 1 cup (150 g) flour and beat for 2 more minutes.

4. Using a wooden spoon, stir in enough of the remaining flour to make a dough that holds together. Turn out onto a floured surface and knead the dough for 8 to 10 minutes until the dough is soft, smooth, sexy and elastic, keeping the work surface floured and adding extra flour as needed.

5. Place the dough in a lightly greased bowl, turning to coat all sides. Cover the bowl with plastic wrap and a kitchen towel and let rise until double in bulk, 45 – 60 mins.


Prepare your filling:

1. In a small bowl, combine the cinnamon and sugar for the filling if using. You can add chopped nuts to this if you like, but I find it easier to sprinkle on both the nuts and the chocolate separately.


Make the meringue:
1. Do this once the dough has doubled. In a clean mixing bowl beat the egg whites with the salt, first on low speed for 30 seconds, then increase to high and continue beating until foamy and opaque. Add the vanilla then start adding the ½ cup sugar, a tablespoon at a time as you beat, until very stiff, glossy peaks form.


Assemble the Coffee Cakes:

1. Line 2 baking/cookie sheets with parchment paper.

2. Punch down the dough and divide in half. On a lightly floured surface, working one piece of the dough at a time (keep the other half of the dough wrapped in plastic), roll out the dough into a 20 x 10-inch rectangle. Spread half of the meringue evenly over the rectangle up to about 1/2-inch from the edges. Sprinkle half of your filling of choice evenly over the meringue (ex: half of the cinnamon-sugar followed by half the chopped nuts and half of the chocolate chips/chopped chocolate).

3. Roll up the dough jellyroll style, from the long side. Pinch the seam closed to seal. Very carefully transfer the filled log to one of the lined cookie sheets, seam side down. Bring the ends of the log around and seal the ends together, forming a ring, tucking one end into the other and pinching to seal.

4. Using kitchen scissors, make cuts along the outside edge at 1-inchintervals. Make them as shallow or as deep as desired but don’t be afraid to cut deep into the ring.

5. Repeat with the remaining dough, meringue and fillings.

6. Cover the 2 coffee cakes with plastic wrap and allow them to rise again for 45 to 60 minutes.

7. Preheat the oven to 350°F (180°C).

8. Brush the tops of the coffee cakes with the egg wash. Bake in the preheated oven for 25 to 30 minutes until risen and golden brown. The dough should sound hollow when tapped.

9. Remove from the oven and slide the parchment paper off the cookie sheets onto the table. Very gently loosen the coffee cakes from the paper with a large spatula and carefully slide the cakes off onto cooling racks. Allow to cool.

10. Just before serving, dust the tops of the coffee cakes with confectioner’s sugar as well as cocoa powder if using chocolate in the filling. These are best eaten fresh, the same day or the next day.


This recipe is definitely a winner! It was ooey-gooey, chocolatey and moist. I have a serious addiction to bread, and since this recipe allowed for me to practice baking with yeast and improve my bread making skills I was very happy to whip this up. All in all, this Daring Bakers' Challenge was pretty easy to complete, and a perfect light snack for tea.


Saturday, February 26, 2011

Daring Bakers: February 2011


Sorry I'm posting late, but I didn't get around to making my Daring Bakers recipe until I returned from my trip to London. I spent 10 days in that amazing city and, although I've just come home, I want to go back already. I can finally check some things off my "to-do" list, such as... go to London, watch an Arsenal game in a London pub, and watch an Arsenal game at the Emirates. But all that aside, let's move on to this month's Daring Bakers challenge.

Blog-checking lines: The February 2011 Daring Bakers’ challenge was hosted by Mallory from A Sofa in the Kitchen. She chose to challenge everyone to make Panna Cotta from a Giada De Laurentiis recipe and Nestle Florentine Cookies.

Vanilla Panna Cotta


Ingredients

1 cup (240 ml) whole milk
1 tablespoon (one packet) (15 ml) (7 gm) (¼ oz) unflavored powdered gelatin
3 cups (720 ml) whipping cream (30+% butterfat)
1/3 cup (80 ml) honey
1 tablespoon (15 ml) (15 gm) (½ oz) granulated sugar
pinch of salt

Directions:

  1. Pour the milk into a bowl or pot and sprinkle gelatin evenly and thinly over the milk (make sure the bowl/pot is cold by placing the bowl/pot in the refrigerator for a few minutes before you start making the Panna Cotta). Let stand for 5 minutes to soften the gelatin.
  2. Pour the milk into the saucepan/pot and place over medium heat on the stove. Heat this mixture until it is hot, but not boiling, about five minutes. (I whisk it a few times at this stage).
  3. Next, add the cream, honey, sugar, and pinch of salt. Making sure the mixture doesn't boil, continue to heat and stir occasionally until the sugar and honey have dissolved 5-7 minutes.
  4. Remove from heat, allow it to sit for a few minutes to cool slightly. Then pour into the glass or ramekin.
  5. Refrigerate at least 6 hours or overnight. Add garnishes and serve.

Coffee G
elee

Ingredients:
2 cups (480 ml) good quality brewed coffee
1/4 cup (60 ml) hot water + 2 tablespoons (30 ml) cold water
1/2 cup (120 ml) (115 gm) (4 oz) granulated sugar
1½ teaspoons (7½ ml) (3½ gm) (1/8 oz) unflavored powdered gelatin
2 teaspoons (10 ml) vanilla extract

Directions:

  1. Place granulated sugar and 1/4 c. hot water in a small saucepan. Bring to a boil, stir until the sugar has dissolved.
  2. Sprinkle gelatin over 2 Tablespoons cold water and let it soften 2 minutes or so.
  3. Stir the coffee, sugar, hot water, and vanilla into a small metal bowl, add gelatin mixture and stir well until gelatin has dissolved. If pouring over Panna Cotta, be sure that this mixture is no longer hot, it will melt Panna Cotta if it is, let it come to room temperature.


Nestle Florentine Cookies

Ingredients:
2/3 cup (160 ml) (150 gm) (5.3 oz) unsalted butter
2 cups (480 ml) (160 gm) (5 2/3 oz) quick oats
1 cup (240 ml) (230 gm) (8 oz) granulated sugar
2/3 cup (160 ml) (95 gm) (3⅓ oz) plain (all purpose) flour
1/4 cup (60 ml) dark corn syrup
1/4 cup (60 ml) whole milk
1 tsp (5 ml) vanilla extract
pinch of salt
1½ cups (360 ml) (250 gm) (9 oz) dark or milk chocolate

Directions:

  1. Preheat oven to moderately hot 375°F (190°C) (gas mark 5). Prepare your baking sheet with silpat or parchment paper.Melt butter in a medium saucepan, then remove from the heat.
  2. To the melted butter add oats, sugar, flour, corn syrup, milk, vanilla, and salt. Mix well. Drop a tablespoon full, three inches (75 mm) apart, onto your prepared baking sheet. Flatten slightly with the back of your tablespoon, or use a spatula.
  3. Bake in preheated oven for 6-8 minutes, until cookies are golden brown. Cool completely on the baking sheets.
  4. While the cookies are cooling melt your chocolate until smooth either in the microwave (1 1/2 minutes), or stovetop (in a double boiler, or a bowl that fits atop a saucepan filled with a bit of water, being sure the water doesn't touch the bottom of the bowl).
  5. Peel the cookies from the silpat or parchment and place face down on a wire rack set over a sheet of wax/parchment paper (to keep counters clean).
  6. Spread a tablespoon of chocolate on the bottom/flat side of your cookie, sandwiching another (flat end) cookie atop the chocolate.
Both the panna cotta with the coffee gelee and the florentine cookies were delicious. The cookies were wonderfully buttery and crisp, and the panna cotta was lusciously rich and creamy. I really enjoyed these comforting dessert, especially after watching the Arsenal v. Birmingham Carling Cup match as it took some of the sting away *sniff*, if you stay up-to-date with association football you'll know what I'm talking about, otherwise... sorry for bugging ya. Well, until next month's challenge ^_^ (or sooner if I find I have some free time to do some baking).

Thursday, January 27, 2011

Daring Bakers Challenge: Biscuit Joconde Imprime/Entremet


The January 2011 Daring Bakers’ challenge was hosted by Astheroshe of the blog accro. She chose to challenge everyone to make a Biscuit Joconde Imprime to wrap around an Entremets dessert.

My version is a vanilla sponge, filled with berries and a banana custard filling.

Joconde Sponge

YIELD: Two ½ size sheet pans or a 13” x 18” (33 x 46 cm) jelly roll pan

Ingredients:
- ¾ cup almond flour/meal
- ½ cup + 2 tbsp confectioners' sugar
- ¼ cup cake flour
- 3 large eggs
- 3 large egg whites

- 2½ tsp white granulated sugar or superfine sugar
- 2 tbsp unsalted butter, melted

Directions:

  1. In a clean mixing bowl whip the egg whites and white granulated sugar to firm, glossy peeks. Reserve in a separate clean bowl to use later.
  2. Sift almond flour, confectioner’s sugar, cake flour. (This can be done into your dirty egg white bowl)
  3. On medium speed, add the eggs a little at a time. Mix well after each addition. Mix until smooth and light. (If using a stand mixer use blade attachment. If hand held a whisk attachment is fine, or by hand. )
  4. Fold in one third reserved whipped egg whites to almond mixture to lighten the batter. Fold in remaining whipped egg whites. Do not over mix.
  5. Fold in melted butter.
  6. Reserve batter to be used later.

Patterned Joconde-Décor Paste

YIELD: Two ½ size sheet pans or a 13” x 18” (33 x 46 cm) jelly roll pan


Ingredients
- 14 tbsp unsalted butter, softened
- 1½ cups + 1½ tbsp confectioners' sugar
- 7 large egg whites
- 1¾ cup cake flour

- Food coloring gel, paste or liquid

Directions:

  1. Cream butter and sugar until light and fluffy (use stand mixer with blade, hand held mixer, or by hand)
  2. Gradually add egg whites. Beat continuously.
  3. Fold in sifted flour.
  4. Tint batter with coloring to desired color, if not making cocoa variation.

Preparing the Joconde- How to make the pattern:

  1. Spread a thin even layer of décor paste approxim ately 1/4 inch (5 millimeter) thick onto silicone baking mat with a spatula, or flat knife. Place mat on an upside down baking sheet. The upside down sheet mak es spreading easier with no lip from the pan.
  2. Pattern the d̩cor paste РHere is where you can be creative. Make horizontal /vertical lines (you can use a knife, spatula, cake/pastry comb). Squiggles with your fingers, zig zags, wood grains. Be creative whatever you have at home to make a design can be used. OR use a piping bag. Pipe letters, or polka dots, or a piped design. If you do not have a piping bag. Fill a ziplock ba g and snip off corner for a homemade version of one.
  3. Slide the baking sheet with paste into the freezer. Freeze hard. Approx 15 minutes.
  4. Remove from freezer. Quickly pour the Joconde batter over the design. Spread evenly to completely cover the pattern of the Décor paste.
  5. Bake at 475ºF /250ºC until the joconde bounces back when slightly pressed, approx. 15 minutes. You can bake it as is on the upside down pan. Yes, it is a very quick bake, so watch carefully.
  6. Cool. Do not leave too lon g, or you will have difficulty removing it from mat.
  7. Flip cooled cake on to a powdered sugared parchment paper. Remove silpat. Cake should be right side up, and pattern showing! (The powdered sugar helps the cake from sticking when cutting.)

Preparing the MOLD for entremets:
  1. Start with a large piece of parchment paper laid on a very flat baking sheet. Then a large piece of cling wrap over the parchment paper. Place a spring form pan ring, with the base removed, over the cling wrap and pull the cling wrap tightly up on the outside of the mold. Line the inside of the ring with a curled piece of parchment paper overlapping top edge by ½ inch. CUT the parchment paper to the TOP OF THE MOLD. It will be easier to smooth the top of the cake.
  2. A biscuit cutter/ cookie cutter- using cling wrap pulled tightly as the base and the cling covering the outside of the mold, placed on a parchment lined very flat baking sheet. Line the inside with a curled piece of parchment paper overlapping.
  3. Cut PVC pipe from your local hardware store. Very cheap! These can be cut into any height you wish to make a mold. 2 to 3 inches is good. My store will cut them for me, ask an employee at your store. You can get several for matching individual desserts. Cling wrap and parchment line, as outlined above.
  4. Glass Trifle bowl. You will not have a free standing dessert, but you will have a nice pattern to see your joconde for this layered dessert.

Preparing the Jaconde for Molding:
  1. Trim the cake of any dark crispy edges. You should have a nice rectangle shape.
  2. Decide how thick you want your “Joconde wrapper”. Traditionally, it is ½ the height of your mold. This is done so more layers of the plated dessert can be shown. However, you can make it the full height.
  3. Once your height is measured, then you can cut the cake into equal strips, of height and length. (Use a very sharp paring knife and ruler.)
  4. Make sure your strips are cut cleanly and ends are cut perfectly straight. Press the cake strips inside of the mold, decorative side facing out. Once wrapped inside the mold, overlap your ends slightly. You want your Joconde to fit very tightly pressed up to the sides of the mold. Then gently push and press the ends to meet together to make a seamless cake. The cake is very flexible so you can push it into place. You can use more than one piece to “wrap “your mold, if one cut piece is not long enough.
  5. The mold is done, and ready to fill.
Entremet- Filling Options: Mousses, pastry creams, Bavarian creams, cheesecakes, puddings, curds, jams, cookie bases, more cake (bake off the remaining sponge and cut to layer inside), nuts, Dacquoise, fresh fruit, chocolates, gelee.

Tuesday, January 25, 2011

Burns Night Supper

It hadn't even occurred to me that it was Burns Night, until I returned home from the supermarket already with a haggis in hand. You may be wondering why on earth I decided to purchase Haggis of all things during my spontaneous trip to the store. Well... I can't even explain it. I originally went to the store to buy bananas, as I had run out just this morning, and while I was perusing the aisles, I spotted it... the lying round and plump, like a little baby crying to be swaddled, in the meat department cooler... haggis! For reasons which are beyond my comprehension, I decided to spend $12.30 of my hard earned cash on this lump of meat which I had never tasted in my life (I think being an Anglophile makes you do crazy things). Anyways, I purchased the Haggis and when I got home, realized that I wasn't quite sure how to cook it because the package did not come with instructions. Do I boil it? Bake it? Steam it? hmmm... I think I'll Google it!

What showed up on Google surprised me... for as I searched among pages of recipes I discovered that today was actually Burns Night (a national day celebrating the birth of Scottish poet, Robert Burns). Delighted with the knowledge that I had found a new holiday to celebrate, I set to work in the kitchen preparing what was to be a delicious supper.

I'm not going to post any recipes, because honestly... all I did was cover the haggis in tin-foil and bung it in the oven for 1 hour, alongside some onions, sweet potatoes and cloves of garlic (which I would later use in my potatoes). And I don't really need to post a recipe for colcannon, because hey... anyone can boil potatoes, mash them with garlic + butter + boiled cabbage + salt.

I literally just threw this supper together last minute, and it was sooooo gooood. The haggis, melted in my mouth and was so tender and moist. It reminded me of meatloaf, but without the beefy taste. I don't regret spending my money on the haggis... and if you've never tried it before, you're seriously missing out! Go get some... and have a happy Burns Night!

I think I'll leave you with the first verse of the Burn's Address to The Haggis:

Fair fa' your honest, sonsie face,
Great chieftain o' the puddin-race.
Aboon them a' ye tak your place.
Painch, tripe or thairm:
Weel are ye wordy o' a grace
As lang's my arm.

I actually memorized this verse a while back, after being introduced to it on QI... I know, such a panel-show nerd. But, it shows you that panel-shows can be quite educational.


Sunday, January 23, 2011

Green Bean Coconut Kueh

It's been a while since I steamed up some Malay goodies, so I thought this weekend I'd play around and experiment with what ingredients I had in my pantry to make a unique version of my favorite Malay sweet...

Green Bean Coconut Kueh

Ingredients:
Coconut Sticky Rice Layer
- 3/4 cup glutinous rice, soaked in water overnight
- 1/2 cup coconut milk + 1/2 cup water
- 1/3 cup sugar
- pinch of salt

Green Bean Coconut Layer
- 3/4 cup glutinous rice flour
- 1/2 cup sugar
- 1/2 cup coconut milk + 1/2 cup water
- 1/2 cup dried green beans, soaked overnight in water, then boiled until tender
- 1/3 cup dried shredded coconut

Method:
1. Combine the soaked rice, coconut milk mixture, sugar and salt in a bowl. Mix well, then pour into your steaming tray (I used a 6inch round tin). Steam over high heat for 45minutes, until rice is cooked.
2. In another bowl, combine the rice flour, sugar, coconut milk mixture, beans and shredded coconut.
3. Pour the flour mixture into the steaming tray, covering the cooked rice in an even layer. Continue steaming the kueh for another 45minutre, until flour layer is firm and cooked through.
4. Remove tray from steamer, allow to cool. Cut into wedges and serve, at room temperature or cold.

I must say, this was a pretty tasty treat! I guess I've made enough kuehs that I know the basics enough to throw together something decent. I hope one day I'll be able to make a cake/brownie/cookie recipe by heart... but baking takes a little bit more calculative work than steaming. Well... after some early morning kitchen antics, I'm off to watch the Arsenal v. Wigan game that I taped from yesterday (and maybe do some tumblr blogging). See ya!

Thursday, January 13, 2011

Cinnamon Apple Upside-down Cake

I've taken it upon myself to do a bit more stress-baking. Apparently the powers that be have decided to seriously screw with me this week. Initially, I was really looking forward to working this week because I had swapped shifts around with a friend so that I could work mostly nights (I usually love nights). But, I guess because I was trying to "make my life easier" karma decided to kick it up a notch. After I got home from my shift, which ended at 7am I emptied my scrub pockets to find, to my dismay, the narcotic keys!! When I saw them, my heart sank... "Crap, crap, nooooooo!! Why!!" these words ran like a continuous news broadcast ticker through my mind. AAAARGH!! I had to drive all the way back to work to bring the keys back to the ward!! Nooo... why!!!

Well, after that adventure, I finally made it home and literally collapsed in my bed, ready to sleep until 5pm... but then I remembered that my colleagues and I had planned a pot-luck for our next shift, and I scrambled out of bed to whip up something tasty. Boy, am I glad that tonight's the last shift of my set... I seriously need to take a break and get reset my internal clock. But anyways, here's what I'm bringing to work tonight.

Cinnamon Apple Upside-down Cake

Ingredients:
- 1 cup butter
- 1 2/3 cup brown sugar
- 1 tsp each, cinnamon, nutmeg and allspice
- 2 tsp vanilla
- 2 apples, cored, peeled and thinly sliced
- lemon juice of one lemon
- 1 1/2 cup flour
- 1 tsp baking powder
- 1/2 tsp salt
- 2 eggs
- 1/4 cup sour cream

Method:
1. Preheat the oven to 325degrees.
2. In a medium sauce-pan, heat 1/2 cup of butter until melted and frothy. Add in 2/3 cup brown sugar and cook over medium-heat until mixture is dark amber and smooth in texture. Add in 1 tsp vanilla and 1/2 tsp each of cinnamon, allspice and nutmeg. Pour mixture into the bottom of a 9-inch round, deep dish baking pan.
3. Arrange the sliced apples in a fancy pattern on top of the caramel mixture in the pan, ensuring that the apple slices are tightly tiled over the caramel. Sprinkle lemon juice over top of the apples.
4. In a medium bowl, combine the flour, remaining 1 cup of brown sugar, salt, baking powder and the remaining 1/2 tsp each of the spices.
5. In another bowl, cream together the butter, eggs, vanilla and sour cream.
6. Add the dry ingredients to the wet and mix until well-combined.
7. Spread the batter over top of the apples in an even layer.
8. Bake for 45-50minutes, or until toothpick inserted comes out clean.
9. Remove from oven, invert on serving dish and serve warm or at room temperature.


You could smell the heavenly scent of apple and cinnamon wafting through the house... and it nearly made me forget about the fiasco that had happened with the narcotic keys. Needless to say, I'm definitely not carrying the keys tonight... no siree.