Showing posts with label Buns. Show all posts

Sunday, February 28, 2010

Lor Bak Go (Radish Cake) & Chicken Bao

Normally, Sunday mornings are a time when my family likes to go out and eat dim sum. But, since my parents are still on vacation and my sisters and I didn't want to miss the Olympic Men's Hockey Gold-medal Game, we decided to make dim sum at home! I had some zongzi in the freezer from Chinese New Year, so we steamed up a couple of those as well as some gai lan. But, we wanted to round out the meal with at least 2 other dim sum dishes. So, we chose Lor Bak Go and Steamed Chicken Buns.
Lor Bak Go

Ingredients:
- 2 cups rice flour
- 1/4 cup tapioca starch
- 1 tsp salt, or to taste
- 2 links of lap cheong (Chinese sausage), diced
- 3 cups daikon, grated
- 1/2 small onion, minced
- 2-3 garlic cloves, minced
- vegetable oil

Method:
1. Combine rice flour, tapioca starch and salt in a large bowl.
2. Boil the daikon in a heavy-bottomed pot for 10minutes. Drain, but reserve the cooking liquid. Set the liquid and cooked daikon aside
3. Heat some oil in a frying pan and cook the lap cheong, garlic and onions for 2 minutes. Set aside. (You do not need to wash the frying pan yet! You will use it to pan-fry the lor bak go)
4. Add the daikon to the flour mixture and slowly add in 3 cups of the cooking liquid. Mix until no dry clumps are visible.
5. Add the lap cheong mixture to the batter and continue to mix.
6. Pour the batter into a greased, steam-proof 8x8inch square, or 9inch round, tray. Steam for 45minutes. When finished cooking, let lor bak go cool completely.
7. Remove the lor bak go from the steaming tray and slice it into 1/2-inch slices.
8. Heat up the frying pan again to medium-high heat, adding more oil if necessary. Pan fry the lor bak go slices until crispy and golden brown on both sides.

This dish has got to be my sisters' most favorite dish at yum cha. We always order 2-3 servings of it when we go to dim sum. The final result of this recipe was gladly gobbled up by my Lor Bak Go loving sisters and they said that they could hardly tell the difference between mine and the ones we eat at the restaurant! *blush* They're so sweet...

But now, onto the chicken buns! My middle sister loves these, even more so than Char Siew Bao. Actually, she told me that she dislikes Char Siew because of the fatty, flubby and tendon-ness of the meat... too hard to chew, she says. So, with this in mind I decided to use a really nice chicken breast for the filling of the buns. The chicken breast had no flubby skin and no tendons or cartilage pieces, so there would be no risk of my sister getting picky about the meat... YAY!

Chicken Bao

Dough Ingredients:
- 2 cups flour
- 1.5 tsp baking powder
- 1/4 cup sugar
- 1/2 tsp salt
- 1 tbsp margarine
- 3/8 cup water
- 1/2 tbsp vinegar
- 1 egg white

Filling Ingredients:
- 250g chicken breast, minced
- 2 garlic cloves, minced
- 1/2 small onion, minced
- 1inch knob of garlic, minced
- 1 tsp soy sauce
- salt and pepper to taste

Method:
  • Combine flour, sugar, salt and baking soda in a large bowl. Blend in the margarine, until they are well incorporated.

  • In a separate bowl, mix together the vinegar, water and egg white.

  • Add water mixture to flour mixture, knead until dough comes together and is smooth.

  • Roll the smooth dough into a thick log shape, roughly 1.5 inches in diameter.

  • Cover dough in cling-wrap and let rest in fridge for at least 1 hour.

  • Make the filling: mince the chicken breast, garlic and onions and combine. Add in soy sauce and salt + pepper to taste.

  • When dough has rested, remove from cling-wrap and cut log into 10 equal sized pieces.

  • Roll dough into flattened circles, fill with 2 tbsp of chicken filling and shape the buns.

  • Prepare a steaming plate by laying cabbage leaves on it. Arrange the chicken buns on the cabbage leaves and steam the buns for 30minutes.

  • Enjoy!
  • 1. Combine flour, sugar, salt and baking soda in a large bowl. Blend in the margarine, until well incorporated.
    2. In a separate bowl, mix together the vinegar, water and egg white.
    3. Add water mixture to flour mixture, knead until dough comes together and is smooth.
    4. Roll the smooth dough into a thick log shape, roughly 1.5 inches in diameter.
    5. Cover dough in cling-wrap and let rest in fridge for at least 1 hour.
    6. Make the filling by mixing together the minced chicken, garlic, ginger and onions. Then, add in soy sauce and salt & pepper to taste.
    7. When dough has rested, remove from cling-wrap and cut log into 10 equal sized pieces.
    8. Roll dough into flattened circles, and fill with 2 tbsp of filling. Shape the buns.
    9. Prepare a steam-proof plate by laying cabbage leaves on it. Arrange the chicken buns on the cabbage leaves and steam the buns for 30-40minutes.
    10. Serve!

    The buns were also a success! Even my youngest sister, who normally hates to eat bao bao enjoyed these buns and devoured TWO! Now, that's saying something. I quite enjoyed the buns as well. I liked the recipe because the dough was fairly simple to make, and didn't require yeast or raising time. Without the yeast to make the dough fluffy, the texture of this bao was more like a tasty noodle or a giant xiaolong bao. I will definitely have to bake this recipe again, for my parents... because I don't think there will be any left by the time they come back :P

  • Combine flour, sugar, salt and baking soda in a large bowl. Blend in the margarine, until they are well incorporated.

  • In a separate bowl, mix together the vinegar, water and egg white.

  • Add water mixture to flour mixture, knead until dough comes together and is smooth.

  • Roll the smooth dough into a thick log shape, roughly 1.5 inches in diameter.

  • Cover dough in cling-wrap and let rest in fridge for at least 1 hour.

  • Make the filling: mince the chicken breast, garlic and onions and combine. Add in soy sauce and salt + pepper to taste.

  • When dough has rested, remove from cling-wrap and cut log into 10 equal sized pieces.

  • Roll dough into flattened circles, fill with 2 tbsp of chicken filling and shape the buns.

  • Prepare a steaming plate by laying cabbage leaves on it. Arrange the chicken buns on the cabbage leaves and steam the buns for 30minutes.

  • Enjoy!
  • Mmm... the delicious bao. Hehehe... look at the mini one (on the right) I made with the leftover scraps :P it looks so gibbled

    Sunday, November 15, 2009

    Fruitcake Bread

    Well, I've been meaning to use up this can of mixed fruit peel that's been in my fridge for the past 3 months. Why did I buy it? Well... it's pretty much the age-old habit of buy it because it's being cleared by the supermarket because nobody wants to buy it... meaning that it's a great value! But, I couldn't think about what to do with it besides nibble at it piece by piece (hehehe... yeah, I have a very strong sweet-tooth). Finally, after 3 months of pondering (or being so stressed out with school that my mind just wasn't thinking straight), I remembered how much I use to love hot-cross buns. So, I decided to use a hot-cross bun recipe to make a loaf because who doesn't love a hot and fresh loaf of fruity bread in the early morning?

    Fruitcake Bread
    Yields 1 loaf and you still have a bit of dough left over for approximately 3-4 buns!

    Ingredients
    - 3/4 cup warm water
    - 3 tbsp butter
    - 1 tbsp instant powdered milk
    - 1/4 cup white sugar
    - 3/8 tsp salt
    - 1 egg
    - 1 egg white
    - 3 cups all-purpose flour
    - 1 tbsp active dry yeast
    - 3/4 cup mixed fruit-peel
    - 1 tsp ground cinnamon
    - 1 egg yolk

    Method:
    1. Put warm water, butter, skim milk powder, 1/4 cup sugar, salt, egg, egg white, flour, and yeast in bread maker and start on dough program.
    2. When 5 minutes of kneading remain, add fruit-peel and cinnamon. Leave in machine until double.
    3. Punch down on floured surface, cover, and let rest 10 minutes.
    4. Shape into log, and place enough dough into a greased loaf pan. Whatever dough is left over can be shaped into little buns. Cover loaf and buns and let rise in a warm place until doubled in size (about 35-40 mins)
    5. Mix egg yolk and 2 tbsp water. Brush on top of loaf and buns.
    6. Bake at 375 degrees F (190 degrees C) for 20 minutes. Remove from pan immediately and cool on wire rack.

    Sadly, I didn't remember to place the fruit-peel in the machine when 5 minutes of kneading were left. I thought actually placed the mixed peel in the machine when 5 minutes of rising were left, so the peel didn't become very well incorporated into the dough. The result was a loaf that had speckles of fruit-peel along the edges of the loaf and buns. Other than that, I would say that the loaf was pretty much a success. Although I may have handled the dough too much after the first rise in the machine, causing the loaf to be a little less raised than I would have liked, the texture of the bread was very soft and delicate. The fruit-peel added a nice sweetness to a regular old white loaf, and the crust was perfectly crusted. The important thing to remember with this recipe is that you must grease the pan well... otherwise you'll end up with some of pieces of loaf getting stuck and simply ripping off because the bread is so delicate. I might attempt making this recipe again, but in the hot-cross bun form... that way I get to make those pretty little crosses on the top of some cute little buns :)

    Friday, August 21, 2009

    Blue Cheese Scones

    The good thing about blue cheese is that since it's already moldy, it doesn't expire very quickly... the bad thing about it is that I honestly had know idea what to make with the remaining piece of my blue cheese wedge. Whenever I am plum out of ideas from my cookbooks/noggin I head for the internet and the place to search was the Rosenborg webpage. Most of the time the manufacturers of food products have some pretty decent recipe ideas that are not only tasty but very simple and use few ingredients (I think the idea is to showcase their product's ease and versatility! Those guys are brilliant)... so anyways, I stumbled upon many recipes that peaked my interest, but settled for one that suited my baking addiction... Blue Cheese Scones! The recipe can be found here.


    These scones were divine!! I decided to forgo sprinkling the extra bits of cheese on top of the scones because I thought that it would make for sloppy looking scones, and that the blue cheese fragrance and taste would be too strong. In all actuality, I could have sprinkled on the cheese because although the flavor was very powerful, when baking, the pungent moldy smell and taste is mellowed and the true cheese-flavor rings through. The scones were wonderfully flaky and buttery and I very much enjoyed the cheesy taste. They taste the best when they're fresh from the oven; so, if serving them for breakfast the next day, be sure to toss them in the microwave or toaster oven to warm up before you snack on them. I definitely recommend this recipe for anyone who loves blue cheese, and for those who've never ventured out to try the moldy stuff this recipe will help ease you into loving the taste of blue cheese!

    Monday, May 04, 2009

    A Bread Machine and Sticky Buns

    I have often wondered how some of my favorite bloggers manage to have such great success with baking with yeast... happyhomebaker, dowhatIlike and bakingfiend (see links on the right) always manage to create such beautifully creative, fluffy and perfect loaves of bread... chinese buns and mantou. Oh, how I have been envious of their success with yeast because it seems no matter how hard I try and how decent my breads/buns/pretzels turn out, they're never as fluffy, fragrant or tastey as I would like them to be.

    But what's this!?!?

    A bread machine!!?! Yes, yes it is... I finally sprung for a bread machine! Yay! I feel like I've been spending a lot of money on random things lately (online shopping, craigslist stuff, baking accessories) but thankfully this bread machine did not cost an arm-and-a-leg. It was actually on sale at Walmart for only $55. When I saw the price, I thought that I had to be dreaming... but once I realized that this amazing deal was calling out to me I decided that I had to buy it. I actually had a discussion with my conscience that went something like...

    "You don't have $50 bucks to splurge on a bread machine" "But think about all of the money I'll save by not having to buy bread each week" "--- erm... okay"

    (I know, my conscience isn't that great of an arguer :P)

    Anyways, the second I brought my bread machine home I was already thinking about different recipes that I wanted to try. But before I could make anything, my conscience spoke to me again and said "read the manual! and don't try anything stupid!" luckily, my erratic mind decided to listen. After reading the manual and inspecting all of the parts for damage I was ready to make something... and I decided to bake STICKY BUNS!

    Cranberry Sticky Buns
    Yields 12 buns (fits in an 8-inch cake pan)

    Ingredients for Dough:
    1/4 cup milk
    1/4 cup water
    1 egg
    1/4 cup sugar
    2 tbsp butter
    1/2 tsp salt
    2 1/2 cups flour
    21/4 tsp active yeast

    Ingredients for Filling:
    2 tbsp butter, melted
    1 tbsp cinnamon (or more if really like cinnamon)
    1/3 cup dried cranberries (may substitute raisins)
    2 tbsp brown sugar

    Ingredients for Glaze:
    2 tbsp butter, melted
    2 tbsp brown sugar
    1/4 cup pine nuts (or your favorite crushed nut)

    Method:
    1. Combine first 8 ingredients in bread machine, as per bread machine instructions. Set cycle to dough.

    2. Once dough cycle is complete, remove mixture from the machine and roll to a 9x14inch rectangle.

    3. Pour 2 tbsp melted butter on rectangle and spread over the dough evenly; sprinkle on the brown sugar, cinnamon and cranberries.

    4. Roll like a Swiss-roll and slice into 1 inch pieces

    5. Prepare an 8-inch cake pan with the sticky glaze by adding melted butter, brown sugar and pine nuts to the pan. Mix thoroughly and then arrange the bun slices into the pan. Cover pan with cling wrap and leave to rise for 30-45minutes

    6. After rising, bake at 350degrees for 25-30minutes.

    7. Remove from oven, invert onto a serving plate and dish out!

    This bread machine was amazing! I just had to add all of the ingredients to the machine as it was instructed in the manual and voila! In 1 1/2 hours, I had a beautifully fluffy dough that was ready for me to play with. These buns were very tasty and even rivaled the cinnamon buns from Cinnzeo! I don't think I'll ever by cinnamon buns again :P The only thing I would change would be to not place the buns in such a small pan. Although the bread was sweet and full of flavor, the small pan didn't allow the rolls to expand to their fluffiest potential :( instead, they were forced to stay more dense.
    Note: the above picture shows the lovely white rolls and their sad denseness :`(

    Oh well, practice makes perfect... and that gives me an excuse to use the bread machine again! Oh... and I forgot to mention, the aroma of fresh dough wafting throughout the house is the most amazing smell in the world!! They should patent that fragrance and sell it as perfume :P

    Thursday, April 24, 2008

    Almost Banh Mi


    At T&T the other day I purchased a Banh Mi... aka Vietnamese Sub. It was delicious! I had not clue what was in it, but I quite enjoyed stuffing it in my mouth :P That's me! Sadly, I did not take my camera with me and thus I will not be posting photos of that Banh Mi. So let me describe it... this sub sandwich was filled with bbq pork, pickled daikon and carrots and lettuce, all stuffed inside a mayo+fish sauce+butter smothered soft-vietnamese bun. The only thing I think it was lacking was some cilantro, that would have been delicious. So, after I got home I decided that I'd have this sub for lunch the next day; but I wasn't going to spend money on it when I had the basic ingredients at home. It's time to make some Banh Mi!

    Pickling the Veggies

    Well, you've got to pickle your veggies before you can put pickled veggies in the sandwich... duh! So here's the recipe I used for my pickled daikon and carrots.

    Method:
    1. Cut half of a medium daikon and 2 carrots into juliennes and place in a large jar (I used a pasta sauce jar, i.e. Ragu).
    2. Pour in 1/4 cup sugar, 1 tsp salt, 1/2 cup water, 1/3 cup white vinegar.
    3. Shake it all around and let sit for at least 1 hr, overnight is best.

    For the Banh Mi filling I used whatever I had on hand, so it's not the traditional vietnamese sub. I filled it with cilantro, my pickled veggies, some chicken, hoisin sauce, sambal oelek and some sliced chinese mushrooms. And sadly I did not have the nice chewy submarine sandwich bun, so I had to make due with regular sliced bread. Well, here's a pick of the real Banh Mi if you're interested in seeing what the real thing looks like. Much different from my poor excuse for a viet-sub, but they were both equally delicious... in their own way.

    Thursday, April 10, 2008

    Getting Fresh... with the bread


    I'm so excited about today! Today I not only made bread (with my current best-friend Yeast) and had it rise beautifully, but I also made it without a recipe! *Gasp* I know... it blows the mind. I was just really sick and tired of sitting at my computer and studying, and with my kitchen just sitting there and not being used I thought I would make myself useful and bake some bread. I wasn't sure if I wanted something savory or sweet, so I just randomly decided I would make an all-purpose bread that could be used for both. I would never have thought the day would come when I would make bread from my own recipe, but it has and now I must reveal to all the amazing recipe I used. I'm so excited to call this recipe my own.


    Joanna's Own All-purpose Bread

    Ingredients:
    - 3 cups ap flour
    - 1 tsp baking powder
    - pinch salt
    - 2 tbsp sugar
    - 7g dried active yeast
    - 200ml milk
    - 1/4 cup cream cheese (and then some... seriously, just go crazy with the stuff)
    - 1 1/2 tbsp butter
    - 1 egg
    - 1 egg + 1 tbsp milk (for eggwash)

    Method:
    1. Heat milk, cream cheese and butter until all ingredients are blended together without clumps.
    2. Mix in the sugar until it dissolves; when mixture is warm (but not hot) sprinkle in the yeast and stir. Let stand for 10mins.
    3. Sift together salt, baking powder and flour in a separate bowl. Set aside
    4. Once milk+yeast mixture is foamy, mix in 1 egg until well incorporated.
    5. Remove 1/2 a cup of flour from the bowl of dry ingredients and set aside.
    6. Stir milk mixture into bowl of dry ingredients, adding the "removed" flour as needed. (Dough should be soft, but not stick to hands and not too dry)
    7. Knead dough for 5mins; place in greased bowl, cover and let rise for 1hr.
    8. After rise, work gently with the dough and shape it into whatever you like.
    9. Place shaped portions of dough on baking sheet, cover and let rise for 15mins.
    10. Combine ingredients for egg wash and brush a generous coating on each portion of dough. Bake in 350F oven for 10-12mins, or until golden brown.

    Thursday, March 06, 2008

    AHHH STRESS!!! Oh, and Melon Pan :P

    What to do, what to do... I have two RELS papers due and one Nursing paper to work on, a ton of journals and a handful of clinicals to complete, not to mention a bunch of forums!!!?!? Rather than stress myself out over my workload, I decided to de-stress through the baking process. And what better way to do it, than by working with my nemesis... YEAST! If I could work with this guy, I would feel invincible and prepared for anything that lies ahead.

    Japanese Melon Pan

    Yields 12 buns

    Dough Ingredients:
    2/3 cup milk
    4 tbsp butter
    2 eggs, beaten
    1/3 cup milk
    1 pkg (8g) dry yeast
    1/2 tsp granulated sugar
    4 1/2 cups flour
    1/2 cup granulated sugar
    2 tbsp brown sugar
    1/2 tsp cinnamon
    1/2 tbsp salt

    Method:

    1. Combine 2/3 cup milk and butter in a saucepan. Heat just until butter melts, then allow the mixture to cool to room temperature. Now add in the eggs.
    2. Heat the 1/3 cup milk until at room temperature, stir in yeast and 1/2 tsp sugar. Allow mixture to sit until bubbles form on surface (10 minutes). Stir it into the milk and egg mixture.
    3. Meanwhile, combine flour, 1/2 cup sugar, 2 tablespoons brown sugar, cinnamon and salt.
    4. Stir yeast, milk and egg mixture into dry ingredients to make a medium dough (not too damp or too dry - add flour or water as needed).
    5. Knead dough for 5 to 10 minutes. Lightly grease the dough, place it in a dish, cover it with a damp towel, and allow to rise until doubled in size (1 to 2 hours)
    6. While the dough is rising cream together the topping ingredients (recipe follows); cover and set aside in the fridge.
    7. After dough has risen, divide it into 12 balls (about 3 inches in diameter) and place them on baking sheets.
    8. Drape damp towel over the rolls and allow for second rise (10 to 15 minutes)
    9. Roll out the topping and cover each roll with a thin layer. Leave topping as is, or cut designs (like my oddly shaped stars).
    10. Bake for 10-12mins at 350 degrees F.

    Topping Ingredients:

    - 1/4 cup butter
    - 1/4 cup granulated sugar
    - 1 egg
    - 1 cup flour
    - 1 tsp baking soda
    - a dash of vanilla essense

    I must say that I have impeccable timing, as these buns were fresh out of the oven the second my sisters got home from school. My sister, who are addicted to all things anime and Japanese were so excited to eat these buns. My mom didn't mind taking a nibble either. The dough was a bit more dense then I would have liked, usually when we buy Polo Pau from T&T the bun dough is very light and fluffy. My dad did comment on how the melon-pan skin was quite pale, perhaps next time I'll try a recipe that uses only egg yolks for the topping. All in all, the bread made a delicious tea-time treat and my whole familiy enjoyed the yeasty goodness. YEAH! I can't believe that this is the third time in my life that I've had the yeast rise properly. I think this is going to be the start of a beautiful friendship :)

    Sunday, February 03, 2008

    Happy CNY

    It's that time of year again, Chinese New Year!!! Wahoo! I love this "holiday" because it gives me an excuse to bake, buy and make yummy CNY treats.

    Prosperity Buns filled with Lotus Paste (Not a creation of mine, but I bought these from T&T... I think I'll try making them someday... but only when yeast and I have mended our broken relationship)


    The Japanese also enjoy CNY celebrations, so of course I had to prepare my sisters' favorite treat. Hanami Dango... this time I used matcha powder for the green dough, and it was superb


    Laughing Dumplings... one of my personal favorites. I actually made these ahead of time, and then brought them to work (KFC) and fried them. Hehehe, I'm so sneaky... but it beats slaving over the wok and hoping that my oil was a consistent temperature.

    The Laughing Dumpling recipe can be found on Florence's Blog along with a bunch of other great CNY recipes. I hope to make some more CNY treats before my stressful student life takes hold of me once more... but I've got midterms this week, and my world is spinning round-and-round. Well, I still have until Thursday to celebrate CNY! But until then... Gong Xi!

    Sunday, January 06, 2008

    Cinnamon Buns

    Breakfast-time and what to do? Well, when you've gotten your cinnamon dough ready the night before there really isn't much to do! Freshly baked cinnamon buns are one of the best breakfasts out there. The smell of the bubbly cinnamony mixture coming out of the oven just makes me want to jump up and down and scream "Good morning world!"

    Cinnamon Buns

    Ingredients:
    - 1/2 cup milk
    - 2 tbsp sugar
    - 1 tsp salt
    - 1/2 cup water
    - 1 tbsp yeast
    - 2 1/2 cup all-purpose flour
    - 1 cup brown sugar
    - 2 1/2 tbsp cinnamon
    - 1/3 cup butter
    - One quantity of cream cheese icing or apricot jam

    Method:

    1. Combing milk and butter in a saucepan and heat until butter melts. Add in water and remove mixture from heat.
    2. Combine sugar, salt, flour and yeast in a separate bowl.
    3. Gradually add the warm (but not scalding) liquid mixture to the flour mixture, stirring continually.
    NOTE: if liquid is too hot, the yeast may be killed and fermenting will be impossible.
    4. Knead together the dough, just until it comes together. Place dough in a greased bowl and let rest in a warm location for 1hr.
    5. Roll out the dough into a long rectangular shape. Spread dough with butter and sprinkle on the combined brown sugar and cinnamon mixture.
    6. Roll dough, in a swiss-roll like fashion, and slice the log into rolls. Let rest for 30minutes.
    7. Place rolls on a greased cookie sheet and bake at 350F for 12-15 minutes, or until golden brown.

    Cream-cheese Icing

    Mix together 1/3 cup cream cheese, 4 tbsp of butter, 1/2 tsp of vanilla and 1 1/2 cup of icing sugar until well combined. Spread on cinnamon buns.


    My friend, who works at a bakery, actually helped me make these. She suggested that we top half of the buns with apricot jam... I was skeptical, but they were actually really tasty.

    Here are the ones with the delightful and classic cream-cheese icing.

    Friday, May 18, 2007

    Chinese Buns

    I know... I haven't been keeping up to date on my blogging lately. But I have a good excuse. I have a final coming up! Which meant that the little time I would love to spend cooking is being devoted to my studies. (I'm such a good student :P)

    Anywho, I decided to busy my hands by baking bread. Apparently everyone's doing it. Why? It's fun! I really love the smell of the yeasty dough and the aroma of freshly baked bread diffuse throughout the entire house whenever I make bread. I used a melange of the recipes from: happyhomebaking and Evan's blog to make my buns. I couldn't decide if I wanted savoury or sweet buns... so in the end I just divided the dough and make both :)


    The buns with the plain tops are filled with custard, the one with sesame seeds on it has peanut-sugar mixture, the one with coconut is filled with coconut + brown sugar. As you can see, there is also a savory bun with hotdogs jabbed into it, and a ham & spring onion bun (they smelled so good that I ended up eating 1/5th of that bun before I took this picture :P)


    Not the most beautiful bun (certainly not as pretty as Evan's) but I was still proud of my attempt, and it tasted superb. Just like the ones you buy from the store! If you can't tell, I actually used vegetarian ham to make this bun... tasted pretty much like regular ham. Don't see why some people thing vegetarian stuff is wierd?

    Ah! Just for my little sister. She loves the combination of coconut and brown sugar. She enjoyed snacking on this bun while my parents nibbled on the peanuty ones.

    Overall, my experience with this recipe was good. The dough was a little more dense than I would have liked, but the taste more than made up for it. I suppose that the next time I try this recipe I'll proof it more and handle it less... that should make the bread more fluffy. (I probably played around with the dough to much... you know, deciding which shapes to make the buns and all :P) I just love bread kneading, it's just like playing with play-dough except that you get to eat your final product... what could be better?


    Friday, March 09, 2007

    Sniff... sniff

    Well, my entire family (all four people :P) have left me to go on their Spring Break trip to Disneyland. I'm slightly depressed, seeing as how no one will be around to sample my cooking... and of course because they're going on a trip without moi! They're going to 10 days, stopping off in Ventura (not quite sure where that is) and then ending up at the "Happiest Place on Earth" for their final 3 days. Alas... but I will get to spend some quality time with my puppy and maybe we'll do some good bonding, who knows.

    I didn't want them leaving me behind empty handed, so I made them some breakfast to take along with them (they driving down to the U.S. isn't that crazy?!!?). I told myself to stop cooking anymore dishes until they come back; otherwise they'll return from their vacation to a fridge full of old food... bleh! Truthfully, I don't know how well that command is going to stick. Anyways, I made them some steamed Malay cakes, otherwise known as Ma Lai Koh. As you can see, I was in the lovey-dovey mood when I was making them... I just love my family soooooo much!

    I just love Florence's Blog, she has a ton of delicious malay bun recipes. You can also find alternate recipes for Ma Lai Koh at: My Zest or jodelibakery.com but I prefer Florence's, it's much simpler and I find it less oiley.
    Well, I hope my family enjoys their vacation... I should be celebrating being home alone; but without my sisters, and mom and dad home just doesn't seem so homey :(

    Hope you're reading this... HAVE A GREAT VACATION!

    Thursday, March 01, 2007

    Swirled Mantou

    Being given this "Independent Study Week" has not really resulted in much reading or study, sad to say. But it has given me a ton of time to prep for my mom's b-day which is coming up this Saturday! I can't wait... hopefully she doesn't read this blog and discover that I have a special treat made for her. Let's distract her from reading this with some nice pictures of my swirled breakfast mantou.


    I decided to make mantou... we finished all of the buns in our freezer and since the snow fall we've gotten too lazy to leave the house (call us chicken). So I thought to myself, why not make some mantou? I found the cutest recipe at Do What I Like and decided to give it a shot, after all her pictures looked tastey. So I got to work and used the yeast I had leftover from making pretzels/bread/turtles to make my own mantou. I decided to make them miniature, because hey... everything that's cute in full-size, can be made cuter by making it mini! I also decided to make the outer layer white, with the chocolate inside; don't know why... I guess it just kinda happened (got to excited when it came to rolling the dough I suppose).

    Monday, February 26, 2007

    Pretzels? Bread? Turtles?

    I had a desire to make something using yeast today. Don't quite know why, but I just wanted to smell freshly baked yeast goods come out of the oven. Isn't that the best smell ever? I was browsing through a couple of blogs and stumbled upon many different versions of turtle bread. They were all so cute that I decided I had to make some of my own. The fact is, I haven't really had much experience with yeast (I actually think it hates me) so I was determined to make the turtle bread recipe perfectly. I used the pretzel recipe from allrecipes.com and got the instructions to shape the loaf from bettycrocker.com. Albeit, my loaf didn't turn out exactly like the crocker one, but I still think it's darned cute!

    As you can see I also made a few pudgey looking pretzels... I wasn't in the mood for anything really salty, so I covered the pretzels with demerara sugar. They were so delicious fresh out of the oven; warm, light and sweet... one of the best breakfasts I'd ever had. No need for butter or jam, they had just the right flavor all by themselves. My parents really enjoyed the pretzels/bread turtles, and my sisters were nice enough to tell me that my pretzels looked like little "turds" but still tasted good (How sweet!).
    Monday, August 07, 2006

    More Hot Dog Adventures

    Left with 7 hot dog buns to devour, before the devilish sun and cruel humidity cause all of them to mold, our hero decides that sandwiches must be made!

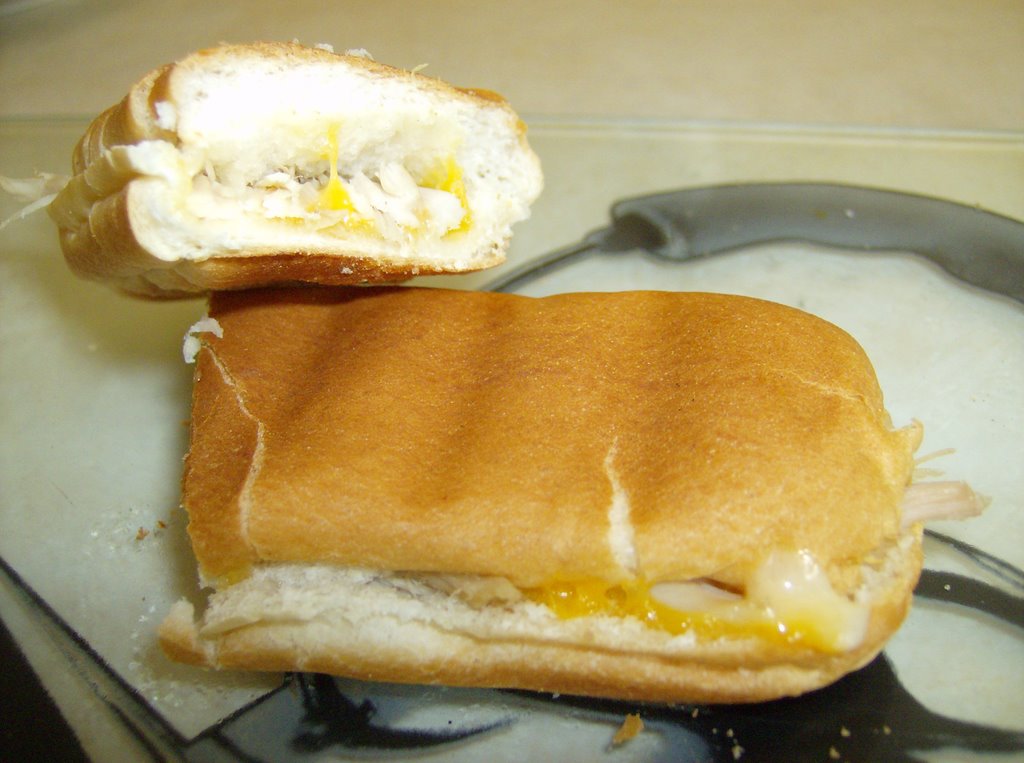
    My sisters, like most young kids, love the creaminess of good old fashioned grilled cheese sandwiches as well as mexican quesadillas. So I decided that since we were out of bread loaves and had no tortillas to play around with that I would grill up some cheesy chicken paninis and use up 3 more hot dog buns!!! hooray!

    My dad bought a george foreman grill, and if you don't have one... man you're missing out. It saves so much time and you don't have to be constantly watching your burgers/chicken fillets/veggies or paninis to make sure they don't burn. I love it and everyone should be forced to own one (although it is kind of a pain to clean up). Anyways... to make the paninis, I just set the grill to low (level 1 or 2) sliced some marble cheese, shredded some KFC chicken (oh yeah... did I mention that I work at KFC... hehehe) you can use any type of chicken here. I then layered my cheese and chicken onto the hot dog buns, which I spread with Hellman's mayonnaise and grilled them for around 1 1/2 minutes or until the cheese was goey and melty.

    They flattened out really well and my sisters loved them.

    My sisters and I also love the novelty of ICE CREAM SANDWICHES... being that it's been a scorching summer and the heat is simply unbearable I decided to use up the next 3 buns to make some wonderful I.C.S.s and my sister had no complaints. The heat was so intense that they started melting right away so we had to scarf them down as quickly as possible before we were left with a disasterous mess to clean up. But here's a pick of what it would have looked like (I got it from Appon's Thai Food Recipes website). Of course our sandwiches looked a little less majestic... but you get the picture.

    Now if you're a math genius... or at least have completed math at a grade 2 level you will have noticed that 7 buns minus 3 minus 3 equals 1... Bravo. I still have one lowly bun that is all alone... what to do?

    Tuesday, August 01, 2006

    Bird's in a ... "basket"?

    Today I found myself staring at a bag of hotdog buns... knowing full well that there was no way that my family was going to eat them all. We're starting to get sick of hotdogs, smokies etc. having had them for 2 dinners in the past week ... yuck!

    Again this raises the question of why hotdog buns are sold in packs of 6 or twelve and hotdogs are sold in packs of 8. That is messed up. Anyways... the bag originally contained 12 buns and we were now down to 7 .

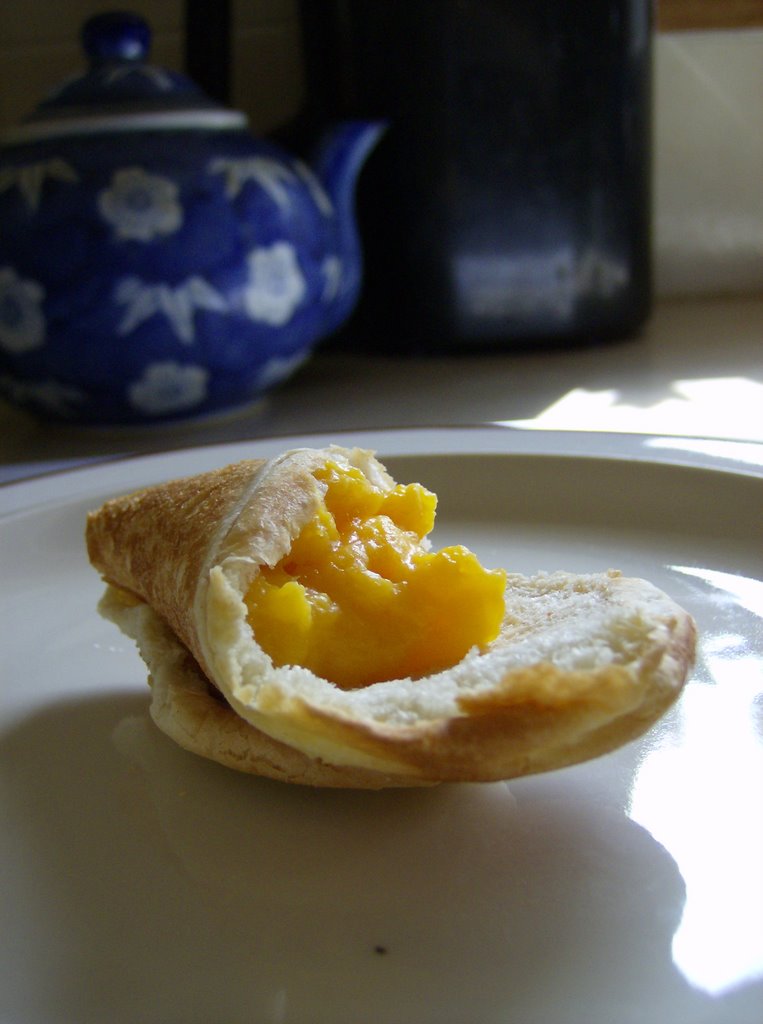
    For breakfast I decided to slice the buns and roll them flat. I then made them into cone shapes and baked them at 325 F for 3 minutes. I cooked up some Bird's custard and piped a small amount into each hotdog cone and served it up as a delicious breakfast treat. For some reason, my custard looks like some weird rhino/elephant or somekind of animal. Everyone loved them... but there are still 5 buns to go. ARGH!

    For more ideas on what to do with leftover hot dog buns check out my other post More Hot Dog Adventures I know the title is kinda stupid but whatevs.