Friday, May 29, 2009

Daring Bakers May 2009: Apple Strudel

This month has been one crazy one, it's taken me up until the last minute to complete this challenge. I've been condo-shopping with my parents for the last 15days and we have finally settled on a place! It's sooo crazy!!! So, between talking with lawyers, notaries, mortgage brokers, real-estate agents and condo-owners I found it a bit difficult to complete this months challenge... but thankfully I did it! I modified the recipe to include strawberries, because I had tons of strawberries lying around the house (in my fridge to be exact). All I did was place 2 cups of sliced strawberries in a small sauce-pan and cooked them over medium heat with 3 tbsp of granulated sugar. I waited for the strawberries to excrete their juices, creating a beautiful, thick and syrupy strawberry compote. I simply mixed the strawberries with the apple-raisin-rum filling and voila! Strawberry-Apple Strudel

Apple Strudel

The May Daring Bakers’ challenge was hosted by Linda of make life sweeter! and Courtney of Coco Cooks. They chose Apple Strudel from the recipe book
Kaffeehaus: Exquisite Desserts from the Classic Cafés of Vienna, Budapest and Prague by Rick Rodgers.


Preparation time
Total: 2 hours 15 minutes – 3 hours 30 minutes

15-20 min to make dough
30-90 min to let dough rest/to prepare the filling
20-30 min to roll out and stretch dough
10 min to fill and roll dough
30 min to bake
30 min to cool

The beautifully flaky, pastry layers

Close-up of the layers within the score-marks

Apple strudel
from “Kaffeehaus – Exquisite Desserts from the Classic Cafés of Vienna, Budapest and Prague” by Rick Rodgers

2 tablespoons (30 ml) golden rum
3 tablespoons (45 ml) raisins
1/4 teaspoon ground cinnamon
1/3 cup plus 1 tablespoon (80 g) sugar
1/2 cup (1 stick / 115 g) unsalted butter, melted, divided
1 1/2 cups (350 ml) fresh bread crumbs
strudel dough (recipe below)
1/2 cup (120 ml, about 60 g) coarsely chopped walnuts
2 pounds (900 g) tart cooking apples, peeled, cored and cut into ¼ inch-thick slices (use apples that hold their shape during baking)


1. Mix the rum and raisins in a bowl. Mix the cinnamon and sugar in another bowl.

2. Heat 3 tablespoons of the butter in a large skillet over medium-high. Add the breadcrumbs and cook whilst stirring until golden and toasted. This will take about 3 minutes. Let it cool completely.

3. Put the rack in the upper third of the oven and preheat the oven to 400°F (200°C). Line a large baking sheet with baking paper (parchment paper). Make the strudel dough as described below. Spread about 3 tablespoons of the remaining melted butter over the dough using your hands (a bristle brush could tear the dough, you could use a special feather pastry brush instead of your hands). Sprinkle the buttered dough with the bread crumbs. Spread the walnuts about 3 inches (8 cm) from the short edge of the dough in a 6-inch-(15cm)-wide strip. Mix the apples with the raisins (including the rum), and the cinnamon sugar. Spread the mixture over the walnuts.

4. Fold the short end of the dough onto the filling. Lift the tablecloth at the short end of the dough so that the strudel rolls onto itself. Transfer the strudel to the prepared baking sheet by lifting it. Curve it into a horseshoe to fit. Tuck the ends under the strudel. Brush the top with the remaining melted butter.

5. Bake the strudel for about 30 minutes or until it is deep golden brown. Cool for at least 30 minutes before slicing. Use a serrated knife and serve either warm or at room temperature. It is best on the day it is baked.

Mmmm, the luscious filling of apples, strawberries, raisins and rum.


Strudel dough
from “Kaffeehaus – Exquisite Desserts from the Classic Cafés of Vienna, Budapest and Prague” by Rick Rodgers


1 1/3 cups (200 g) unbleached flour
1/8 teaspoon salt
7 tablespoons (105 ml) water, plus more if needed
2 tablespoons (30 ml) vegetable oil, plus additional for coating the dough
1/2 teaspoon cider vinegar


1. Combine the flour and salt in a stand-mixer fitted with the paddle attachment. Mix the water, oil and vinegar in a measuring cup. Add the water/oil mixture to the flour with the mixer on low speed. You will get a soft dough. Make sure it is not too dry, add a little more water if necessary.
Take the dough out of the mixer. Change to the dough hook. Put the dough ball back in the mixer. Let the dough knead on medium until you get a soft dough ball with a somewhat rough surface.

2. Take the dough out of the mixer and continue kneading by hand on an unfloured work surface. Knead for about 2 minutes. Pick up the dough and throw it down hard onto your working surface occasionally.
Shape the dough into a ball and transfer it to a plate. Oil the top of the dough ball lightly. Cover the ball tightly with plastic wrap. Allow to stand for 30-90 minutes (longer is better).

3. It would be best if you have a work area that you can walk around on all sides like a 36 inch (90 cm) round table or a work surface of 23 x 38 inches (60 x 100 cm). Cover your working area with table cloth, dust it with flour and rub it into the fabric. Put your dough ball in the middle and roll it out as much as you can.
Pick the dough up by holding it by an edge. This way the weight of the dough and gravity can help stretching it as it hangs. Using the back of your hands to gently stretch and pull the dough. You can use your forearms to support it.

4. The dough will become too large to hold. Put it on your work surface. Leave the thicker edge of the dough to hang over the edge of the table. Place your hands underneath the dough and stretch and pull the dough thinner using the backs of your hands. Stretch and pull the dough until it's about 2 feet (60 cm) wide and 3 feet (90 cm) long, it will be tissue-thin by this time. Cut away the thick dough around the edges with scissors. The dough is now ready to be filled.

The strudel is rolled-up, scored and placed on the baking tray


I had a lot of fun rolling and shaping the strudel dough. It was actually a lot of fun! The pasty was wonderfully light and tender, especially after letting the dough rest for quite some time. The filling was perfect! Not too sweet and not too tart... just right. My sisters are still at school right not, but when they come home I'm going to serve up a nice slice of strudel with a scoop of ice-cream on the side... mmmm, what a perfect summer-time snack.

Boy are my parents and siblings going to miss me when I move out. I mean, who's going to surprise them with tasty bakes on random occasions when I'm not around?? And who's going to eat all of my tasty bakes when I make them all on my lonesome?? Wait... I've got it! Thank you Daring Bakers... you'll give me an excuse to invite my family over at least once a month to enjoy a relaxing hang-out and treat-time with me in my new condo. Yay!


Wednesday, May 20, 2009

Using the bread machine to make PIZZA!

Lately I've been seriously craving pizza. I normally enjoy trying out new pizzerias in my area, in search of that perfect crust+topping combination (that reminds me, I'll have to post some reviews for my local pizza shops) but being kind of broke and too lazy to drive out in search for the perfect pizza I decided that I'd make it myself. Now, you may be saying to yourself... "if you're too lazy to drive and buy pizza, how are you possibly un-lazy enough to spend time making your own pizza". Well, my first response would be... I am so dangerously addicted to baking and cooking that I don't even see it as work, and it actually invigorates me... and gives me more energy to power on through the rest of the day. Weird eh? And my second response would be... I have a bread machine to do most of the hard work for me! Yeah!

After my bread machine pumped out some amazingly tasty sticky-buns, I was ready to try making something on the more savory side. I was ready to find out how the machine would fair in making a pizza crust... and it did not disappoint.

Homemade Bread Machine-Assisted Pizza
Yields 2 pizza crusts

Ingredients
- 1 1/2 cups water (warm at around 90F)
- 1 tbsp sugar
- 2 tbsp extra virgin olive oil
- 1 1/2 tsp salt
- 4 1/4 cup bread flour (I used 3 1/4 cups AP flour + 1 cup whole wheat flour)
- 2 tsp active dry yeast

Method:
1. Measure ingredients into bread pan, in order listed
2. Select DOUGH setting.
3. Press START
4. Wait for bread to finish and COMPLETE SIGNAL to sound
5. Remove dough from the pan, place in a large ceramic bowl that has been well greased. Cover bowl with cling-wrap and let dough sit for 10 minutes.
6. Divide dough in half, roll each half into a circle large enough for your 2 pizza pans. Grease the 2 pizza pans with olive oil and sprinkle with cornmeal.
7. Place one rolled-dough circle onto one pan, pinch edges to make a crust and then top with pizza sauce, cheese and your choice of toppings. Repeat for second rolled-dough circle.
8. Bake at 400F for about 20 minutes, or until edges are golden and cheese is bubbling.

This bread machine is a wonder! It made the most fluffy, beautiful smelling and delicious tasting crust I have ever made or tried!


This pizza was designed by my sisters; they enjoyed onions, Italian sausage, Ukrainian sausage, pizza sauce and lots of cheese.

My mom and I designed this pizza. It's an all-veggie one, topped with zucchini, mushrooms, bell peppers, onions, green olives, tomato sauce and cheese.

My mom and dad really enjoyed the pizza! They were surprised at how much it tasted like an authentic pizza from a classy Italian pizzeria. It tasted much more fresh than those frozen Delissio pizza we usually eat. And since we made the crust ourselves, we were able to put whatever we wanted on the pizza which is always fun! By making our own pizzas, we can guarantee the freshness of ingredients, and also guarantee that no body will be picking topping pieces off of their slice! I'm glad I tried out this recipe, and I think my parents are starting to appreciate the money I put in to buying the bread machine... whew! When you're parents begin to accept that a pricey purchase is truly valuable, that's always a good thing :)

Friday, May 15, 2009

The BMO Vancouver 1/2 Marathon


I know that the race took place on May 3rd, but I just haven't gotten around to posting about it. Don't get me wrong, I'm super excited and all but it just totally slipped my mind with all the craziness of May that's going on. Mother's day, my dad's b-day, my b-day, working casual as a student nurse in hospital, doing some condo-shopping and trying to have a life :P

So anyways, this post is quite late but I'm still very proud of my accomplishment even though it happened 2 weeks ago. I did it! I ran my first 1/2 marathon ... a whole 21.1k done in under 2hours (1 hour and 49minutes to be exact)! My dad was amazing as well, he finished the 1/2 marathon in under 2 1/2 hours! I'm so proud of him, he's such a trouper.

Surprisingly, I wasn't psyched out the day of the run. The moment I woke up on May 3rd, I was ready to run. I scarfed down a hearty breakfast of low-fat yogurt, whole wheat toast and a banana and of course coffee. I fueled up with a butt-load of water and encouraged my dad to do the same. We had to wake up at 5:30am in order to get to the skytrain station by 6:00am and be at the race in downtown Vancouver by 7:00am. Thankfully the weather was amazing; not too hot and not too cold. I wore my gloves just because they always freeze when I run, and they look cool as well :P

When we arrived at the starting area of the race, we were quite surprised that one of the sponsors was McDonald's... I thought to myself, "probably not the most health motivating franchise" but whatever, they were giving out free coffee! The thing I love about races is not just the event, but it's the atmosphere. There were so many racers hustling and bustling along the busy street, all ready and all eager to show their enthusiasm for health and fitness. There were young and old, new runners and the seasoned professionals... and yet, all were equals on this field. Everyone was happy, chatting away with people they had never met before... but that was okay because runners all have one thing in common, a love for the sport.


Look at all the runners! Who knew that there were so many?? They must've all been hiding indoors on their treadmills (like moi) until race day.

During the run, there were many times when I felt like slowing down and walking parts of the course. But, my determined side pushed through and forced me to keep my speed, dig deep and even run up the toughest parts of the course (i.e. the giant hill at Prospect Point). I'd been training for this run for the past 6 months, and I think it went very well. I wasn't sore at all the next day and upon completing the race, I was actually very invigorated and energized.

My dad always enjoys the post-race freebies that accompany each race. After finishing, we were treated to gatorade, water, electrolyte water, Bear Paws, Dare cookies and crackers, fresh fruit, Cozy Shack pudding, yogurt, mini bagels, baby carrots and McDonald's iced coffee. I'm pretty sure my dad spent about one hour snacking and perusing the post-race arena after the race, and of course I had to join him :P By the time we left Vancouver, it was noon and we were ready to head home with our plastic bags full of free snacks.

My future goal is to possibly run a full marathon, although that is quite ambitious. I'm not sure how well I'd fare if I had to run 42k... although I love running, I think that 3+hours on the road might burn me out and make me go crazy. But anyways, back to the present... most of the craziness of May is over... oh and I probably should think about completing this month's Daring Baker's challenge before the month ends. TTFN

Sunday, May 10, 2009

A Mother's Day Pancake Bar!

I actually spent a lot of time trying to decide what to treat my mother to for this Mother's Day, I thought that I'd pretty much done it all... french-toast, breakfast stratas, crepes, omelets, eggs Florentine, potato latkes, finger sandwiches. But then in discussing it with my younger sister, she mentioned that I never really made the traditional pancake breakfast. She's a genius!! So, with my menu pretty much figured out all I had to do wat figure out how I wanted to prepare my pancakes... and I thought what better way than to create the customize-your-own PANCAKE BAR!!

What You Need:
- Pancake Recipe (see below)
- "Mix-in" ingredients
- Topping ingredients
- Super sweet sauces to cover all of the above :P
The "Mix-Ins" included: crushed pecans, chocolate chips, blueberries, butterscotch chips, toffee bits, cookie crumbs and flaked coconut.

The topping choices included: fresh strawberries, apple cinnamon compote, pineapple chunks, bananas and freshly made whipped cream.

I had a lot of sauces available to choose from... I made a strawberry compote, a chocolate fudge sauce, the classic maple syrup and some caramel sauce.

Super-easy Pancake Recipe
Yields 8 large pancakes

Ingredients
- 2 cup all-purpose flour
- 2 tbsp sugar
- 1 tbsp + 1 tsp baking powder
- 1 tsp salt
- 2 egg
- 1 3/4 cup buttermilk (or 1 3/4 cup milk + 1 1/2 tbsp lemon juice or vinegar)
- 3 tbsp shortening, melted

Method:
1. Combine the flour, baking powder, sugar and salt in a large bowl.
2. Mix together the buttermilk, eggs and melted sugar.
3. Add the wet ingredients to the dry, stirring until just moistened.
4. Let the mixture rest in the fridge for at least 5 minutes (this allows for the baking powder to react and produce nice bubbles, which create the fluffiness)
5. Heat a frying pan or griddle on medium heat. Grease the pan with margarine or butter, using a 1/4 cup sized ladle, spoon the batter onto the pan.
6. Scatter the "mix-in" (1/4 cup mix-in per 1/4 cup pancake batter) ingredients on top of the pancake batter, continue frying the pancake until he bottom is nicely golden. Flip the pancake and cook the other side.
7. Once the pancake is cooked, plate and serve with toppings and sauce!

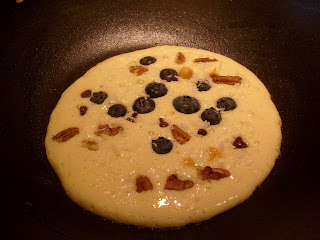
Here's the batter in the pan with some mix-ins on top... mmmm blueberries, coconut flakes and crushed pecans.

Flipping the pancake over, the blueberries are still kind of visible!


So, the way I set up the bar was that I provided each family member with 2 small dishes (labeled with their names) that were approximately 1/4 cup. I let them know that each cup would be for one pancake, and that they could mix and match whatever "mix-ins" they wanted into one pancake. After selecting their "mix-ins", all they had to do was hand me their dish and I would make them their personalized pancakes right on the spot. With the frying pans already heated and ready to go, each pancake only took about 3 minutes.

Here's my mom's lovely looking pancake. It looks so delicate and elegant, just like my mom :P

This is my pancake, a bit of a mess... all hodge-podge with whipped cream, fudge, caramel and fruits on the side... hehehe, strange looking yet super tasty.

These pancakes were amazing, they were very fluffy... even more so than the ones made using a pre-mix. I don't think I'll ever use that pre-mix stuff again; besides, making pancakes from scratch isn't that difficult. The pancake bar was a success, my sisters really enjoyed it and my mom was excited that she didn't have to cook (or clean)... all-in-all it was a fantastic mother's day breakfast!

HAPPY MOTHER'S DAY MOM!! WE LOVE YOU LOTS ~_~


Friday, May 08, 2009

Celebrating 2 Birthdays Downtown at Mosaic Bar and Grill

Rated **** 1/2 out of *****
Well, another year's gone by and I am now a year older. Luckily, I'm not the only one feeling a little bit more mature... my dad's birthday is only 4 days before mine :P Being that our birthday's were so close together, and we always enjoy a good ol' 2-for-1 deal... we decided to celebrate 2 birthdays on one day, thus saving us from spending money on 2 trips to a fancy restaurant :P (yes, our Asian-ness shines through even when it comes to celebrations!). My mom said that she would treat the two of us to a meal at any restaurant we chose; my dad, being undecisive and unable to discern between a quality dining experience and a meal at a local Denny's, left the decision making up to me (thank goodness). But, with all of the fancy restaurants located in the Metro-Vancouver area, I wasn't sure of where to start my search.

Finally, after searching for a few hours on my favorite restaurant review site (dinehere.ca) I stumbled upon the reveiw of Mosaic: Bar and Grill, located on the upper level of the Hyatt Regency Hotel. I had never heard of this restaurant before, but apparently from the reviews, it's a hidden gem that must be tried at least once (also, they give free dessert if it's your birthday :P). And to my mother's surprise, there was a buy-one-entree-get-one-free coupon in the 2008-2009 Entertainment book so we were gonna save big-time on this fancy meal :) YEAH!

Check out their website: http://vancouver.hyatt.com/hyatt/hotels/entertainment/restaurants/index.jspWe decided to drive downtown rather than take the transit, and boy oh boy was this NOT the night to dine at the Hyatt Regency Hotel. Apparently a whole bunch of grade twelve students had decided to celebrate their graduation dinner on my birthday... the nerve!!! :P The lobby of the hotel was packed, and for a minute I was worried that Mosaic would be packed full of noisy teens but luckily they were dining in one of the hotel's conference rooms. Once we arrived at the restaurant, my parents and I were blown away by the crisp, fresh atmosphere of the restaurant. Although it was a hotel restaurant, it had a very classy, west-coast feel to it. We were seated by a very nice host, who introduced us to our waiter and was very kind and courteous.

The set up of the menu was very unique, it came on a clip-board and was very simple. Although it only had a few appetizers and entrées to choose from, their was a great variety in the choices. There were vegetarian dishes, seafood, soups, salads, steak, lamb and poultry. They were also kind enough to suggest wine pairing for a number of the entrées, but since my mom, dad and I are not wine connoisseurs my dad got a Granville-Island Lager, my mom a Golden Margarita and I chose a Sour Apple Martini.

Before our entrées arrived, we were served some warm foccacia bread, olive bread and sesame-poppy seed flatbread. This was a nice change from the classic "french-bread and balsamic vinegar" that you normally recieve from pasta places. The foccacia was very fragrant, as was the olive bread, and the flatbread was crisp and light. The flatbread reminded my parents of the pappadams they use to eat in Malaysia and Singapore, although they said that these breads were much less greasy.

To my surprise, the freebies didn't end there. Our server came around with these little porridge spoons that were carrying the cutest little crab-cakes I had ever seen. One bite into the crab cake, and my first reaction was "woah, this is real crab!" and then "woah, this is sooo good!"

And now, on to the entrées...
My mom is a fairly picky eater, and didn't want to have any fish because she's cautious of the dangers that their little bones pose on her mouth/throat... so she decided to have the 8 oz. mesquite New York strip with shallot butter, haricots, mushrooms and the most amazing potato-leek gratin!! Yes, it cost $34 but it was a very delicious steak.

My dad ordered the chicken legs with tomato ragu, asparagus, creamy mashed potatos and au jus. This dish was $26, and my dad said that it was one of the best pieces of chicken he had ever eaten. (That's saying a lot, because he's eaten a lot of chicken in his life-time)

I of course ordered the lamb. Honestly, anytime there's lamb on the menu my eyes (and stomach) will gravitate towards it. I ordered my lamb rare, and it came out perfectly. The meat was delicious, and far more fresh than any other lamb I'd tried in the past. The lamb was paired with a compote of tomatoes, pearls of yellow squash and zucchini on a bed of arugala. This mixture was topped with a lovely anise-flavored spaetzle (a dish that my close-friend has often suggested I try... and now I see why) and the three medallions of lamb surrounded the beautiful garnish. This dish was truly a masterpiece. All of the flavors married each other so well; the meat was wonderfully tender, and the vegetables were cooked to perfection. Although it cost $34, I would definitely order this dish again.

My mom had heard that Mosaic Bar and Grill provided those celebrating their birthdays with a lovely chocolate cake, but when we asked our server if there was any chocolate cake tonight for our birthday dinner she regretfully informed us that they had sold out. I was a bit disappointed because I had heard so many great things about their giant chocolate ganache cake, and was really looking forward to sampling it. But, our server was so nice that she told us that we would be able to choose anything we wanted from the dessert menu to have for dessert on-the-house. She was so nice about it, and even brought out my dessert with a little candle on top!
My dad ordered the cheesecake, which we all had a sample of. It was divine! The cheesecake was not too dense, but nice and airy; and, the blueberry compote was delicious as well. This dish would have been $8, but for the b-day guy it was complimentary!


One look at the menu and I knew that I wanted the crème brulée. The dish came served with three miniature madelienes (you can only see one in the above picture), a small cup of caramel macchiato and a ramekin of crème brulée. The madelienes were not as flavorful as I would have liked, I was hoping for some citrus essence but I think it was just plain vanilla. However, when you dunk the madelienes in the caramel macchiato the flavors just explode in your mouth! The brulée itself was superb. The custard had a wonderfully smooth texture and the thick layer of caramelized sugar was perfectly crisp and crunchy. This dish would have been $8 but since it was my b-day it was free!!!

All in all, the dining experience at Mosaic Bar and Grill was one that I will never forget. The atmosphere was wonderful, the staff were very friendly and accomodating. We did not feel rushed at all, and the food was spectacular. I think that the only reason we may not return to this restaurant is that the price-range is a little high. We normally don't spend over $100 on dinner for 3, and even with the coupon and free desserts our bill came to over $100. However, despite the pricey menu I must say that this was one of the most gourmet dining experiences I've ever had the pleasure of enjoying and I would do it again... if only we had another Entertainment book coupon :P

Monday, May 04, 2009

A Bread Machine and Sticky Buns

I have often wondered how some of my favorite bloggers manage to have such great success with baking with yeast... happyhomebaker, dowhatIlike and bakingfiend (see links on the right) always manage to create such beautifully creative, fluffy and perfect loaves of bread... chinese buns and mantou. Oh, how I have been envious of their success with yeast because it seems no matter how hard I try and how decent my breads/buns/pretzels turn out, they're never as fluffy, fragrant or tastey as I would like them to be.

But what's this!?!?

A bread machine!!?! Yes, yes it is... I finally sprung for a bread machine! Yay! I feel like I've been spending a lot of money on random things lately (online shopping, craigslist stuff, baking accessories) but thankfully this bread machine did not cost an arm-and-a-leg. It was actually on sale at Walmart for only $55. When I saw the price, I thought that I had to be dreaming... but once I realized that this amazing deal was calling out to me I decided that I had to buy it. I actually had a discussion with my conscience that went something like...

"You don't have $50 bucks to splurge on a bread machine" "But think about all of the money I'll save by not having to buy bread each week" "--- erm... okay"

(I know, my conscience isn't that great of an arguer :P)

Anyways, the second I brought my bread machine home I was already thinking about different recipes that I wanted to try. But before I could make anything, my conscience spoke to me again and said "read the manual! and don't try anything stupid!" luckily, my erratic mind decided to listen. After reading the manual and inspecting all of the parts for damage I was ready to make something... and I decided to bake STICKY BUNS!

Cranberry Sticky Buns
Yields 12 buns (fits in an 8-inch cake pan)

Ingredients for Dough:
1/4 cup milk
1/4 cup water
1 egg
1/4 cup sugar
2 tbsp butter
1/2 tsp salt
2 1/2 cups flour
21/4 tsp active yeast

Ingredients for Filling:
2 tbsp butter, melted
1 tbsp cinnamon (or more if really like cinnamon)
1/3 cup dried cranberries (may substitute raisins)
2 tbsp brown sugar

Ingredients for Glaze:
2 tbsp butter, melted
2 tbsp brown sugar
1/4 cup pine nuts (or your favorite crushed nut)

Method:
1. Combine first 8 ingredients in bread machine, as per bread machine instructions. Set cycle to dough.

2. Once dough cycle is complete, remove mixture from the machine and roll to a 9x14inch rectangle.

3. Pour 2 tbsp melted butter on rectangle and spread over the dough evenly; sprinkle on the brown sugar, cinnamon and cranberries.

4. Roll like a Swiss-roll and slice into 1 inch pieces

5. Prepare an 8-inch cake pan with the sticky glaze by adding melted butter, brown sugar and pine nuts to the pan. Mix thoroughly and then arrange the bun slices into the pan. Cover pan with cling wrap and leave to rise for 30-45minutes

6. After rising, bake at 350degrees for 25-30minutes.

7. Remove from oven, invert onto a serving plate and dish out!

This bread machine was amazing! I just had to add all of the ingredients to the machine as it was instructed in the manual and voila! In 1 1/2 hours, I had a beautifully fluffy dough that was ready for me to play with. These buns were very tasty and even rivaled the cinnamon buns from Cinnzeo! I don't think I'll ever by cinnamon buns again :P The only thing I would change would be to not place the buns in such a small pan. Although the bread was sweet and full of flavor, the small pan didn't allow the rolls to expand to their fluffiest potential :( instead, they were forced to stay more dense.
Note: the above picture shows the lovely white rolls and their sad denseness :`(

Oh well, practice makes perfect... and that gives me an excuse to use the bread machine again! Oh... and I forgot to mention, the aroma of fresh dough wafting throughout the house is the most amazing smell in the world!! They should patent that fragrance and sell it as perfume :P

Tuesday, April 28, 2009

Daring Bakers April '09 Challenge...


When I read that this month's challenge was going to be CHEESECAKE!! I was so excited that I had to make it within the week. Since my sisters had spring break during this month, I enlisted their help to make the cake. They really enjoyed helping me in the kitchen and this challenge became a truly family affair. My mom is a huge fan of tiramisu, thus for this challenge I decided to make a tiramisu version of Abby's Infamous Cheesecake... my alterations to the original recipe will be in red.

The April 2009 challenge is hosted by Jenny from Jenny Bakes. She has chosen Abbey's Infamous Cheesecake as the challenge.


Abbey's Infamous Cheesecake:


crust:
2 cups / 180 g graham cracker crumbs
1 stick / 4 oz butter, melted
2 tbsp. / 24 g sugar
1 tsp. vanilla extract


Ladyfinger Layer:
1 box of ladyfingers
1 cup fresh espresso, cooled to room temperature


cheesecake:
3 sticks of cream cheese, 8 oz each (total of 24 oz) room temperature
1 cup / 210 g sugar
3 large eggs
1 cup / 8 oz heavy cream (1 cup mascarpone cheese)
1 tbsp. lemon juice (omitted)
1 tbsp. vanilla extract (or the innards of a vanilla bean) (1 tbsp rum extract)
1 tbsp liqueur, optional, but choose what will work well with your cheesecake (2 tbsp kahlua)


Decorating:
1/4 cup cocoa powder
Chocolate swirls


DIRECTIONS:
1. Preheat oven to 350 degrees F (Gas Mark 4 = 180C = Moderate heat). Begin to boil a large pot of water for the water bath.


2. Mix together the crust ingredients and press into your preferred pan. You can press the crust just into the bottom, or up the sides of the pan too - baker's choice. Set crust aside.


3. Combine cream cheese and sugar in the bowl of a stand-mixer (or in a large bowl if using a hand-mixer) and cream together until smooth. Add eggs, one at a time, fully incorporating each before adding the next. Make sure to scrape down the bowl in between each egg. Add heavy cream (mascarpone), vanilla (rum extract), lemon juice (omitted), and alcohol (Kahlua) and blend until smooth and creamy. Set aside.

4. Prepare ladyfinger layer by placing cooled espresso in a shallow bowl. Working quickly, dip ladyfingers one at a time in the espresso for only about 7seconds. Then place the soaked ladyfinger in the pan (on top of the prepared crust layer). Continue with the remaining ladyfingers until the bottom of the pan is covered in an even layer of ladyfingers. Note: If you are using a circular cake pan, you may have to "cut"/break some of the ladyfingers to fit in the pan.

5. Pour cream cheese batter into prepared crust and tap the pan on the counter a few times to bring all air bubbles to the surface. Place pan into a larger pan and pour boiling water into the larger pan until halfway up the side of the cheesecake pan. If cheesecake pan is not airtight, cover bottom securely with foil before adding water.


6. Bake 45 to 55 minutes, until it is almost done - this can be hard to judge, but you're looking for the cake to hold together, but still have a lot of jiggle to it in the center. You don't want it to be completely firm at this stage. Close the oven door, turn the heat off, and let rest in the cooling oven for one hour. This lets the cake finish cooking and cool down gently enough so that it won't crack on the top. After one hour, remove cheesecake from oven and lift carefully out of water bath. Let it finish cooling on the counter, and then cover and put in the fridge to chill. Once fully chilled, decorate by dusting it with cocoa powder and arranging chocolate swirls on top. Now it is ready to slice and serve!


Pan note: The creator of this recipe used to use a springform pan, but no matter how well she wrapped the thing in tin foil, water would always seep in and make the crust soggy. Now she uses one of those 1-use foil "casserole" shaped pans from the grocery store. They're 8 or 9 inches wide and really deep, and best of all, water-tight. When it comes time to serve, just cut the foil away.


Prep notes: While the actual making of this cheesecake is a minimal time commitment, it does need to bake for almost an hour, cool in the oven for an hour, and chill overnight before it is served. Please plan accordingly!

My sisters really enjoyed working with me on this challenge. It was a lot of fun, and it was great to see them so excited to eat something that they helped make! We all enjoyed licking the bowl/spoons/spatulas/fingers after putting the cheesecake in the oven... that is always one of the highlights about baking. And since we couldn't all finish the whole cake in one night, we froze some of it to eat the next day... OMG! Frozen cheesecake is simply divine! The only alteration I would make to my Tiramisu Cheesecake would be to possibly make a second layer of lady fingers (i.e. layer the cheesecake: crust, ladyfingers, cream cheese, ladyfingers, cream cheese). I found that while I really enjoyed the bottom ladyfinger-layer, there simply was not enough of it, and you could barely distinguish it from the crust layer (I guess the heavy cream cheese batter kind of squished it flat :P)

Thursday, April 23, 2009

Butterscoth Cereal Bars


They're super easy and super tasty... I looooove these cereal bars. I don't quite know why, but for some reason I woke up this morning craving not cereal + milk but cereal bar sweets. I riffled through my pantry looking for some marshmallows, but to no avail. So I decided to try out this cereal-bar recipe that my friend gave to me, which didn't require marshmallows. The original recipe calls for peanut-chippers (the Reese's chips that look like chocolate chips), but since that would mean that my sister could enjoy the cereal bars I decided to use butterscotch chips instead. And now... on with the recipe!

Butterscotch Cereal Bars

Ingredients:
- 1/2 cup butter
- 1/2 cup brown sugar, packed
- 1/2 cup corn syrup
- 1 cup butterscotch chips
- 6 cups of your favorite cereal (I used half Cheerios and half Nesquik)
- Melted chocolate, to drizzle (optional)

Method:
1.Heat butter, brown sugar and corn syrup in a small saucepan. Stir until sugar dissolves.
2. Stir in the butterscotch chips until they are fully melted. Remove mixture from heat and add in the cereal, mixing well.
3. Press the cereal mixture into a prepared 9x13-inch pan. Let rest at room temperature and then slice, drizzle with melted chocolate and enjoy!

These bars were a wonderful breakfast treat... although I did end up enjoying them for a mid-morning snack as well. Apparently they are really sweet, but since my taste-buds are sort of adapted to anything super-sweet I couldn't really tell (that's not good is it??!! :P) My sisters really enjoyed eating the bars while they were still slightly warm and gooey, but I preferred them more crunchy. I may try making this recipe with peanut-butter chips, if I bring this recipe to a potluck or something... mmmm, I can just taste it now!

Sunday, April 19, 2009

Chocolate Pudding Cake

I just ran the Sun Run for the second year in a row... and I think my time was much better than last years. Last year I joined the "purple" group of runners expecting to finish the race in an hour and fifteen minutes, but this year I decided to join the "green" group, as I anticipated completing the race under an hour. I pleasantly surprised myself by finishing the 10k in 50minutes even!! Yay me :) This year was the 25th anniversary of the Sun Run, but strangely enough there were fewer runners at this years event than there were last year!? Go figure. But even though there were fewer than last year, there were still around 50,000 participants registered to run!

So, to treat myself and my dad (who decided that he'd join me on the Sun Run for a second time! Yay dad!) for a job well done, I decided to whip up something warm, comforting, chocolaty and gooey... chocolate pudding cake!


Chocolate Pudding Cake


Pudding

1 1/4 cups water
1/3 cup semisweet chocolate chips
2/3 cup brown sugar
4 tablespoons cocoa
1 teaspoon vanilla

Cake

3/4 cup all-purpose flour
2/3 cup granulated sugar
4 tablespoons cocoa
1 1/2 teaspoons baking powder
1/2 teaspoon salt
1/2 cup milk
3 tablespoons vegetable oil

Method:
Preheat the oven to 350 degrees
1. For Pudding: in a saucepan, heat the water with chocolate chips until the chocolate chips melt. In a bowl, stir the brown sugar and four tablespoons of cocoa together. Add brown sugar-cocoa mixture to the saucepan and stir until mixed. Remove from heat and add the vanilla
2. For the Cake: mix flour, granulated sugar, four tablespoons cocoa, baking powder, and salt together in a medium bowl. Add milk and vegetable oil and mix until combined. Scrape batter into an un-greased 9x9 baking pan.

3. Pour hot pudding mixture over batter. Place pan in the oven and bake for 25 minutes or until a toothpick inserted in the cake comes out clean. Cool in the pan on a rack.

4. Serve pudding-cake hot with a scoop of vanilla ice cream!


The cake was amazing, even the cooled down pieces (as pictured directly above) were still slightly "gooey" and chewy the next day. But of course, the best part was eating the cake while it was still piping hot, fresh from the oven... with a scoop of my favorite ice-cream (rainbow flavor!). This recipe is definitely a keeper and I will be making this recipe a staple in our house-hold... not only for a post-run snack, but for anytime I want chocolate cake... because it's just so simple to make!

Thursday, April 09, 2009

Peach Cakes


I've had a couple of Dole ready-to-eat canned peaches hanging around my pantry, and nobody in my family is a huge fan of the syrup-drenched mushy fruits. Actually, I'm not even sure where these canned peaches came from... my sisters must have gotten it from school friends or something?!? Anyways, I was thinking of a way that I could use up these fruits so that everyone would eat them and I could clear up some space in my pantry for some more necessary baking ingredients (not quite sure what I'd consider most necessary in the kitchen?). So, I came up with this simple recipe for Peach Cakes... it's almost like a cobbler/slump-cake but with a tasty, moist, scone-like topping versus a crumbly biscuit.

Peach Cake

Ingredients for Peach Filling:
3 cans of the ready-to-eat, small peach cans (drained of half the liquid)
2 tsp corn starch
1/4 tsp cinnamon
1/4 tsp nutmeg
1 tbsp brown sugar

Method:
1. In a small bowl, combine the peaches with the halved-liquid with the cornstarch, cinnamon, nutmeg and brown sugar. Evenly distribute this mixture into 4 ramekins until they are 1/2 to 2/3 full of fruit.
2. Make the topping.

Ingredients for Topping:
1 egg
1/3 cup milk
1/4 cup melted butter
1 cup flour
1/4 cup sugar
2 tsp baking powder
1/4 tsp salt

Method:
1. In a separate bowl, mix butter, milk and egg.
2. Add in the sugar and stir.
3. Combine the dry ingredients, then add them to the wet ingredients. Stir until well combined.
4. Using an ice-cream scooper, scoop a portion of the mixture and place on top of the peach mixture in the ramekins. Cover the fruits fully with the topping.
Optional: Sprinkle 1 tbsp sugar on top of the topping, and before baking. This will give the top layer a nice crunch.
5. Bake for 45 minutes at 350 degrees, or until the top is golden brown.

Well, my plan worked and the peaches were used up. My sisters came home from school and actually ate their fruits! Yeah! Hmmm... now all I have to do is find that "necessary ingredient" to fill my pantry??

Wednesday, April 01, 2009

Mincemeat Bars

I know it's not the season for mincemeat, but hey... when they're in bar-form and super tasty, anyone will gobble them up even though it's not Christmas. But I have some very good reasons for making these mincemeat bars...

Reason #1: it was snowing today (I know!! April 1st does not equal snow in a logical world :P) so I thought I may as well take advantage of the frigid weather and make some piping hot baked goodies.
Reason #2: since it's not mincemeat season Save-on-Foods was clearing out all their mincemeat (yup, I can't resist a great deal)
Reason #3: I love, love, love mincemeat... it's so good by itself or spread on toast (I know, I'm strange)

Anyways, I'll stop trying to justify my baking escapades and give you the recipe!

Mincemeat Bars
Recipe Adapted from TheBakingPan.com
Yields 24 bars


Ingredients:
- 1 cup flour
- 1/4 tsp baking soda
- 1/4 tsp salt
- 1/2 tsp cinnamon, ground
- 1/2 tsp cloves, ground
- 1/2 tsp allspice, ground
- 1/2 tsp nutmeg, ground
- 1 egg
- 2 tbsp butter, room temperature
- 3/4 cups brown sugar, packed
- 2 tbsp molasses
- 1/2 tsp rum extract
- 1/2 tsp vanilla extract
- 1 cup mincemeat
- 1/2 cup raisins
- 1/2 cup pine-nuts (pecans or walnuts can be substituted)
- powdered sugar for dusting

Method:
1. Preheat oven to 350 degrees. Grease and flour a 13x9-inch baking pan (Note: I lined the pan with aluminum foil, leaving some over-hang on the sides of the tray. This provides "handles" for easy removal of the bars when they're finished baking)
2. Sift together the flour, baking soda, salt and spices. Set aside
3. In a separate bowl, combine egg, butter, brown sugar and molasses; mix well. Add in the rum and vanilla extract and mix; add in mincemeat, raisins and pine-nuts, continue mixing until well incorporated.
4. Pour the batter into the pan, and spread into an even layer. Bake in oven for 25-30 mins or until a toothpick inserted comes out clean.
5. Allow the bars to cool until warm, at room temperature; then, use a sifter to dust the bars with powdered sugar. Allow them to cool fully and then slice into 2 inch squares.

When spreading the batter into the pan, I was a bit worried that I wouldn't have enough. It looked like the batter was spread-out fairly thin and that the bars wouldn't be thick enough, but thankfully they rose to almost triple their height in the oven. In the end these bars were great! They tasted just like gingerbread, with mincemeat and pine-nuts studded throughout! I was so impressed that the rest of my family enjoyed it, even though they're not fans of mincemeat... I guess it was that good.