

Friday, August 27, 2010

August's Daring Baker's Baked Alaska


I've always wanted to try my hand at making a real baked Alaska. I say real, because I've made a baked Alaska once before... a long time ago in my High School Home Economics class... it didn't turn out so well :P But with this month's Daring Baker challenge asking us bakers to try out hand at this finicky dessert I new I had to have my "A-game". My variation for this DB recipe was to make a banana-rum baked Alaska. The cake base would consist of a brown-butter banana bread pound cake, and the ice cream would be a cinnamon, maple, rum flavor.
The August 2010 Daring Bakers’ challenge was hosted by Elissa of 17 and Baking. For the first time, The Daring Bakers partnered with Sugar High Fridays for a co-event and Elissa was the gracious hostess of both. Using the theme of beurre noisette, or browned butter, Elissa chose to challenge Daring Bakers to make a pound cake to be used in either a Baked Alaska or in Ice Cream Petit Fours. The sources for Elissa’s challenge were Gourmet magazine and David Lebovitz’s “The Perfect Scoop”.

Individual Baked Alaska

Vanilla Ice Cream

- 1 cup (250ml) whole milk
- A pinch of salt
- 3/4 cup (165g) sugar
- 1 vanilla bean, split lengthwise OR 2 tsp pure vanilla extract
- 2 cups (500ml) heavy (approx 35% butterfat) cream

- 5 large egg yolks- 1 tsp pure vanilla extract
- My Variation: substitute 2tsp vanilla with 2tsp rum extract, add 1/2tsp ground cinnamon and 2tsp maple syrupMethod:
1. Heat the milk, salt, and sugar in a medium saucepan until the liquid steams. Scrape out the seeds of the vanilla bean (or extract if using) with a paring knife and add to the milk, along with the bean pod. Cover, remove from heat, and let infuse for an hour. (If making cinnamon-maple ice cream, add in the powder and syrup now!)
2. Set up an ice bath by plac
ing a 2-quart (2 litre) bowl inside a large bowl partially filled with water and ice. Put a strainer on top of the smaller bowl and pour in the cream.
3. In another bowl, lightly beat the egg yolks together. Reheat the milk in the medium saucepan until warmed, and then gradually pour ¼ cup warmed milk into the yolks, constantly whisking to keep the eggs from scrambling. Once the yolks are warmed, scrape the yolk and milk mixture back into the saucepan of warmed milk and cook over low heat. Stir constantly and scrape the bottom with a spatula until the mixture thickens into a custard which thinly coats the back of the spatula.
4. Strain the custard into the heavy cream and stir the mixture until cooled. Add the vanilla extract (1 teaspoon [5ml] if you are using a vanilla bean; 3 teaspoons [15
ml] if you are not using a vanilla bean) and refrigerate until thoroughly chilled, preferably overnight.
5. Remove the vanilla bean and freeze in an ice cream maker. If you don’t have an ice cream maker, you can make it without a machine.
Brown Butter Pound Cake
- 19 tbsp (275g) unsalted (sweet) butter
-- or if making banana brown-butter cake, use 8 tbsp butter and 1/2 cup mashed banana
- 2 cups (200g) sifted cake flour (not self-rising; sifted)
- 1 tsp baking powder- 1/2 tsp (3g) salt
- 1/2 cup (110g) packed light brown sugar
- 1/3 (75g) cup granulated sugar
- 4 large eggs- 1/2 teaspoon pure vanilla extractMethod:
1. Preheat the oven to 325°F/160°C and put a rack in the center. Butter and flour a 9”x9” (23cmx23cm) square pan.
2. Place the butter in a 10” (25cm) skillet over medium heat. Brown the butter until the milk solids are a dark chocolate brown and the butter smells nutty. (Don’t take your eyes off the butter in case it burns.) Pour into a shallow bowl and chill in the freezer until just congealed, 15-30 minutes.3. Whisk together cake flour, baking powder, and salt.
4. Beat the brown butter (if making banana-brown butter cake, add mashed banana now), light brown sugar, and granulated sugar in an electric mixer until light and fluffy, about 2 minutes. Beat in the eggs one at a time, mixing well, and then the vanilla extract.
5. Stir in the flour mixture at low speed until just combined.

6
. Scrape the batter into the greased and floured 9”x9” (23cmx23cm) square pan. Smooth the top with a rubber spatula and rap the pan on the counter. Bake until golden brown on top and when a toothpick inserted into the center comes out clean, about 25 minutes.
7. Cool in the pan 10 minutes. Run a knife along the edge and invert right-side-up onto a cooling rack to cool completely.Meringue (For the Baked Alaska)
- 8 large egg whites
- ½ teaspoon (3g) cream of tartar
- ½ teaspoon (3g) salt
- 1 cup (220g) sugar

Method:
1. Beat the egg whites, cream of tartar, and salt on high speed in an electric mixer until soft peaks form. Beat in the sugar gradually in a slow stream until stiff peaks form.


Assembly Instructions – Baked Alaska
1. Line four 4” (10cm) diameter tea cups with plastic wrap, so that plastic wrap covers all the sides and hangs over the edge. Fill to the top with ice cream. (For my banana-rum baked Alaska, I sliced pieces of banana and layered it on top of the ice cream after I pressed it into the bowls/cups)

2. Level the top of the brown butter pound cake with a serrated knife or with a cake leveler. Cut out four 4” (10cm) diameter circles from the cake. Discard the scraps or use for another purpose.

3. Make the meringue (see above.)

4. Unwrap the ice cream “cups” and invert on top of a cake round. Trim any extra cake if necessary.
5. Pipe the meringue over the ice cream and cake, or smooth it over with a spatula, so that none of the ice cream or cake is exposed. Freeze for one hour or up to a day.

I attempted to use my hand-held long-ended lighter to brown the edges of the meringue but I suppose the flame wasn't hot enough for the browning effect to be properly seen. Note to self: invest in a good quality hand-held torch (justify the need for one by making creme brulee and baked Alaskas at least 2 times a week :P). So, with the failed attempt at browning with my lighter, I decided to just put the baked Alaska in the oven as the recipe had described. In the end, there was a little bit of a mess on my pan. I must have missed a spot during the meringue piping process, leaving a part of the ice cream exposed. This resulted in a little bit of a melty, leakage of ice cream through the meringue layer... but, thankfully, I pulled the dessert out of the oven before any real damage was done. And my sisters, my parents and I decided to just enjoy the dessert communally, straight off the pan. I cannot describe the taste, only that it was deliciously sweet, cakey and fluffy (thanks to the meringue). I will definitely be trying this recipe again.
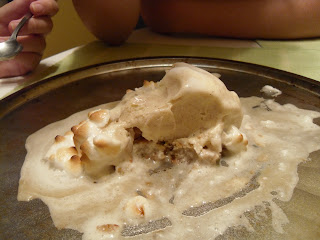
Mmm... the aftermath of the melty, fluffy, sweet dessert! What a nice treat on a warm summer's day.

Tuesday, August 17, 2010

Mac&Cheese... on a stick!


Okay... before you think I've gone completely insane with the comfort food on a stick thing, I'll have you know that I'm simply making this recipe in order to enter a "Food on a Stick Contest". Actually, I've found that competitions are a great way to light a fire under my butt and spark my creativity when it comes to baking or cooking. Without a little challenge, I'd probably just stick with making the same-old, same-old foods that I've tried over and over and over again. But I digress... you guys probably just want the recipe :P

If you like the recipe, you can check it out at Instructables.com And if you really like it, please vote for my recipe. Voting begins August 22.

Macaroni & Cheese On a Stick

Mac&Cheese Ingredients:

- 3/4 cup elbow macaroni, uncooked

- 2 tbsp butter

- 1 ½ tbsp flour

- 1 ¼ cup warm milk

- Pinch of nutmeg and cayenne pepper

- ½ cup grated cheese (I used marble, but you could use any good quality hard cheese gruyere, mozzarella, cheddar)

- Salt and pepper to taste

Method:
1. In a medium sized pot, bring some salted water to a boil and cook macaroni as per instructions on the bag. Once al dente, drain the pasta and set aside.
2. In a separate saucepan, melt the butter.
3. Add flour to butter, whisking vigorously until mixture if of uniform consistency. Remove pot from heat, and slowly add the warm milk (whisking continuously to avoid lumps).
4. Return butter + flour + milk mixture to stove and bring to a simmer. Add cayenne and nutmeg, and continue to stir.

5. Once sauce thickens, remove pan from heat and add in the cheese. Continue to stir sauce until cheese dissolves.
6. In a rectangular casserole dish, combine the sauce and the macaroni. Mix thoroughly until all pasta is coated with cheese sauce. Cover dish, and place macaroni in the fridge for at least 4 hours (or overnight).
7. Remove refrigerated/day-old macaroni and cheese from fridge.
8. Take handfuls of mac&cheese and form them into balls ~1.5-2inches in diameter.
9. Place balls on a baking tray and return to fridge while you prepare the frying batter.

Batter Ingredients:

- 1 ¼ cup flour

- ¼ cup corn starch

- ½ tsp baking powder

- ½ tsp baking soda

- ¼ tsp salt

- 1 cup cold water (adjust amount of water to produce a batter that is not too runny)

- ½ cup bread crumbs

- ¼ cup grated cheese

- 2 tbsp parmesan cheese

- Pinch of Cajun seasoning and cracked black pepper


Method:
1. Sift together the flour, corn starch, baking powder, baking soda and salt.
2. Stir in the bread crumbs, cheeses, seasonings and pepper.
3. Have cold water ready to add to dry ingredients when your frying oil, mac&cheese balls and cooking station is ready to begin the frying process.

Frying the Balls:
1. Complete preparation of batter mixture by adding the cold water to the dry ingredients. Stir until no lumps remain, and batter is nice and thick (add more flour if batter is too runny).
2. In deep wok, heat 2L of canola oil (or 2-3inches of oil) over medium until it reaches 375degrees (or batter-test the oil temperature: drop a tsp of batter in the oil and if ready, the batter should bubble up to the surface immediately).
3. Remove Mac&Cheese balls from fridge. Place one ball into the batter mixture gently. Use a spoon to coat the sides and top of the ball fully. Use that same spoon to gently drop the battered ball into the hot frying oil. Cook for 3-4minutes (or until batter is nicely browned), remove with a slotted spoon and place on a paper-towel lined plate to cool. 4. Repeat step 3 for all the Mac&Cheese balls. (Note: again, be not alarmed if the balls fall apart slightly. Remain calm! Slowly scoop up the Mac&Cheese bits with your large spoon, and if the pieces are all coated in batter then the ball is remain whole once deep fried ^_^)


Mmm... nothing like Mac& Cheese with Ketchup :)


Friday, August 13, 2010

Black Cherry and Coconut Tart

I had just returned from a 2-day trip to Seattle, and on my answering machine was a message offering me a job as an RN on the unit that I'm currently casual on. "Finally!" I thought to myself, "I'll have a steady schedule, and be able to make plans with friends without having to say 'well, I'm casual and always on-call... so, I may or may not be able to come... we'll have to wait and see'."

Words cannot express my excitement!! And so, to celebrate a wonderfully sunny summer day, and me having a steady job (at least for the next 7 months), I decided to do some baking.

I'd always wanted to bake a fruity, tart-like, butter-cookie based bar... and with my black cherry tree producing an over-abundant amount of tiny, tasty cherries I thought that making a Black Cherry and Coconut Tart (with a shortbread cookie base) would be perfect. My friend works at a bake-shop (in Cloverdale) and they make the best almond-cherry tarts... so, this was my attempt to gain par with their tart... although I'm pretty sure that that would be an impossible feat.

Black Cherry and Coconut Tart


Ingredients:
- 1 cup flour
- 1/4 cup confectioner's sugar
- 1/2 cup butter
- 1/4 cup flour
- 3/4 cup granulated sugar
- 1/2 tsp baking powder
- 1/4 tsp salt
- 1 egg
- 1/2 cup cherries, fresh and pitted
- 1/2 tbsp corn starch
- 1/2 cup shredded coconut

Method:
1. Crust: By hand, combine the first 3 ingredients until a soft, crumbly dough forms. Press this crusty dough into the bottom of a lined baking pan (8x8 square, or 8-inch round). Bake at 350degrees for 25minutes (watch that the edges do not burn).
2. Filling: Combine the cherries and corn starch, mix until all cornstarch is no longer powdery white and visible. In a small bowl, combine the flour, sugar, baking powder and salt. Add the flour mixture to the cherries and mix until well combined. Beat in the egg, beating until uniform batter forms. Add in the coconut, continue to mix until well combined.
3. Pour the filling mixture over the warm crust, bake the tart at 350degrees for another 30minutes. Allow to cool, remove from pan, slice and serve.


This tart had the perfect balance of sweet and tangy. I loved the beautiful purple color that the freshly pitted cherries gave to the filling component of the recipe. Served with ice cream, this was the perfect treat for my summer-time celebration ^_^

Thursday, August 05, 2010

Cassava Cake (Bibingka)

Well, it's still a swelteringly hot summer day... and you'd think that that would mean that I'd stay away from anything hot and potentially sweat-inducing. However, my addiction to baking has rendered it nearly impossible for me to stay out of the kitchen and away from the heat-producing box known as my oven.
Upon opening the fridge this morning, I discovered that I had about a cup of evaporated milk left over from another dish I'd made (I can't quite recall what though, the heat is seriously melting my brain o_O) and like any normal person I thought that it'd probably be a good idea to use up the milk in another recipe, before the heat rendered it curdled, sour and just plain disgusting.

I put my thinking cap on, and thought long and hard about what I wanted to make... and then it hit me! Cassava cake! Or Bibingka. My dad makes a wicked cassava cake, and I thought I'd try my hand at making one that was as good as (if not better than) his. So, onward with the recipe...

Cassava Cake (Bibingka)

Yields 1 cake
~8-10 servings

Ingredients:

- 1 pack (454g) frozen, shredded cassava root; thawed

- 250ml evaporated milk

- 250ml coconut milk

- 2 eggs
- 1/2 cup sugar

- topping: shredded coconut + brown sugar mixed together (optional)

Method:

1. Mix all ingredients together

2. Pour into two 8-inch round glass pan (or two 8x8inch square glass pans) that have been well greased.

3. Place dishes in a water bath and bake at 350degrees for 1hour.

4. Remove bibingka from water bath and sprinkle on the topping if desired. Continue to bake for another 25-35minutes (without water bath).

5. Set oven to broil and cook for 5minutes (or until the top of the cake is nicely browned).

6. Remove from oven and allow to cool before slicing.


The heat from the oven was unbearable... but the smell that the cake gave off was simply delightful. I couldn't stay away :P And the cake itself, although I'll admit, not as good as my dad's recipe, was pretty darned good. My dad's bibingka is usually more chewy and glutinous than the recipe I made. This bibingka was more like a firm, creamy, egg and cassava pudding... not too sweet, but just sweet enough and with just enough coconut milk to not overpower the cassava taste. I'll have to ask my dad for his recipe... because there's one more pack of frozen cassava in the freezer and I definitely want to learn the secret to his chewy cassava cake recipe.

One thing that I'd probably do differently, is that I'd make the cake a bit thicker. Upon pouring the batter into the glass dish, I realized that I had much more batter than would fit into the glass dish; however, the leftover batter was not enough to make a completely whole, second cake. Perhaps if I had a larger glass dish... maybe a 9x13inch rectangle glass dish would have been just the right size. Well... there's always next time, because this recipe is so simply and easy to make! But, I'll probably wait until the heat dies down before I get back into that blazing hot kitchen.

Wednesday, July 28, 2010

July '10 Daring Baker's Challenge: Swiss Swirl Ice Cream Cake

The weather this summer has been tolerable but not very pleasant. Yes, the summer sun is out in full force and wrecking havoc upon those of us who dread the sunlight. I'm not a cold-blooded monster per se, just more of a fall/winter girl. Yes, I rather enjoy the cool, damp Autumn showers as well as the blisteringly frigid breeze that December brings. But that's not to say that summer doesn't have it's positive notes; one thing is for certain, during the summer-time nobody can give you the "glarey-eyes" if they catch you eating ice cream for dinner :P. And if they do give you the "glarey-eye" you know it's only because they're jealous that you're enjoying a frosty treat whilst they are left to suffer in the sweltering heat, without the reprieve of their own tasty sweet. Okay, maybe some of you health-nuts and parents out there don't condone ice cream as a meal... but when you're desperate and sweaty you must admit that nothing beats ice cream.

Anyways, all this banter is simply leading into this month's Daring Baker's Challenge which was hosted by Sunita of Sunita’s world – life and food. Sunita challenged everyone to make an ice-cream filled Swiss roll that’s then used to make a bombe with hot fudge. Her recipe is based on an ice cream cake recipe from Taste of Home.

So... on with the recipe... and the pretty pictures


Swiss Rolls

Ingredients:
- 6 medium sized eggs
- 1 cup caster sugar + extra for rolling
- 6 tbsp, a pinch over 1.5 oz of all purpose (plain) flour + 5 tbsp/a pinch under 1.5 oz of natural unsweetened cocoa powder, sifted together
- 2 tbsp of boiling water
- a oil for brushing the pans


Filling:
- 2 cups whipping cream
- 1 vanilla pod, cut into small pieces of ~ ½ cm (or 1 tsp vanilla extract)
- 5 tbsp caster sugar


Method:
1. Pre heat oven to 200C or 400F.
2. Brush baking pans ( 11 x 9 in) with a oil and line with greaseproof baking paper. If you have just one pan, bake one cake and then let the pan cool completely before using it for the next cake. 3. In a large mixing bowl, beat together eggs and sugar until very thick; when the beaters are lifted, it should leave a trail on the surface for at least 10 seconds.
4. Add the flour mixture, in three batches and fold in gently with a spatula. Fold in the water.
5. Divide the mixture among the two baking pans and spread it out evenly, into the corners of the pans.
6. Place a pan in the center of the pre-heated oven and bake for about 10-12 minutes or till the center is springy to the touch.
7. Spread a kitchen towel on the counter and sprinkle a little caster sugar over it.
8. Turn the cake on to the towel and peel away the baking paper. Trim any crisp edges.
9. Starting from one of the shorter sides, start to make a roll with the towel going inside. Cool the wrapped roll on a rack, seam side down.
10. Repeat the same for the next cake as well.
11. Grind together the vanilla pieces and sugar in a food processer till nicely mixed together. If you are using vanilla extract, just grind the sugar on its own and then add the sugar and extract to the cream.
12. In a large bowl, add the cream and vanilla-sugar mixture and beat till very thick.
13. Divide the cream mixture between the completely cooled cakes.
14. Open the rolls and spread the cream mixture, making sure it does not go right to the edges (a border of ½ an inch should be fine).

15. Roll the cakes up again, this time without the towel. Wrap in plastic wrap and chill in the fridge till needed, seam side down.


Vanilla Ice Cream

Ingredients:
- 2 ½ cup whipping cream
- 1 vanilla bean, minced or 1 tsp vanilla extract
- ½ cup granulated sugar

Method:
1. Grind together the sugar and vanilla in a food processor. In a mixing bowl, add the cream and vanilla –sugar mixture and whisk lightly till everything is mixed together. If you are using the vanilla extract, grind the sugar on its own and then and the sugar along with the vanilla extract to the cream.
2. Pour into a freezer friendly container and freeze till firm around the edges. Remove from the freezer, beat till smooth and return to the freezer. Do this 3-4 times and then set completely.


The Hot Fudge Sauce

Ingredients:
- 1 cup caster sugar
- 3 tbsp natural unsweetened cocoa powder
- 2 tbsp cornflour/cornstarch
- 1 ½ cup water
- 1 tbsp butter
- 1 tsp vanilla extract

Method:
1. In a small saucepan, whisk together the sugar, cocoa powder, cornflour and water
2. Place the pan over heat, and stir constantly, till it begins to thicken and is smooth (for about 2 minutes).
3. Remove from heat and mix in the butter and vanilla. Keep aside to cool .

The Chocolate Ice Cream

Ingredients:
- 2 cups whipping cream
- 1 cup caster sugar
- 3 tbsp natural unsweetened cocoa powder

Method:
1. Grind together the sugar and the cocoa powder in a food processor .
2. In a saucepan, add all the ingredients and whisk lightly.
3. Place the pan over heat and keep stirring till it begins to bubble around the edges.
4. Remove from heat and cool completely before transferring to a freezer friendly container till firm around the edges. If you are using an ice cream maker, churn the ice cream according to the manufacturer’s instruction, after the mixture has cooled completely.
5. Remove from the freezer, beat till smooth and return to the freezer. Do this 3-4 times and then set completely


Assembly
1. Cut swiss rolls into 20 equal slices (~2 cms each)
2. Cover the bottom and sides of the bowl in which you are going to set the dessert with cling film/plastic wrap.
3. Arrange two slices at the bottom of the pan, with their seam sides facing each other. Arrange the Swiss roll slices up the bowl, with the seam sides facing away from the bottom, to cover the sides of the bowl. Cover the bowl with plastic wrap and freeze till the slices are firm (at least 30 minutes).
4. Soften the vanilla ice cream. Take the bowl out of the freezer, remove the cling film cover and add the ice cream on top of the cake slices. Spread it out to cover the bottom and sides of the bowl. Cover the bowl with plastic wrap and freeze till firm ( at least 1 hour)

5. Add the fudge sauce over the vanilla ice cream, cover and freeze till firm . ( at least an hour)
6. Soften the chocolate ice cream and spread it over the fudge sauce. Cover with plastic wrap and freeze for at least 4-5 hours till completely set .
7. Remove the plastic cover, and place the serving plate on top of the bowl. Turn it upside down and remove the bowl and the plastic lining. If the bowl does not come away easily, wipe the outsides of the bowl with a kitchen towel dampened with hot water. The bowl will come away easily.
8. Keep the cake out of the freezer for at least 10 minutes before slicing, depending on how hot your region is. Slice with a sharp knife, dipped in hot water.

I decided against making the hot fudge part and the chocolate ice cream part because I had gone a little overboard with the chocolate-ness of my swiss rolls. The over-zealousness of my frosting and my decision to make the frosting chocolate flavored versus vanilla flavoured was probably my downfall. The frosting kinda oozed out, and since it was a similar color to the cake it didn't really create that nice color-differentiation that would have added a lovely finesse to the Swiss Roll. Oh, well... there's always next time.

Also, I didn't have enough whipping cream to make a separate batch of chocolate ice cream, so I simply used up all of my vanilla ice cream to fill the bombe. I'm sure if I used the hot fudge and chocolate ice cream, the bombe would have looked ultra-fantastic... but my sisters and my parents were just so happy that I had made a cold treat for them to enjoy that had both the deliciousness of cake and the refreshing creaminess of ice cream. I really enjoyed making this recipe, and will definitely do it again sometime... probably sticking closer to the original recipe than I did this time.

Friday, July 16, 2010

Butterless Cookies

Living on my own, and trying to manage my budget for only the necessities (i.e. cds, comics, trading cards and other collectibles :P), I've noticed that butter has not become one of my regular staples in the house. I don't use butter all that often, opting to spread my toast with banana spread, kaya, pb or jam, and the only butter I have in my condo are those individual packets that I've kept from my late-night Tim Horton's runs ^_^
These mini-packs of butter are clearly not sufficient to make baked goods with; so, now when I feel compelled to bake a batch of cookies I've learned that I can be pretty savvy with my ingredient substitution. This morning, I think I may have found the perfect recipe for soft and tender butterless cookies!

Butterless Cookies (Yields 30 cookies)

Ingredients:

- 1 1/3 cup flour

- 1 cup dry oats

- 1 tsp baking soda

- 1 tsp baking powder

- 1/4 tsp salt

- 1/4 tsp each: cinnamon and allspice

- 1/2 cup granulated sugar

- 1/2 cup brown sugar, loosely packed

- 1 egg

- 1 tbsp maple syrup

- 1 tbsp caramel sundae syrup

- 2 heaping tbsp fat-free miracle whip

- 2 tsp water

- 1/2 cup of whatever mix-ins you like (I went with rum soaked raisins, cranberries and almonds)


Method:

1. Combine the flour, oats, baking powder, baking soda, salt and spices. Set aside

2. In a separate bowl, mix together the egg, sugar, syrups, water and miracle whip.

3. Add the wet ingredients to the dry ingredients and stir until well combined.

4. Add in the desired mix-ins.

5. Place on prepared baking sheet and bake at 350degrees for 8-10minutes. Cool on wire rack and serve.

These cookies were simply delicious and so moist that you wouldn't have believed there was no butter added. I don't know why I decided to add the miracle whip... I guess I just looked in my fridge and thought "Well, this is the most butter-esque thing I have in my fridge and I do like the taste of miracle whip... so why not?" And I'm glad I did, because it added so much life to these little cookies. Mmmmmm... now I shall go and share the goodness with the world (or my world anyways... aka my family).

Thursday, July 15, 2010

Vietnamese Salad Rolls

With the summer heat making it almost unbearable to use the oven and stove without causing one to go into a gross sweat, I decided upon making a dish that would be quick, fun, easy and anti-diaphoretic. I'd always wanted to try making Vietnamese Salad rolls, as I often buy them for a quick lunch at my favorite Asian supermarket T&T. They usually come 3 to a pack and are accompanied by a delicious satay-peanut sauce. However, since I'm trying to save money (what with the crazy HST kicking in and making everything 12% more expensive then necessary) I thought I should try to save money by making my own salad rolls. Also... it's more fun making your own food :P
Vietnamese Salad Rolls (Yields 14 rolls)

Ingredients:
- 14 pieces of Rice Paper Sheets

- 21 pieces of shrimp, cooked
- 115g rice noodles
- 2 cloves garlic, minced very finely
- 2 tbsp ginger, grated finely
- 1/2 small onion, finely chopped
- 2 tsp soy sauce, or more to taste (add slowly - a little goes a long way)
- Pinch of sugar, to taste- 1 tsp white vinegar or rice wine vinegar- 1/3 cup carrots, shredded
- 1/3 cup snow peas, diced
- 1 cup lettuce, shredded
- Hoisin sauce, Sweet Chili sauce, or Spicy Peanut Sauce (see recipe below) to serve
Method:
1. Prepare the shrimp by cooking them and cutting them in half lengthwise; set aside.
2. Prepare Rice Noodle Filling: Place rice noodles in a bowl and cover with boiling water. Let stand for 2 minutes, strain, rinse with cold water, strain again to remove any access water and set aside in a large mixing bowl. To the noodles, add the grated ginger, garlic, onion, soy sauce, sugar, vinegar, carrots and peas. Toss well with tongs to combine the ingredients and set aside.

Note:
Adjust the flavor of the filling to your liking by adding soy sauce (to increase saltiness), sugar (to alter sweetness) or vinegar (to adjust sourness). Other vegetables may also be used in lieu of or in addition to the carrots and peas. Examples: shredded cucumber, green onions, sliced red pepper, sweet corn niblets and any other summer vegetable you enjoy!
3. Prepare Your Work Station: Arrange your work station so it is easy to wrap your salad rolls.
- Soak a clean cloth in warm water and ring until all excess water is removed, place on your work station.
- To the right of your cloth-covered wrapping area have the filling (noodles, shrimp, lettuce) ready to go.
- To the left of your wrapping area have a shallow pan of lukewarm water ready for soaking the dry rice paper sheets.
- Have a dish ready to place your completed salad rolls.
My poorly drawn illustration of what my wrapping-station looked like.

Rice noodle filling atop a sheet of rice paper

4. Ready to Wrap: Quickly dip 1 sheet of dry rice paper in the pan of water, wetting one side and then flipping it over to wet the other side. Place the rice roll on the damp cloth on your wrapping area, fold cloth to cover the rice wrap and let it remain covered for ~30seconds. Unfold cloth, place 3 half-pieces of shrimp onto the lower 1/3rd of the rice sheet, cover with some lettuce and place some noodle filling on top. Fold the lower portion of the rice sheet to cover the filling, fold in the left and right sides of the rice sheet and then roll the rice sheet to make your salad roll. Repeat process for the remaining salad rolls.

5. Can be stored in the fridge, but is best served the say of preparation. Serve chilled, with Hoisin Sauce, Sweet Chili Sauce or Spicy Peanut Sauce.

Spicy Peanut Sauce (Yields 1/3 cup sauce)

Ingredients:
- 3 tbsp crunchy peanut butter
- 1 tbsp ginger, minced
- 1/2 tsp sambal oelek
- 1/2 tsp sriracha (adjust to spice preference)
- 1 clove of garlic, minced
- 1 tsp soy sauce
- 1 tsp white vinegar
- 1/2 tsp sugar
- 1/2 tsp chili pepper flakes
- 1 to 2 tbsp warm water

Method:
1. Whisk together all ingredients in a small bowl.

I more or less guesstimated how to make these salad rolls, but a friend of mine liked this dish so I'm trying to standardize my ingredients list and the method. I think I've recreated the recipe to be almost exactly like the rolls I made yesterday, so if there are any issues with it please let me know and I'll try and touch it up a bit.

I will most definitely be making these salad rolls again sometime soon, especially if the weather continues to be unbearable warm. Well, since the weather is so nice, I should probably go out and enjoy it... so, bye bye computer :P

Tuesday, June 29, 2010

Japadog

The last time I visited a Japadog was when I travelled to downtown Vancouver with my sisters during the Olympics. During this visit, we bought our dogs from the stand on Burrard & Smithe and thoroughly enjoyed them... they were delicious and unique and to be honest, my sisters and I simply adore anything Japanese (cuisine, manga, anime, music etc.). Here are some pictures of our culinary experience at the Japadog stand...
Their cute menu board
Their array of condiments... including: sweet chili sauce, mustard, wasabi mayo, Japanese mayo, honey mustard, dijon mustard, sriracha, ketchup and bacon bits
I decided on the Oroshi Dog (bratwurst topped with grated radish, green onions and soy sauce... the sweet chili-sauce and mayo were my additions), while my sister ordered the Okinomi dog (Kurubuta weiner topped with Japanese mayo, okinomiyaki sauce, bonito flakes and fried cabbage). My other sister remained on the less adventurous side and ordered a regular Kobe beef hot dog.


Flash-forward to yesterday, and it marks the day my sisters and I travelled downtown for another Vancouver outing. We were hankering for something to eat that was quick and affordable and as we walked down Robson Street we noticed that the Japadog sit-down restaurant was now open. So, without hesitation we headed towards the wonderful aroma of cooked meat and ordered us some tasty Japadog creations.
Signage outside of the restaurant
Look at all those hot dog buns!! Crazy!
Their Terimayo dog (teriyaki sauce, seaweed and Japanese mayo) $4.75

The Tonkatsu dog (breaded pork patty topped with red cabbage and Japanese mayo) $4.95


Once I saw this on the menu board, I knew I'd have to try it. Their Yakiniku Rice dog (pork dog with grilled teriyaki beef, lettuce and radish sprouts all in a rice-patty "bun") a bit pricey at $6.25, but totally worth it.


My sister's and I have always found that the quality at the Japadog stalls is always top-notch, and although on the expensive side (especially for a hot dog) we're always willing to pay for it. The only thing I'd have to say about the Yakiniku Rice dog is that you must eat this sitting down. Chomping at this baby is kind of a messy ordeal; and if you're like me and enjoy topping your hot-dogs off with "the works" in terms of condiments, then the drippy-soppy-messiness will be tripled. The rice "bun" of the Yakiniku dog is fairly sturdy and soaks up the meat juices and condiments well, but once it reaches its saturation point it will slowly begin to break apart. I went through my fair share of napkins while eating this bad-boy; yet, while it may have been a challenge to eat, it was really good! I highly recommend that if you're in the Downtown Vancouver area, you try Japadog at least once.

Sunday, June 27, 2010

June Daring Bakers Challenge - Pavlova

I know I've been slacking off severely in my postings. All this hectic business with trying to find a job :P AAHHH! Can't believe my last post was for May's DB Challenge. Well, at least being part of the Daring Bakers has forced me to keep up the blogging.

The June 2010 Daring Bakers’ challenge was hosted by Dawn of Doable and Delicious. Dawn challenged the Daring Bakers’ to make Chocolate Pavlovas and Chocolate Mascarpone Mousse. The challenge recipe is based on a recipe from the book Chocolate Epiphany by Francois Payard


Chocolate Pavlovas

Recipe 1: Chocolate Meringue (for the chocolate Pavlova):

- 3 large egg whites
- ½ cup plus 1 tbsp (110 grams) granulated sugar
- ¼ cup (30 grams) confectioner’s sugar
- 1/3 cup (30 grams) cocoa powder

Method:

  1. Place a rack in the center of the oven and preheat to 200º F (95º C) degrees. Line two baking sheets with silpat or parchment and set aside.
  2. Put the egg whites in a bowl and whip until soft peaks form. Increase speed to high and gradually add granulated sugar about 1 tbsp at a time until stiff peaks form. (The whites should be firm but moist.)
  3. Sift the confectioner’s sugar and cocoa powder over the egg whites and fold the dry ingredients into the white. (This looks like it will not happen. Fold gently and it will eventually come together.)
  4. Fill a pastry bag with the meringue. Pipe the meringue into whatever shapes you desire. Alternatively, you could just free form your shapes and level them a bit with the back of a spoon. (Class made rounds, hearts, diamonds and an attempt at a clover was made!)
  5. Bake for 2-3 hours until the meringues become dry and crisp. Cool and store in an airtight container for up to 3 days.

Recipe 2: Chocolate Mascarpone Mousse (for the top of the Pavlova base):

- 1 ½ cups (355 mls) heavy cream grated zest of 1 average sized lemon
- 9 ounces (255 grams) 72% chocolate (I used milk chocolate), chopped
- 1 2/3 cups (390 mls) mascarpone
- pinch of nutmeg
- 2 tbsp (30 mls) Grand Marnier

Method:

  1. Put ½ cup of heavy cream and lemon zest in a saucepan over medium high heat. Once warm, add chocolate and whisk until melted & smooth. Transfer mixture to a bowl and let sit at room temperature until cool.
  2. Place the mascarpone, remaining cup of cream and nutmeg in a bowl. Whip on low for a minute until the mascarpone is loose. Add Grand Marnier and whip on medium speed until it holds soft peaks (DO NOT OVERBEAT OR MASCARPONE WILL BREAK.)
  3. Mix about ¼ of the mascarpone mixture into the chocolate to lighten. Fold in remaining mascarpone until well incorporated. Fill pastry bag with mousse. Again, you could just free form mousse on top of the pavlova.


Recipe 3: Mascarpone Cream (for drizzling):

- 1 recipe crème anglaise
- ½ cup (120 mls) mascarpone
- 2 tbsp (30 mls) Sambucca (optional)
- ½ cup (120 mls) heavy cream

Method:

  1. Prepare the crème anglaise. Slowly whisk in the mascarpone and the Sambucca and let the mixture cool. Put the cream in a bowl and beat with electric mixer until very soft peaks are formed. Fold the cream into the mascarpone mixture.


Recipe 4: Crème Anglaise (a component of the Mascarpone Cream above):

- 1 cup (235 mls) whole milk
- 1 cup (235 mls) heavy cream
- 1 vanilla bean, split or 1 tsp pure vanilla extract
- 6 large egg yolks
- 6 tbsp (75 grams) sugar

Method:

  1. In a bowl, whisk together the egg yolks and sugar until the mixture turns pale yellow.
  2. Combine the milk, cream and vanilla in a saucepan over medium high heat, bringing the mixture to a boil. Take off the heat.
  3. Pour about ½ cup of the hot liquid into the yolk mixture, whisking constantly to keep from making scrambled eggs. Pour the yolk mixture into the pan with the remaining cream mixture and put the heat back on medium. Stir constantly with a wooden spoon until the mixture thickens enough to lightly coat the back of a wooden spoon. DO NOT OVERCOOK.
  4. Remove the mixture from the heat and strain it through a fine mesh sieve into a bowl. Cover and refrigerate until the mixture is thoroughly chilled, about 2 hours or overnight.


Assembly:
Pipe the mousse onto the pavlovas and drizzle with the mascarpone cream over the top. Dust with confectioner’s sugar and fresh fruit if desired.


Yes, I know... I didn't put the mascarpone drizzle on top of the pavlovas. But to tell you the truth, my drizzle-sauce stuff was a bit on the liquid side and I didn't want to drown my cute little creations. So, instead I served the cream on the side so that whoever wanted some additional creamy-sweetness could just spoon some on top as liberally as they wanted. The puffy little pavlovas were a hit with my sisters and my parents. And they were almost too cute to eat!

Thursday, May 27, 2010

Piece Montée: May's Daring Baker Challenge

In just 6 days I will be taking my final comprehensive RN exam, and from there... who knows. With all the craziness of trying to cram 4years of nursing school knowledge into the past month would probably have driven me insane, were it not for my beloved baking. Yes, as I've said in previous posts, baking really helps me to de-stress. At first I was not really planning on partaking in this month's challenge, what with having to deal with all the stress of studying for the exam as well as job-searching (who knew it would be so difficult to find a job as a nurse!?!? not what I was told 4years ago).

But after thinking it over, I decided to do the baking thing because, I'm pretty sure there's a limit to the amount of time one can spend studying in a 24hour period before all of the information begins to drip out of one's brain and onto the floor (at which point it is essentially useless b/c there's no getting it back in there!). So, off I went into the kitchen... ready to whip up a storm.

The May 2010 Daring Bakers’ challenge was hosted by Cat of Little Miss Cupcake. Cat challenged everyone to make a piece montée, or croquembouche, based on recipes from Peter Kump’s Baking School in Manhattan and Nick Malgieri.


Piece Montée


Pastry Cream:

Ingredients:
For Vanilla Crème Patissiere (Half Batch)
- 1 cup whole milk
- 2 tbs. cornstarch
- 6 tbsp sugar
- 1 large egg
- 2 large egg yolks
- 2 tbsp unsalted butter
- 1 tsp vanilla


Method:
1. Dissolve cornstarch in ¼ cup of milk. Combine remaining milk with sugar in a saucepan; bring to boil. Remove from heat.

2. Beat the whole egg, then the yolks into the cornstarch mixture. Pour 1/3 of boiling milk into egg mixture, whisking constantly so that eggs do not begin to cook.

3. Return remaining milk to boil. Pour in hot egg mixture in a stream, continuing whisking.

4. Continue whisking until the cream thickens and comes to a boil. Remove from heat and beat in the butter and vanilla.

5. Pour cream into a stainless steel/ceramic bowl. Press plastic wrap firmly against the surface. Chill immediately and until ready to use.


Variations:
- Chocolate Pastry Cream (Half Batch Recipe):
Bring 1/4cup (~50ml) milk to a boil in a small pan; rem
ove from heat and add in 3 ounces (~80g) semisweet chocolate, finely chopped, and mix until smooth. Whisk into pastry cream when you add the butter and vanilla.

- Coffee Pastry Cream (Half Batch recipe)
Dissolve 1 ½ tsp instant espresso powder in 1 ½ tspoons boiling water. Whisk into pastry cream with butter and vanilla.


Pate a Choux
Yields ~28
pieces


Ingredients:
- 3/4cup water
- 6 tbsp unsalted butter
- ¼ tsp salt
- 1 tbsp sugar
- 1 cup all-purpose flour
- 4 large eggs
- For egg wash: 1 egg and pinch of salt


Method:
1. Pre-heat oven to 425◦F/220◦C degrees. Line two baking sheets with parchment paper.

2. Preparing batter:Combine water, butter, salt and sugar in a saucepan over medium heat. Bring to a boil and stir occasionally. At boil, remove from heat and sift in the flour, stirring to combine completely.

3. Return to heat and cook, stirring constantly until the batter dries slightly and begins to pull away from the sides of the pan.

4. Transfer to a bowl and stir with a wooden spoon 1 minute to cool slightly.

5. Add 1 egg. The batter will appear loose and shiny. As you stir, the batter will become dry-looking like lightly buttered mashed potatoes. It is at this point that you will add in the next egg. Repeat until you have incorporated all the eggs.

6. Piping: Transfer batter to a pastry bag fitted with a large open tip (I piped directly from the bag opening without a tip). Pipe choux about 1 inch-part in the baking sheets. Choux should be about 1 inch high about 1 inch wide.

7. Using a clean finger dipped in hot water, gently press down on any tips that have formed on the top of choux when piping. You want them to retain their ball shape, but be smoothly curved on top.

8. Brush tops with egg wash (1 egg lightly beaten with pinch of salt).

9. Baking: Bake the choux at 425◦F/220◦C degrees until well-puffed and turning lightly golden in color, about 10 minutes.

10. Lower the temperature to 350◦F/180◦C degrees and continue baking until well-colored and dry, about 20 minutes more. Remove to a rack and cool. Can be stored in a airtight box overnight.

11. Filling: When you are ready to assemble your piece montée, using a plain pastry tip, pierce the bottom of each choux. Fill choux with pastry cream using either the same tip or a star tip, and place on paper-lined sheet. Choux can be refrigerated briefly while you make your glaze.

12. Use one of these to top your choux and assemble your piece montée.

Chocolate Glaze:

Ingredients:
- 8 ounces/200g finely chopped chocolate (semi-sweet is best)

Method: Melt chocolate in microwave or double boiler. Stir at regular intervals to avoid burning. Use the best quality chocolate you can afford. Use immediately.

Hard Caramel Glaze:

Ingredients:
- 1 cup sugar
- 1/2 tsp lemon juice


Method: Combine sugar and lemon juice in a saucepan with a metal kitchen spoon stirring until the sugar resembles wet sand. Place on medium heat; heat without stirring until sugar starts to melt around the sides of the pan and the center begins to smoke. Begin to stir sugar. Continue heating, stirring occasionally until the sugar is a clear, amber color. Remove from heat immediately; place bottom of pan in ice water to stop the cooking. Use immediately.


Assembly of Piece Montée:
Once you are ready to assemble your piece montée, dip the top of each choux in your glaze (careful it may still be hot!), and start assembling on your cake board/plate/sheet. Continue dipping and adding choux in levels using the glaze to hold them together as you build up. After building your piece montée, decorate the tower with drizzled glaze or use ribbons, sugar cookie cut-outs, almonds, flowers, etc. Have fun and enjoy!

Well, after all that baking... I should probably get back to studying. Wish me luck :)

Monday, May 24, 2010

Panda-ish Bread

I've actually had this recipe saved on my computer for the longest time and just hadn't gotten around to making it because I was far to inexperienced with bread to even attempt to look at the recipe :P However, now that I've purchased a bread machine I'm a little less fearful of yeast baked goods and so I decided to give this panda bread a shot.

I used the recipe from Do What I Like and followed it to a "T", except for the major oopsie I did with the arrangement of the dough pieces. I don't quite know what I was thinking, but for some reason I thought I would put a slab of green dough in between the eyes (why a panda would have a random blob of green between its eyes, I don't quite know). Maybe I was tired, and it looked right at the time... I should probably be getting more sleep T_T. I actually realized the mistake after I had placed the final section of white dough around the green slab and the eyes, but by that time it was too late to fix my mistake... the dough was quite sticky and I couldn't fix the panda's face without mangling his eyes. So, I left it and thought "how bad could it turn out?"

My irreversible mistake!!! I think I thought I did it right b/c I was distracted by how cute the bread looked... kinda like a leaf on the panda's face.

Having to live with my mistake and finish the bread... at least it still looks kinda cute.

After I sliced it... I realized how unpanda-like it looked :(

Well, the answer is pretty badly... the panda no longer looked like a panda; even as I tried to pass it off as the daikon panda from Nerima (see picture below) by sister still thought it just looked like random swirls in a loaf of bread.


Dang-it!!?! Oh well, at least I attempted something so ambitious... maybe I'll try this recipe again in the future, and be more careful about how I arrange the dough.


Wednesday, May 05, 2010

Sushi Cupcakes for Dad and Mom (and me)

Well, as always, may is quite the busy month. It's my dad's birthday, then my birthday, mother's day, my best friends birthday and in addition to all the celebrations I have to hunker-down and study like crazy for my final RN exams! Man, trying to condense 4 years of nursing knowledge into one month is quite the stressful experience.

With all the celebrations going on (and my need for some major study/stress relief) I decided that the best thing to do would be to bake and decorate a couple cupcakes! I thought long and hard about what type of cupcakes I wanted to make... and for some reason I was craving just an old fashioned vanilla cupcake. I also knew I wanted to use fondant to decorate the cupcakes... but the tricky part was figuring out what theme I wanted the cupcakes to take on!

After scouring google for a solid half-hour I decided that since my dad and mom both love sushi (and we always go out, just the three of us, to all-you-can-eat late-night sushi once a month) that sushi-themed cupcakes were most definitely the way to go! So, I got to work baking the cupcakes, allowing them to cool, rolling out the fondant (I used Wilton's pre-made white fondant and simply dyed it into the colors I wanted) and slapping the cupcakes together. Ooooh, I simply love playing with the fondant! It's like making sculptures with play-doh... brings back such fond childhood memories ^_^

Vanilla Cupcake
Yields 12 cupcakes

Ingredients:
- 1 1/2 cups all-purpose flour
- 1/2 tsp baking powder
- 1/4 tsp salt
- 1 stick (1/2 cup) butter, softened
- 1 cup sugar
- 2 large eggs
- 1/4 tsp vanilla
- 1/2 cup milk

Method:
1. Sift together the flour, baking powder and salt. Set aside.
2. Cream sugar and butter until soft and fluffy. Add in eggs one and a time, beating well after each addition.
3. Combine the milk and vanilla in a small bowl.
4. Add half of the flour mixture to the butter mixture. Stir until just moistened.
5. Add in the milk mixture and continue stirring, only until just combined (do not over-mix).
6. Add in the final half of the flour mixture; again, stir until just combined.
7. Pour into a prepared muffin tray and bake at 350degrees for 24-28minutes, until golden.
8. Allow to cool completely and then decorate.

Ahi tuna nigiri and an Akagai (red clam) nigiri

Your classic sushi roll

Ebi (shrimp) nigiri

Ikura (salmon roe) roll and a Toro (fatty tuna) nigiri

Well, when I unveiled these cuties to my mom and dad (and my sisters) they were so surprised at the intricate details... namely the tiny blobs of ginger and wasabi. However, since these cupcakes had so much effort put in to their decoration, my mom didn't want to touch them for fear of "breaking" them, my dad was busy taking pictures. and my sisters didn't want to eat them because they were "too cute". Alas, why did I make them so adorable that everyone was scared to take a bite?? Oh, well... I wasn't scared, so I dug in... and they were just as delicious as they were well-decorated!

Saturday, May 01, 2010

Another Free E-magazine from Betty Crocker


As the title of this post states, I have another link to an online Betty Crocker magazine! They sent it to me because my birthday's coming up and this e-mag is all about Birthday Cakes.

Enjoy: http://www.nxtbook.com/nxtbooks/gm/birthdayparties/