Saturday, November 29, 2008

Daring Bakers Challenge -

Yeah! Finally, I'm posting this month's challenge. I actually completed this one quite a few weeks ago, because I couldn't get the thought of cake with caramlized butter frosting out of my head... it was driving me crazy! I just wanted to have a bite of this delicious sounding cake.

This month's recipe comes from the amazingly talented baker Shuna Fisher Lydon (to view her webpage click here: http://blogs.kqed.org/bayareabites/2006/12/24/caramel-cake-the-recipe/). And this month's hosts are: Dolores (of Culinary Curiosity), Alex (of Blondie and Brownie), Jenny (of Foray Into Food), and for the alternative bakers Natalie (of Gluten-A-Go-Go). Thanks guys, you are doing a great job :)
And now, on to the recipe:


Caramel Cake with Caramelized Butter Frosting
-10 tbsp unsalted butter at room temperature
-1 1/4 cups granulated sugar
-1/2 tsp kosher salt
-1/3 cup Caramel Syrup (see recipe below)
-2 each eggs, at room temperature
-A splash of vanilla extract
- 2 cups all-purpose flour
- 1/2 tsp baking powder
- 1 cup milk, at room temperature


1. Preheat oven to 350F

2. Butter one tall (2 – 2.5 inch deep) 9-inch cake pan.

3. In the bowl of a stand mixer fitted with a paddle attachment, cream butter until smooth. Add sugar and salt & cream until light and fluffy.

4. Slowly pour room temperature caramel syrup into bowl. Scrape down bowl and increase speed. Add eggs/vanilla extract a little at a time, mixing well after each addition. Scrape down bowl again, beat mixture until light and uniform.

5. Sift flour and baking powder.

6. Turn mixer to lowest speed, and add one third of the dry ingredients. When incorporated, add half of the milk, a little at a time. Add another third of the dry ingredients, then the other half of the milk and finish with the dry ingredients. {This is called the dry, wet, dry, wet, dry method in cake making. It is often employed when there is a high proportion of liquid in the batter.}Take off mixer and by hand, use a spatula to do a few last folds, making sure batter is uniform. Turn batter into prepared cake pan.

7. Place cake pan on cookie sheet or 1/2 sheet pan. Set first timer for 30 minutes, rotate pan and set timer for another 15-20 minutes. Your own oven will set the pace. Bake until sides pull away from the pan and skewer inserted in middle comes out clean. Cool cake completely before icing it.

8. Cake will keep for three days outside of the refrigerator.


CARAMEL SYRUP
-2 cups sugar
-1/2 cup water
-1 cup water (for "stopping" the caramelization process)

1. In a small stainless steel saucepan, with tall sides, mix water and sugar until mixture feels like wet sand. Brush down any stray sugar crystals with wet pastry brush. Turn on heat to highest flame. Cook until smoking slightly: dark amber.

2. When color is achieved, very carefully pour in one cup of water. Caramel will jump and sputter about! It is very dangerous, so have long sleeves on and be prepared to step back.

3. Whisk over medium heat until it has reduced slightly and feels sticky between two fingers. {Obviously wait for it to cool on a spoon before touching it.}

Note: For safety reasons, have ready a bowl of ice water to plunge your hands into if any caramel should land on your skin.


CARAMELIZED BUTTER FROSTING
-12 tbsp unsalted butter
-1 pound confectioner’s sugar, sifted
-4-6 tbsp heavy cream
-2 tsp vanilla extract
-2-4 tbsp caramel syrup
- Kosher or sea salt to taste

1. Cook butter until brown. Pour through a fine meshed sieve into a heatproof bowl, set aside to cool.

2. Pour cooled brown butter into mixer bowl.

3. In a stand mixer fitted with a paddle or whisk attachment, add confectioner's sugar a little at a time. When mixture looks too chunky to take any more, add a bit of cream and or caramel syrup. Repeat until mixture looks smooth and all confectioner's sugar has been incorporated. Add salt to taste.

Note: Caramelized butter frosting will keep in fridge for up to a month.To smooth out from cold, microwave a bit, then mix with paddle attachment until smooth and light

(recipes above courtesy of Shuna Fish Lydon)

Using my new foodbuzz spatula to whip up the butter cream :)


(The below recipes were optional, I didn't really want to make caramels... and I had a lot lying around in my pantry, so I just molded pre-made caramels into weird pole-shaped things and used them to decorate... pretty lame I know :P)

Ooooo layering the cake :)


GOLDEN VANILLA BEAN CARAMELS
Yields eighty-one 1-inch caramels
-1 cup golden syrup
-2 cups sugar
-3/8 tsp fine sea salt
-2 cups heavy cream
-1 1/2 tsp pure ground vanilla beans, purchased or ground in a coffee or spice grinders, or 1 tablespoon plus 1 teaspoon pure vanilla extract
-3 tbsp unsalted butter, cut into chunks, softened

Equipment: A 9-inch square baking pan, candy thermometer

Method:
1. Line the bottom and sides of the baking pan with aluminum foil and grease the foil. Combine the golden syrup, sugar, and salt in a heavy 3-quart saucepan and cook over medium heat, stirring with a silicone spatula or wooden spoon, until the mixture begins to simmer around the edges. Wash the sugar and syrup from the sides of the pan with a pastry brush dipped in water. Cover and cook for about 3 minutes. (Meanwhile, rinse the spatula or spoon before using it again later.) Uncover the pan and wash down the sides once more. Attach the candy thermometer to the pan, without letting it touch the bottom of the pan, and cook, uncovered (without stirring) until the mixture reaches 305°F. Meanwhile, combine the cream and ground vanilla beans (not the extract) in a small saucepan and heat until tiny bubbles form around the edges of the pan. Turn off the heat and cover the pan to keep the cream hot.

2. When the sugar mixture reaches 305°F, turn off the heat and stir in the butter chunks. Gradually stir in the hot cream; it will bubble up and steam dramatically, so be careful. Turn the burner back on and adjust it so that the mixture boils energetically but not violently. Stir until any thickened syrup at the bottom of the pan is dissolved and the mixture is smooth. Continue to cook, stirring occasionally, to about 245°F. Then cook, stirring constantly, to 260°f for soft, chewy caramels or 265°F; for firmer chewy caramels.

3. Remove the pan from the heat and stir in the vanilla extract, if using it. Pour the caramel into the lined pan. Let set for 4 to 5 hours, or overnight until firm.

4. Lift the pan liner from the pan and invert the sheet of caramel onto a sheet of parchment paper. Peel off the liner. Cut the caramels with an oiled knife. Wrap each caramel individually in wax paper or cellophane.

Variations

Fleur de Sel Caramels: Extra salt, in the form of fleur de sel or another coarse flaked salt, brings out the flavor of the caramel and offers a little ying to the yang. Add an extra scant 1/4 teaspoon of coarse sea salt to the recipe. Or, to keep the salt crunchy, let the caramel cool and firm. Then sprinkle with two pinches of flaky salt and press it in. Invert, remove the pan liner, sprinkle with more salt. Then cut and wrap the caramels in wax paper or cellophane.

Nutmeg and Vanilla Bean Caramels: Add 1/2 teaspoon freshly grated nutmeg to the cream before you heat it.

Cardamom Caramels: Omit the vanilla. Add 1/2 teaspoon slightly crushed cardamom seeds (from about 15 cardamom pods) to the cream before heating it. Strain the cream when you add it to the caramel; discard the seeds.

Caramel Sauce: Stop cooking any caramel recipe or variation when it reaches 225°F or, for a sauce that thickens like hot fudge over ice cream, 228°F. Pour it into a sauceboat to serve or into a heatproof jar for storage. The sauce can be stored in the refrigerator for ages and reheated gently in the microwave or a saucepan just until hot and flowing before use. You can stir in rum or brandy to taste. If the sauce is too thick or stiff to serve over ice cream, it can always be thinned with a little water or cream. Or, if you like a sauce that thickens more over ice cream, simmer it for a few minutes longer.

(recipe from Alice Medrich's Pure Dessert)

I know my cake looks a little bit hodge-podge. I decided to decorate my cake with these strange caramel "poles" for some reason... it sounded like a good idea in my head, but when it came down to actually decorating it, it kind of turned out... well... like a mess. I also wanted to dust the top with some crumble praline cookies, in a sort of checkered patterns, but to no avail. Sometimes I wonder what exactly is going on inside my crazy mind. So in the end, although it looked like a crumble-topped, lame-looking cake it was still delicious. I will definitely make the buttercream again... the caramelized butter was oooooh soo tasty.


Tuesday, November 25, 2008

Earl Grey Tea Bread


So, with finals drawing nearer what better way to de-stress than to make some bread?? Bread and .... hmmm, tea! I always like to "chill out" (or is it warm up?) with a nice cup of tea. My favorite by far is earl grey, with jasmine tea coming in a very tight second. If I'm in the mood sometimes I enjoy a nice cup of chai or matcha with a splash of milk, but I generally enjoy my tea straight... no sugar, no milk, no nothing. So in wanting to relax with bread and tea, I decided to be silly and mix the two! I used an old "sweet-bread" recipe that I had used before to make
Melon Pan
but when combining the milk and butter in a saucepan (in Step 1), I added in the contents of 2 Earl Grey Tea Bags. As the milk warms up, the tea begins to infuse... at first it doesn't seem like the tea will have any effect on the taste, but as the bread goes through it's proofing process twice, the tea continues to permeate the dough, creating a lovely Earl Grey color, aroma and taste.

Also in variation from the Melon Pan recipe, I did not form the dough into individual rolls. Instead I used a special flower-shaped canape tin (see here) to form my bread. I placed enough dough into the greased+floured tin to fill it 2/3rds of the way (leaving room for expansion) and baked it for 40 minutes. I had some dough left over to make a very, very miniature loaf... good for appetizers at a party or something. I would serve is with some sweet butter or your favorite jam...


What a cute flower-shaped loaf... awww...

Here's the loaf, in it's uncut glory


Anyways... I should probably get back to studying don't you think??


Thursday, November 20, 2008

Soba Time

I decided on a minimalist meal for lunch today. Its not that I was feeling lazy and not wanting to cook up anything spectacular, it's just that for some reason (probably from watching too much Gintama) I was craving the simple Japanese dish of Kake Soba (hot soba noodles, in soup with scallions). After cooking the soba noodles to an aldente state, I made my soba soup using a pre-made soba dipping sauce. I did not really use a standardized recipe, but simply eye-balled all the ingredients (I'm slowly becoming more like Rachel Ray) and seasoned it to my personal taste. I added some water and soy sauce to the pre-made dipping sauce, mixed in some granulated sugar and minced ginger, and brought the whole mixture to a boil. Once the soup boiled, I added in the chopped scallions and turned off the heat (I didn't want the scallions to start wilting on me). I placed servings of soba noodles in each of the bowls, and topped the noodles with some sliced nori, julienned green onions (julienned carrots would have been a nice addition) and sesame seeds. I slowly poured the hot soup over the cooked noodles, and lunch was ready to be served.

To get more information on soba noodles, and a few great recipes check out Just Hungry. This site has a ton of great information specifically relating to Japanese cuisine.


Happy Birthday Jacques!

Sorry I haven't been posting for a while. Schools been crazy, but that's okay because I'm nearing the end of the term. Anywho, I just realized that I didn't get around to posting anything about my precious pups birthday. He turned on November 2nd... aww isn't he precious? Look at that face, not knowing that it's his special day...


I wanted to treat Jacques to a little something special, his own personal cake. He loves soft and chewy baked goodies and he will gobble up peanut-flavored treats with a vengeance, so I decided that his cake would be peanuty and moist... mmm I think I might have to steal a slice.

That night we sung him Happy Birthday, sliced him a lovely piece of cake and then came him a bijillion hugs to celebrate his awesomeness! He's so cute, cuddly and loving :)

There he is, sniffing out the final product... I guess he's unsure of what this big blob of tasty smelling squishy-stuff is.

But then he gives in and takes the big bite! He actually has this strange ritual of taking the food somewhere where there's carpet and eating it there. Strange... so he kind of took his cake and ran away from us, but we followed him (like stalkers) and watched him eat his cake (kind of creepy)


Wednesday, November 12, 2008

Awards!

Isn't it nice when someone awards you for something you love to do?! Thanks to Steph from Obsessed With Baking for giving me this nice award ...


And I would like to pass this one on to:

1. Crazy Asian Gal
2. Camille of Rtemis
3. Janet Is Hungry
4. Lucy of Sweets Savories etc. <-- I noticed you've already got this award, but your blog is so much fun to read I think you deserve it again :)

All of these blogs are amazing to read, so if you have the chance go and check them out!


Monday, November 10, 2008

Eating Natto!


Some of you may be asking, "What is Natto?! Does such a word even exist?" The answer is, "It's fermented soybean, and yes it does!" :P

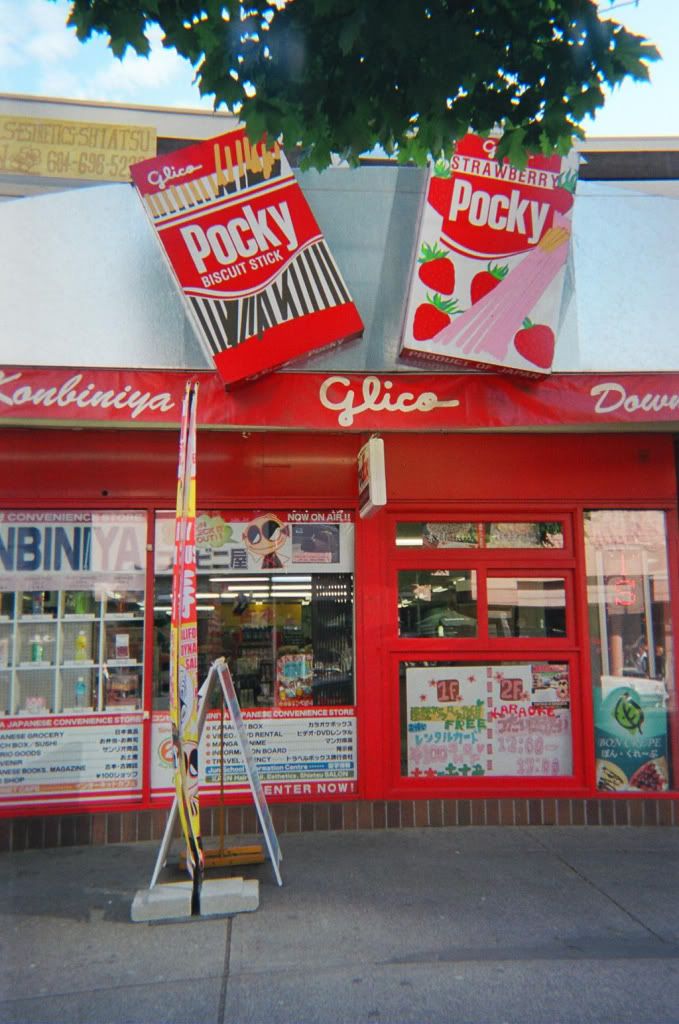
I was wondering around downtown Vancouver with a friend of mine when we stumbled upon a lovely little Japanese Grocery Store on Robson Street. It's kind of hard to miss, since it has two giant boxes of Pocky plastered to the entrance way (seriously... want to see the picture? click here). So I wandered inside, because I am a true foodie... and all foodies know that you can't just walk by a grocery store and not go inside! And so, it was in this Japanese store that I stumbled upon the triple-pack styrofoam boxes that encase the wonderous food known as natto...

I took the package home and wasn't quite sure how to eat it. I had heard about this interesting Japanese food from a couple Japanese friends (some saying it was good, other's saying that it was the devil's puke) but it was only after reading Gintama, and seeing one of the characters (Sa-chan) always holding a bowl of natto, that I dared to try the smelly beans.

If you want to see how natto is traditionally eaten, I recommend you do what I did... watch it on youtube... or for more reliable sources check out wikipedia :P

Inside the styrofoam package is the fermented soy beans, along with a packet of mustard and a packet of soy sauce.

Start by unveiling the beans. The slime coating is sticky... be careful not to get it all over your placemat, shirt and/or friends.

Add in the mustard and soy sauce packets. Then stir the mixture vigorously with your chopsticks about 15 times.
Note the gooey-ness... be glad you cannot smell the stinky-ness.

Eaten by itself, natto is a force to be reckoned with. It has a very pungent smell; but if you can get past that, you will probably enjoy the bean's taste. Adding the natto to rice helps to mellow out the flavor, while also increasing the ability to pick up the slimey buggers with your chopsticks.

I'm not sure what it is with me and food that has a slightly "off" aroma. I do like durian, and stinky tofu... and I actually really liked the natto. The only thing I didn't like about the natto was that it got all over my face; I'm not even joking. The little strings of sticky stuff were hanging off my chin by the end of the meal; so, after eating, I had to go to the washroom and wash my face... and while I was there, brush my teeth (lest someone be unfortunate enough to get a whiff of my "natto breath").


So my verdict for natto: I like it! But I'll have to remember to only snack on it when I have access to a clean washroom and toothpaste :P

Sunday, November 09, 2008

Grape Muffins! What!

I'm always a sucker for a cheap buy at the grocery store... no I do not go out and purchase the dented cans, or the clearance section foods (because we all know that those things are sketchy, way past their expiry date, and just plain unsafe); but I do always looking out for the latest coupons on the web, in the flyers, placed on store shelves. The only thing that I find sneaky about the coupons that you pick up in-store, is that they always hike up the price of the item that the coupon is good for. For example, I found some 50cents-off coupons for cereals in the cereal section but alas the price of the Mini-Wheats was a whopping $6.99 (when I normally purchase them at $4.99). So even with the coupon I'm not saving money :( Tricksters... I have learned how to use in-store coupons wisely though; the key is to be patient. Grab all the coupons that you are interested in, but don't go and purchase the items at that store, or on that day. Since the in-store coupons are usually good for the next 4-6months, I put all of my collected coupons in an envelope in my purse, so that they're always there for me to access when I go out shopping. And when the store decides that they're going to have a "sale" on a product whose coupon I picked up a few months back, *ba-bing* EXTRA SAVINGS!!

So, why am I randomly talking about coupons? Well, because I was walking through Save-On Foods today when I happened upon a sale on Europe's Best Frozen Grapes (I love frozen fruit!). The bag of grapes was priced at $2.99, when the usual price is $6.99... and wouldn't you know it, I had a coupon for $1-off any bag of Europe's Best Frozen Fruit! Woot! A whole bag of frozen grapes for only $2!!

And when I brought the grapes home, I decided to be healthy and reward myself with my favorite healthy muffins... Grape Bran Muffins!


Healthy Grape Bran Muffins
Yields 9 Muffins

1/3 cup all-purpose flour
1/3 cup whole wheat flour
3/4 cups wheat bran

1/3 cup brown sugar, lightly packed
1/4 tsp salt
1/2 tsp baking soda
2 tbsp maple syrup (you could use honey if you wish)
2/3 cups buttermilk
1 egg white, beaten
1 tbsp butter, melted

2/3 cups Europe's Best Di-Vine frozen grapes, thawed

Method:
1. Preheat oven to 350 degrees F (175 degrees C).

2. Grease muffin pans or line a pan with paper cups.
3. In a large bowl, combine all purpose flour, whole wheat flour, wheat bran, salt and baking soda. Add maple syrup, buttermilk, egg and butter; stir just to moisten.

4. Stir in the thawed grapes until just combines.
5. Pour batter into prepared muffin pans, until each muffin cup is 3/4 full.
6. Bake at 350 degrees F for 20 minutes, or until a toothpick inserted into the center of a muffin comes out clean.


I really enjoyed these muffins. My family isn't all that in to eating bran and flax and all that fun fiber stuff, so it was a little tough convincing them that these muffins were just as good as banana muffins. My youngest sister, who really loves blueberries, actually liked the muffins (probably because she thought that the grapes were simply gigantic blueberries)... but hey, whatever gets them eating more fiber! You gotta get that 25g a day to stay regular :P

So, what have we learned today? Hoard in-store coupons and always keep them at the ready, and also... fiber is our friend :)

Wednesday, November 05, 2008

Rice Fritters


For dinner today, the family decided to be lazy and have frozen pasta with pre-made Olivieri Four Cheese Sauce. Well, I suppose I shouldn't call them lazy, because they do usually whip up dinner from scratch and they do work very hard so once in a while it is nice to make a quick, easy and satisfying meal. Besides, it gives us more time to bond during the meal without being utterly exhausted after having created a masterful feast. But, being a foodie, I simply would not be satisfied until at least one dish was made by my own two hands and not manufactured. I always find it hard to pick the perfect pairing of appetizer to accompany the main dish... especially when it's pasta. The food that came to mind when I thought pasta-accompaniment was garlic bread. Booo! That would definitely not be a challenging enough dish to prepare... all that involves is sliced french-bread, roasted garlic, parsley and paremsan cheese... no fun, no fun at all. So, my only option was to surf the web for italian appetizers and that's when I discovered the rice fritter!!


Rice Fritters (Makes 12 golf-ball sized fritters)

- 3 cups leftover rice (arborio rice works well, or you can use any moist rice that holds together)
- Twelve 1/2-inch cubes of your favorite cheese
- 1 egg, beaten
- 1/2 cup panko crumbs
- 3 tbsp parmesan cheese, grated
- 2 tsp dried parsley
- A pinch of salt and pepper, to taste

Method:
1. Work with the room-temperature leftover rice and divide your rice into 12 equal portions.
2. Shape each portion into a flattened circle and place a create a well in the center
3. Place a cheese cube in the well, and then roll up the rice ball until the cheese is hidden in the middle.

Note: If the rice is sticking to your hands, use seran-wrap to help you mold the rice. Place the rice in the center of a seran-wrap square and then bring all the edges of the seran together, twist and squeeze the rice into a neat (non-messy) ball.
4. Perform steps 2 and 3 for all of the rice-ball portions.
5. In a small bowl, combine the panko, parmesan, salt & pepper, and parsley. In a separate small bowl, crack in the egg and lightly beat.
6. Dip each rice-ball into the beaten egg, into the panko-mix and then place on a tin-foil lined baking sheet.
7. Place the baking sheet in the fridge for 15minutes to help the egg and panko crust to set.
8. Remove sheet from fridge and bake the rice fritters at 350F for 15-20minutes, or until nicely goldened and crisp.


My sisters first reaction to the strange side-dish was "what are those round things?" When I told that they were rice fritters they were a bit skeptical and hesitant to try them. But then I announced that there was cheese inside and all was good. They dove in and were ready to taste the cheesey goodness... not sure what it is with kids and cheese :P The rice fritters were good plain, but they were even better when they were dipped in a marinara sauce. Any ol' generic marinara sauce will do, it's just that the tomato and the cheese combined is simply divine! Try it for yourself and see...


Thursday, October 30, 2008

Halloween Bakes

I wasn't quite sure how this years Halloween baking was going to come along. I just kind of went the ol' fashioned route and decided to bake and decorate some cupcakes and cookies. Here are my final products! I dunno what it is about Halloween that gets me all in the creative spirit, but I simply had to make each cupcake unique... and here there are...


Kooky Old-man-esque cookie... yup that's a cashew nose


Was supposed to be a pumpkin man... then he turned into a pink, punk, pumpkin dude


Cute Spider. I used Pocky vegetable sticks, M&M's and chipits


This one kind of reminds me of Doraemon. I used Pocky vegetable sticks, a tic-tac, a chipit and two mini fuzzy-peaches for his eyes.


Monster Cyclops Star Thing. There's an M&M, regular candy corn, caramel candy corn, cinnamon-apple candy corn, and gummy vampire teeth


Green-horned cyclops. I used lime-tootsie rolls, tic-tacs and gave him an M&M + chipit eye


The Green-eyed monster. I used a marshmallow, colored coconut shreds, lime-tootsie rolls and an M&M

Random Graveyard of Randomness. There's oreo crumbs, coconut shreds, a pumpkin and two gummy ghosts.

Hehe.... one of my faves! The "shrunken head" cupcake. I used a marshmallow, chipits, and a Pocky stick.

The Purple Monster named Bob. Hmm... you can probably guess what I used to make him.


This one's got the wink down to an art. There's a chocolate skittle, vampire teeth, a pocky stick and a face-down gummy ghost for the winking eye! Who wouldn't love a face like that?!

Woah! That was fun eh? I think I have a thing for vampire teeth. They make awesome decorations for monster cupcakes. I also made a couple of the dirt (oreo crumbs) + gummy worms/spiders cupcakes. But I figure you've seen enough of those there's no need for pictures. Happy Halloweening everyone... get lots of candy (or in my case, go to Safeway and buy a lot of discount candy on Nov 1st!) and enjoy brushing your teeth all night long :P


Wednesday, October 29, 2008

I've Been Tagged!

I was tagged by Camille at Rtemis. Her blog is quite the epicurean feast for the eyes. I simply love reading her posts and I really enjoyed reading her tag-post. I'm sure anyone who reads my blog, will love reading hers... go visit! Anywho, on with the tag... here are 7 random facts about yours truly:

1. I'm addicted to Gintama, both the anime and the manga!
2. My favorite genre of music is indie/brit rock
3. My current favorite TV show is Dr. Who!
4. I'm a 3rd year nursing student (one more year to go! Woot!)
5. I love dressing up and trick-or-treating (yes, I still do it... even though I'm in my 20's)
6. I can literally spend one-and-a-half hours in the grocery store and not buy anything *gasp* I know... but apparently I'm super picky about a) quality b) quantity c) price
7. I've been to 3 comedy clubs in the past 2 weeks and have loved every single show!

You're It!:
Crazy Asian Gal
Fried Wontons 4 U
Noob Cook
Obsessed With Baking
Somewhere in Singapore
The Weather Down Here <-- my friend has just recently become a blogger! only one post thus far, but still I'm proud *sniff*
So Good Blog

Here are the rules for tagging.
Link to my blog (tagger) on your blog.
Give seven facts about yourself.
Tag another seven blogs by leaving a comment on their blog and letting them know they were tagged and listing them (and their blogs) on your blog.

October's Daring Bakers Challenge: BBQ Chicken Pizza

I know I've been silent for a long, long time... but don't count me out of the baking scene just yet. I'm still raring to go and baking up a storm. Today, I just realized that I was way behind on the Daring Baker's Challenge for this month. I don't know how I simply forgot about it, but I wasn't about to let the challenge pass me by. I decided to make pizza for lunch this afternoon and the daring baker's recipe turned out splendid! Anywho, here's the recipe... with my topping of BBQ Chicken and a hodge-podge of veggies. The recipe actually makes a lot of bread dough, and I wasn't sure if everyone else in my family wanted pizza, so I made a couple "special" buns with the excess dough. I'll post the picture of my "special" bun at the end of this post ... kinda forces you to read the entire post eh?! I'm sneaky... "Hey! Don't even think about scrolling to the bottom... I mean it :P"

Basic Pizza Dough
Adapted from “The Bread Baker’s Apprentice” by Peter Reinhart
Yields 6 (9-inch) pizza crusts

Ingredients:
- 4 1/2 Cups unbleached high-gluten (%14) bread flour or all purpose flour, chilled
- 1 3/4 tsp Salt
- 1 tsp instant yeast
- 1/4 Cup (2 ounces/60g) olive or vegetable oil
- 1 3/4 Cups (14 ounces/420g or 420ml) water, ice cold (40° F/4.5° C)
- 1 tbsp sugar
- Semolina/durum flour or cornmeal for dusting

DAY ONE (I did mine in one day!)
Method:
1. Mix together the flour, salt and instant yeast in a big bowl (or in the bowl of your stand mixer)
2. Add the oil, sugar and cold water and mix well (with the help of a large wooden spoon or with the paddle attachment, on low speed) in order to form a sticky ball of dough. On a clean surface, knead for about 5-7 minutes, until the dough is smooth and the ingredients are homogeneously distributed. If it is too wet, add a little flour (not too much, though) and if it is too dry add 1 or 2 teaspoons extra water.

NOTE: If you are using an electric mixer, switch to the dough hook and mix on medium speed for the same amount of time.The dough should clear the sides of the bowl but stick to the bottom of the bowl. If the dough is too wet, sprinkle in a little more flour, so that it clears the sides. If, on the contrary, it clears the bottom of the bowl, dribble in a teaspoon or two of cold water.
The finished dough should be springy, elastic, and sticky, not just tacky, and register 50°-55° F/10°-13° C.

3. Flour a work surface or counter. Line a jelly pan with baking paper/parchment. Lightly oil the paper.
4. With the help of a metal or plastic dough scraper, cut the dough into 6 equal pieces (or larger if you want to make larger pizzas).

NOTE: To avoid the dough from sticking to the scraper, dip the scraper into water between cuts.

5. Sprinkle some flour over the dough. Make sure your hands are dry and then flour them. Gently round each piece into a ball.

NOTE: If the dough sticks to your hands, then dip your hands into the flour again.

6. Transfer the dough balls to the lined jelly pan and mist them generously with spray oil. Slip the pan into plastic bag or enclose in plastic food wrap.
7. Put the pan into the refrigerator and let the dough rest overnight or for up to thee days.

NOTE: You can store the dough balls in a zippered freezer bag if you want to save some of the dough for any future baking. In that case, pour some oil(a few tablespooons only) in a medium bowl and dip each dough ball into the oil, so that it is completely covered in oil. Then put each ball into a separate bag. Store the bags in the freezer for no longer than 3 months. The day before you plan to make pizza, remember to transfer the dough balls from the freezer to the refrigerator.


DAY TWO
8. On the day you plan to eat pizza, exactly 2 hours before you make it, remove the desired number of dough balls from the refrigerator. Dust the counter with flour and spray lightly with oil. Place the dough balls on a floured surface and sprinkle them with flour. Dust your hands with flour and delicately press the dough into disks about 1/2 inch/1.3 cm thick and 5 inches/12.7 cm in diameter. Sprinkle with flour and mist with oil. Loosely cover the dough rounds with plastic wrap and then allow to rest for 2 hours.
9. At least 45 minutes before making the pizza, place a baking stone on the lower third of the oven. Preheat the oven as hot as possible (500° F/260° C).

NOTE: If you do not have a baking stone, then use the back of a jelly pan. Do not preheat the pan.

10. Generously sprinkle the back of a jelly pan with semolina/durum flour or cornmeal. Flour your hands (palms, backs and knuckles). Take 1 piece of dough by lifting it with a pastry scraper. Lay the dough across your fists in a very delicate way and carefully stretch it by bouncing it in a circular motion on your hands, and by giving it a little stretch with each bounce. Once the dough has expanded outward, move to a full toss.

NOTE: Make only one pizza at a time.During the tossing process, if the dough tends to stick to your hands, lay it down on the floured counter and reflour your hands, then continue the tossing and shaping. In case you would be having trouble tossing the dough or if the dough never wants to expand and always springs back, let it rest for approximately 5-20 minutes in order for the gluten to relax fully,then try again.You can also resort to using a rolling pin, although it isn’t as effective as the toss method.

11. When the dough has the shape you want (about 9-12 inches/23-30 cm in diameter - for a 6 ounces/180g piece of dough), place it on the back of the jelly pan, making sure there is enough semolina/durum flour or cornmeal to allow it to slide and not stick to the pan.
12. Lightly top it with sweet or savory toppings of your choice.

NOTE: Remember that the best pizzas are topped not too generously. No more than 3 or 4 toppings (including sauce and cheese) are sufficient.

13. Slide the garnished pizza onto the stone in the oven or bake directly on the jelly pan. Close the door and bake for abour 5-8 minutes.

NOTE: After 2 minutes baking, take a peek. For an even baking, rotate 180°.If the top gets done before the bottom, you will need to move the stone or jelly pane to a lower shelf before the next round. On the contrary, if the bottom crisps before the cheese caramelizes, then you will need to raise the stone or jelly.

14. Take the pizza out of the oven and transfer it to a cutting board or your plate. In order to allow the cheese to set a little, wait 3-5 minutes before slicing or serving.

Toppings
For my BBQ Chicken Pizza, I used only the best-quality ingredients :P
- Freshly sliced onions
- Freshly diced tomatos
- Bull's Eye BBQ Sauce (Hickory Smoke)
- Oven Roasted Chicken shredded
- Freshly grated, medium-aged cheddar cheese

I must say, I've made my fair share of pizzas before, but this recipe was pretty darn good! I ate up a whole 3 pieces (okay, that may not seem like a lot... but I'm tiny, and have a small stomach). The BBQ sauce was wonderfully tangy, and the chicken was seasoned very nicely (thank you Superstore). The tomatoes added a nice juiciness to the pizza and the onions were baked to perfection, tasting not too strong but still maintaining their crispness.
Yeah! I've completed the DB challenge, just in the nick of time. Oh, and before I forget... here's my "special bun"...

Mmmm... should make a nice quick lunch for tomorrow (that's mayo on top by the way... not a fried white worm :P) Just needs some ketchup, corn and chives and I've got myself a T&T like chinese bun!

Tuesday, October 21, 2008

Yikes it's been a long time...

AH! I can't believe I haven't blogged in over a week! What's wrong with me?! Well, the truth is that I've been all caught up with school and... um, Gin Tama! Yes, I know I'm such an otaku (anime-obsessed person). But seriously, Gin Tama is hilarious and I don't care if it's shonen (written for teen boys)... it's freaking awesome!!!


Anywho, I wouldn't just write a post about how obsessed I am with that manga... I'm also writting to post a recipe! It's a pretty tame one by any standard but here is my recipe for Bailey's-coated Almonds.


Bailey's-Coated Almonds

- 4 cups raw almonds
- 3 tbsp Baileys Irish Creme
- 1 egg white
- 1 cup granulated sugar
- 1/4 tsp salt
- 1 tsp cinnamon


Method:
1. In a medium-sized bowl, mix together the irish creme and the egg white until well blended.
2. Add in the almonds, toss to coat
3. In a small bowl, mix together the sugar, salt and cinnamon.
4. Add sugar mixture to the almond mixture and toss together until all almonds have a good coating of sugar.
5. Place the almonds on a greased baking-sheet, in a single layer, and bake at 325degrees for 20 minutes, or until nicely toasted but not burnt.


I guess the reason I made this recipe is that my dad had bought this huge package of raw almonds from Costco and no one was touching it besides him and me (and let me tell you, that's slow pickings). So, in order to "trick" my mom and sister into eating the healthy nuts I had to coat them in something sugary-sweet... and guess what? It worked!

Monday, October 13, 2008

Thanksgiving 2008

I didn't really end up do a whole lot of baking this thanksgiving. The family was simply ready to accept that the long-weekend had arrived and relax! Yeah! Nothing better to do with the family than just kick back and catch up on some much needed rest. But of course, if everyone rests during the big day (which we celebrate on Sunday) then there will obviously be no turkey dinner :P Good thing we realized this in time and got crackin' on some thanksgiving dinner prep. My dad was in charge of the turkey, as he always is... we always end up getting the smallest turkey there is, because we usually have so many sides that it's almost impossible to finish the entire turkey (even given an entire week to do so!) My mom was in charge of the roasted potatoes and brussel sprouts. I was in given free reign to cook up some yams and pop-overs... and our good friend "stove-top" was ready and willing to whip up some tasty stuffing :P


Here's the turkey, accompanied by it's friends: potato, stuffing and butter-laden brussel sprouts!


Raisin, Red Onions and Rum Sweet Potatoes

Ingredients:
- 1 kg sweet potatoes, peeled and diced into 3/4-inch cubes
- 3 tbsp vegetable oil
- 1/3 cup raisins, soaked in 3 tbsp of dark rum (for at least 10mins)
- 1/4 cup apple cider
- 1 medium red onion, chopped
- 2 tbsp molasses
- 3 tbsp brown sugar
- 1/2 tsp cinnamon, ground
- 1/2 tsp nutmeg, ground
- Salt and pepper to taste

Method:
1. Toss together the sweet potatoes and vegetable oil and spread out on a baking sheet, making sure to coat all the pieces of sweet potato with oil
2. Add the molasses, brown sugar, cinnamon, nutmeg, salt and pepper to the sweet potatoes. Mix well until all of the pieces are seasoned.
3. Place in a 350 degree oven and bake for 10mins.
4. Remove pan from oven, and add the raisin+rum mixture and the apple cider (deglazing the pan and preventing the potatoes from burning)
5. Add in the red onions and continue to bake the entire mixture at 350 degrees for another 20mins or until the potatoes are tender.

Hehehe... my dinky (yet tasty) looking cheesy popovers.
Get the recipe: HERE

All-in-all, for a pretty low-key Thanksgiving we had a blast. We spent a lot of time attempting to carve the turkey "properly" but then kinda gave up and ripped it apart (see the first pick for proof). It was great to just forget about school and the stresses of life and simply give thanks for being in good-health and being with family! Here's wishing all of you a HAPPY THANKSGIVING!


Sunday, October 05, 2008

Betty Crocker E-Book!


How awesome is it to have more free stuff?! Betty Crocker seems to be jumping on the free e-book band-wagon and I couldn't be happier. So, here's the link to another fantastic cookbook with tons of recipes, enjoy!

Whole Wheat Baking

To check my past posts regarding free e-books, click here.


Saturday, October 04, 2008

Coconut Rum and Brazil Nut Shortbread


Not quite sure why I was in the mood to make something tropical. I haven't been thinking about going anywhere in the caribbean, or been listening to tropical-island music or anything. I guess as I sat in my kitchen, trying to think about what I could possibly make with the ingredients I had on-hand, it just struck me. I had some left-over brazil nuts, and some leftover malibu rum! So, what better thing to do then to combine them into a nice buttery bit-sized cookie?!


Coconut Rum and Brazil Nut Shortbread

(Yields 16 bite sized cookies)

Ingredients:

- 1/2 cup butter, room temperature

- 1/3 cup sugar, plus more for sprinkling

- 1 tsp artificial rum extract

- 2 tsp Malibu coconut rum

- 1/8 tsp salt

- 1 cup all-purpose flour

- 3/4 cup brazil nuts, salted, lightly roasted and smashed into tiny chunks

Method:

1. Preheat the oven to 350degrees

2. Beat together butter and sugar until light and fluffy. Add in rum extract, Malibu and salt; combining until the dough comes together.

3. Add in the smashed nuts until well incorporated.

4. Take heaping tablespoons of dough and roll them into spheres. Roll these spheres of dough in the remaining sugar and place on a baking sheet. Continue forming cookies until all the dough is used up. If you want, you may sprinkle more sugar on the cookies.

5. Flatten the spheres slightly with a glass (touching up the cookies if necessary). Place in the oven and bake for 15mins or until golden.

6. Cool cookies on a wire rack, share and enjoy!

These cookies, although small, pack a really intense flavor. I simply love the brazil nuts, and will definitely be using them in my baking adventures sometime in the near future (although they are kind of expensive). Hmmm... I wonder what I could possibly use brazil nuts in (besides cookies that is)?


Sunday, September 28, 2008

Daring Bakers Challenge: Lavash Crackers


Holy Moly!! I swear I finished this challenge within the first week of September... but I was just so busy I guess I forgot to post yesterday. I guess it's because I completed the challenge so early in the month that it just slipped my mind when the posting date was. I usually remember around the 28th/29th... but this one was for the 27th! Pretty early if you ask me... but whatevs. Well, I've eaten and enjoyed my crackers and "dip" and there are no longer any remnants remaining in my house... so the task now is to attempt to remember how great these crackers were. They actually were very tasty, for my variations of the cracker's spices I used: paprika, sesame seeds, cumin and fennel seeds. And for the accompanying "dip" I decided to bring a taste of the Southwest to the Arabic flat-bread. Anywho, here's my entry for the DBs challenge...


Lavash Crackers & Southwest Beans and Corn

Makes 1 sheet pan of crackers

- 1 1/2 cups (6.75 oz) unbleached bread flour

- 1/2 tsp salt

- 1/2 tsp instant yeast

- 1 tbsp sugar

- 1 tbsp vegetable oil

- 1/3 to 1/2 cup + 2 tbsp water, at room temperature

- Choice of spices: Poppy seeds, sesame seeds, paprika, cumin seeds, caraway seeds, or kosher salt for toppings


Method

1. In a mixing bowl, stir together the flour, salt yeast, agave, oil, and just enough water to bring everything together into a ball. You may not need the full 1/2 cup + 2 Tb of water, but be prepared to use it all if needed.

2. For Non Gluten Free Cracker Dough: Sprinkle some flour on the counter and transfer the dough to the counter. Knead for about 10 minutes, or until the ingredients are evenly distributed. The dough should pass the windowpane test and register 77 degrees to 81 degrees Fahrenheit. The dough should be firmer than French bread dough, but not quite as firm as bagel dough (what I call medium-firm dough), satiny to the touch, not tacky, and supple enough to stretch when pulled. Lightly oil a bowl and transfer the dough to the bowl, rolling it around to coat it with oil. Cover the bowl with plastic wrap.

OR

2. For Gluten Free Cracker Dough: The dough should be firmer than French bread dough, but not quite as firm as bagel dough (what I call medium-firm dough), and slightly tacky. Lightly oil a bowl and transfer the dough to the bowl, rolling it around to coat it with oil. Cover the bowl with plastic wrap.

3. Ferment at room temperature for 90 minutes, or until the dough doubles in size. (You can also retard the dough overnight in the refrigerator immediately after kneading or mixing).

4. For Non Gluten Free Cracker Dough: Mist the counter lightly with spray oil and transfer the dough to the counter. Press the dough into a square with your hand and dust the top of the dough lightly with flour. Roll it out with a rolling pin into a paper thin sheet about 15 inches by 12 inches. You may have to stop from time to time so that the gluten can relax. At these times, lift the dough from the counter and wave it a little, and then lay it back down. Cover it with a towel or plastic wrap while it relaxes. When it is the desired thinness, let the dough relax for 5 minutes. Line a sheet pan with baking parchment. Carefully lift the sheet of dough and lay it on the parchment. If it overlaps the edge of the pan, snip off the excess with scissors.

OR

4. For Gluten Free Cracker Dough: Lay out two sheets of parchment paper. Divide the cracker dough in half and then sandwich the dough between the two sheets of parchment. Roll out the dough until it is a paper thin sheet about 15 inches by 12 inches. Slowly peel away the top layer of parchment paper. Then set the bottom layer of parchment paper with the cracker dough on it onto a baking sheet.

5. Preheat the oven to 350 degrees Fahrenheit with the oven rack on the middle shelf. Mist the top of the dough with water and sprinkle a covering of seeds or spices on the dough (such as alternating rows of poppy seeds, sesame seeds, paprika, cumin seeds, caraway seeds, kosher or pretzel salt, etc.) Be careful with spices and salt - a little goes a long way. If you want to precut the cracker, use a pizza cutter (rolling blade) and cut diamonds or rectangles in the dough. You do not need to separate the pieces, as they will snap apart after baking. If you want to make shards, bake the sheet of dough without cutting it first.

6. Bake for 15 to 20 minutes, or until the crackers begin to brown evenly across the top (the time will depend on how thinly and evenly you rolled the dough).

7. When the crackers are baked, remove the pan from the oven and let them cool in the pan for about 10 minutes. You can then snap them apart or snap off shards and serve.


Southwest Beans and Corn

Ingredients:

- 1 tbsp olive oil
- 1 medium onion, diced
- 2 jalapeño peppers, chopped
- 1 clove garlic, minced
- 15 ounce can of red kidney beans, rinsed and drained
- 16 ounces of frozen corn, thawed
- 1/2 green bell pepper, diced
- 1/2 orange pepper, diced
- 2 tsp chili powder
- 3/4 tsp salt
- 1/2 tsp cumin, ground
- 1/2 tsp black pepper

Optional: Sour cream or plain yogurt; black olives

Method:
1. Heat oil in medium non-stick skillet over medium heat. Add onion, jalapeño pepper and garlic; cook and stir for 5 minutes.
2. Add in beans, corn, tomatoes, bell pepper, chili powder, salt, cumin and black pepper to slow skillet; mix well. Cover; cook on low heat for 15mins.
3. Dish out into serving bowl; accompanied with with sour cream and black olives if desired.

The crackers were very tasty and oh-so-easy to make. I couldn't believe that I had finished making and baking these crackers within 40mins! For a Daring Baker's Challenge, I was surprised to have been started and finished the task in the same day :P Anywho, my dad (who's all into eating healthfully nowadays) thought that these crackers were delicious and nutritious. My mom liked the paprika portion of the crackers, but wasn't too sure about the licorice-flavor of the fennel seeds (I suppose it's an aquired taste). One of my sisters really liked the crackers with jam... not what I was expecting her to eat it with, considering I made the lovely corn-bean salsa/relish/dip/whatever you want to call it, but at least she was going back for seconds. My other sister (who is a little less adventurous) wouldn't go near them... she said they smelled funny... but in my opinion, the auroma was sensational.

I think I will definitely be making these crackers in the future. Way to go Daring Bakers!


Thursday, September 25, 2008

Cupcakes and Marshmallows

I was having much too much fun playing around with this month's SHF event. The theme for SHF #47 was ... duh, CUPCAKES! I wasn't quite sure what to make of the event, sometimes I can't think when I'm given a theme that's too narrow and allows for no creativity... but then other times I feel so overwhelmed with ideas that I find it difficult to pin-point exactly what I want to bake. My issue this SHF, was the latter. But thankfully, I figured it out in time for posting on September 26th... whew, cutting it close.

The flavor combination was a tricky one for me to churn out. I wanted something different, but also something that I knew my sisters would eat. And so, I settled on this...

Cookies & Cream Cupcakes with Strawberry-Marshmallow Buttercream

Cupcake Ingredients:
- 2 1/4 cups all-purpose flour
- 1 tbsp baking powder
- 1/2 tsp salt
- 1-2/3 cups sugar
- 1 cup milk
- 1/2 cup butter, softened
- 2 tsp vanilla
- 3 egg whites
- 1 cup crushed oreo thinsations (or 10 oreo cookies)

- 1 recipe of Strawberry Marshmallow Buttercream (recipe follows)
- Pulsed/crumble praline pieces, to decorate

Method:
1. Set the oven to 350°F. Fill 24-muffin pan with with paper baking cups (or grease the pan).
2. Sift flour, baking powder and salt in large bowl. Add in sugar.

3. Add in milk, butter and vanilla; beat with electric mixer at low speed 30 seconds. Beat at medium speed 2 minutes.
4. Pour in the egg whites and beat for 2 minutes. Stir in the crushed cookies.
3. Pour batter evenly into prepared muffin cups, filling two-thirds full. Bake for 20 to 25 minutes or until toothpick inserted comes out clean. Cool completely, on wire racks, before decorating.
4. Place 1/2 a large marshmallow on top of each cupcake.

5. Swirl the buttercream frosting ontop of each cupcakes; garnish with praline crumble.

Marshmallow Buttercream
Ingredients
1 1/3 cups butter, softened
2 cups marshmallow cream(7 oz tub)
1 tablespoon strawberry essence
1 teaspoon almond essence
1-1 1/2 teaspoon cream
2 2/3 cups confectioner's sugar


Method:
1. Combine butter and marshmallow creme till smooth.
2. Pour in liquid ingredients and continue to mix, until well blended.
3. Add in the confectioner's sugar and beat till smooth. (If frosting is too thick, add more cream)


I actually tried to decorate my first cupcake using one whole, large marshmallow. Low and behold, there was waaay to much frosting and the cupcake looked ridiculously hideous. So, I decided to cut the large marshmallow's into halves and only use 1/2 a marshmallow for each cupcake. I think the effect was much better. The frosting-peak was nice and tall, and didn't overpower the cupcake itself. Mmmm, looks delicious :P

I'd seen someone make a flower cupcake with marshmallow slices before, so I decided to make two of them. That's a chocolate flavored skittle lying in the middle (note the white "s") ain't it cute?!

For the list of the past SHF events, check out The Domestic Goddess